So, you’re searching for toe nail ideas that look fun but don’t take hours to pull off, right?
Here are 17 fresh polka dot looks that’ll make your toes the star of the show.
You’ll spot simple styles, bright pops, and a few classy twists—pick whatever fits your mood or plans.
Flip through playful retro dots, soft pastels, bold contrasts, and just a hint of sparkle.

You can try these at home or show your nail tech and say, “Let’s do this!”
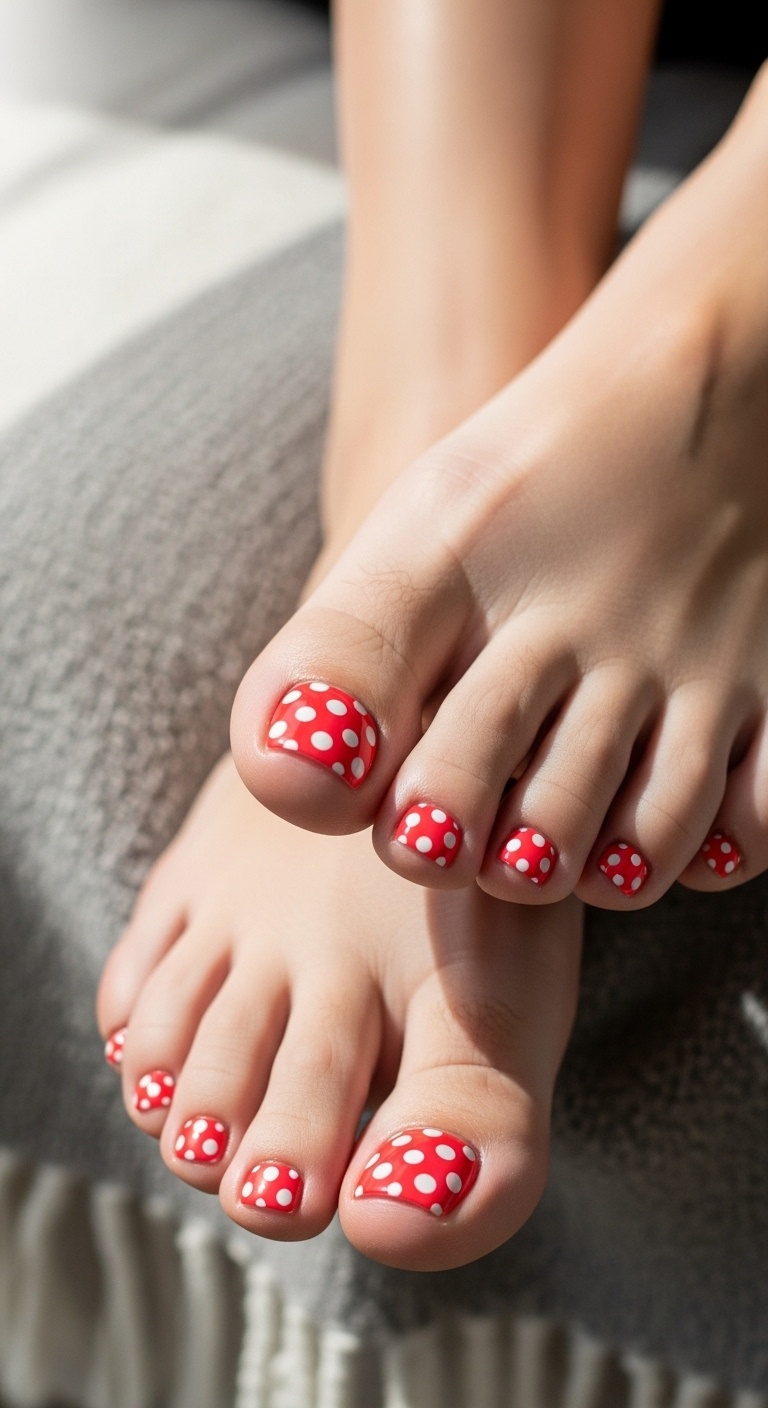
1. Classic White Polka Dots on a Red Base – Retro Chic!
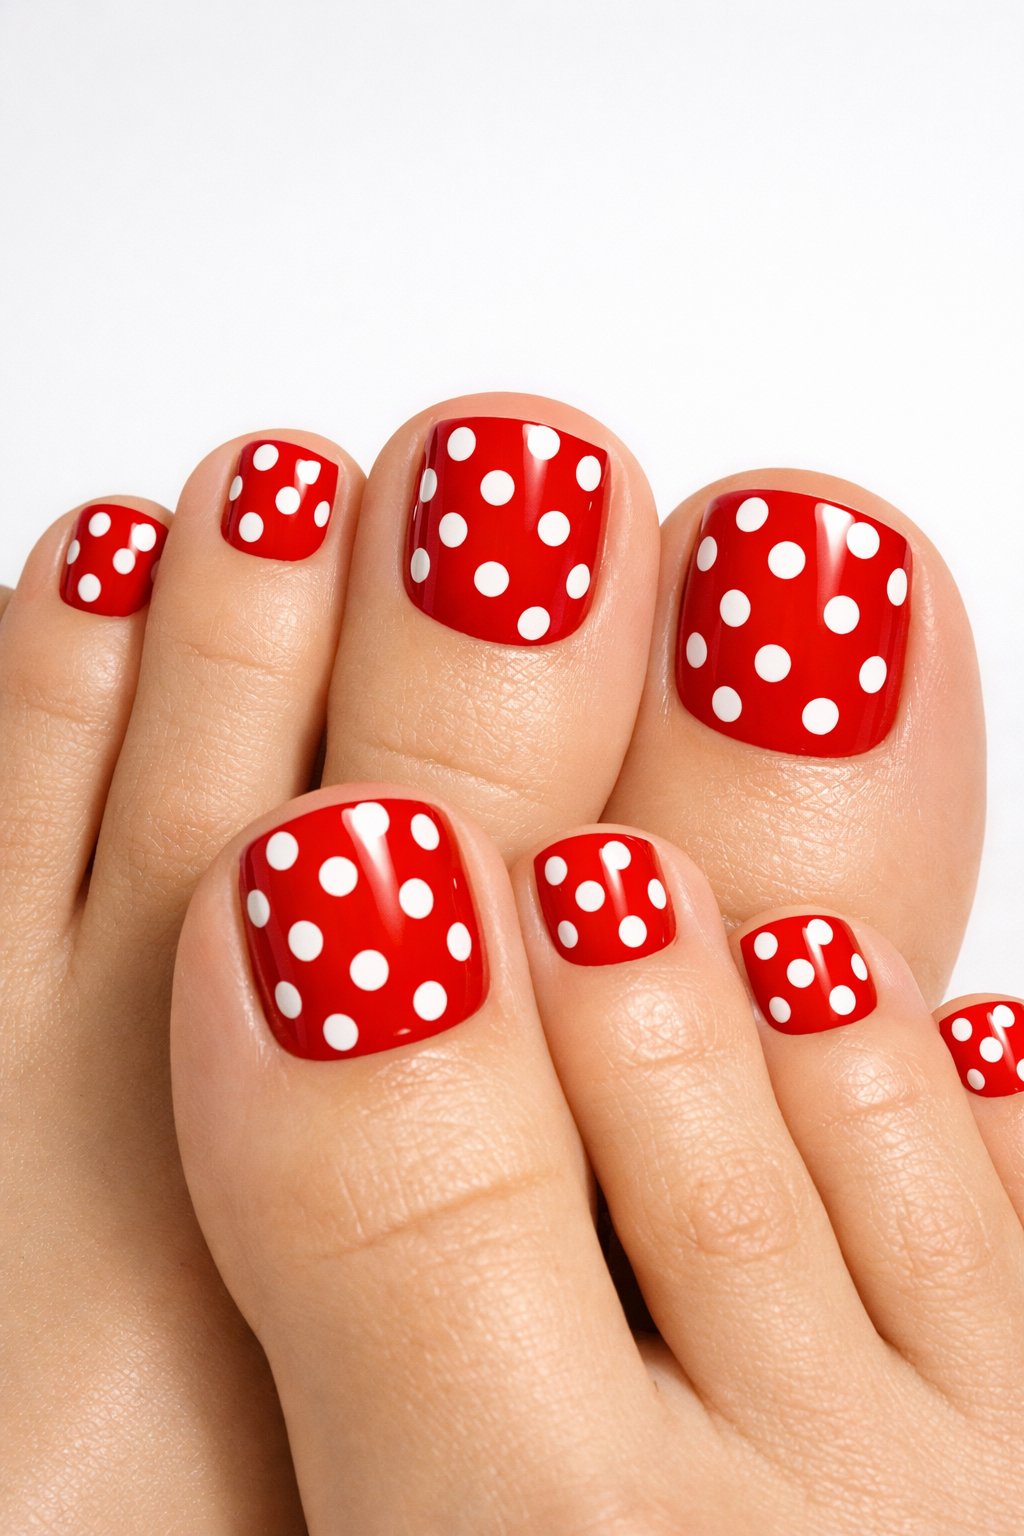
Bright red polish with crisp white dots? You get instant vintage vibes. This one works for short or medium toes, and you can rock it at a backyard BBQ or a party.
Grab a dotting tool or flip a bobby pin around for those dots. Start with a glossy top coat to make that red really stand out.
Work one toe at a time and try not to rush, or you’ll end up with polka “blobs.” If you mess up, fix it with a tiny brush and slap on more top coat.
Expert Tip from KidsCareIdeas: “Paint two thin red coats for full color, then add white dots while the polish is dry. Finish with a gel top coat for longer wear.”
2. Pastel Pink Nails with Tiny White Dots – Soft & Sweet
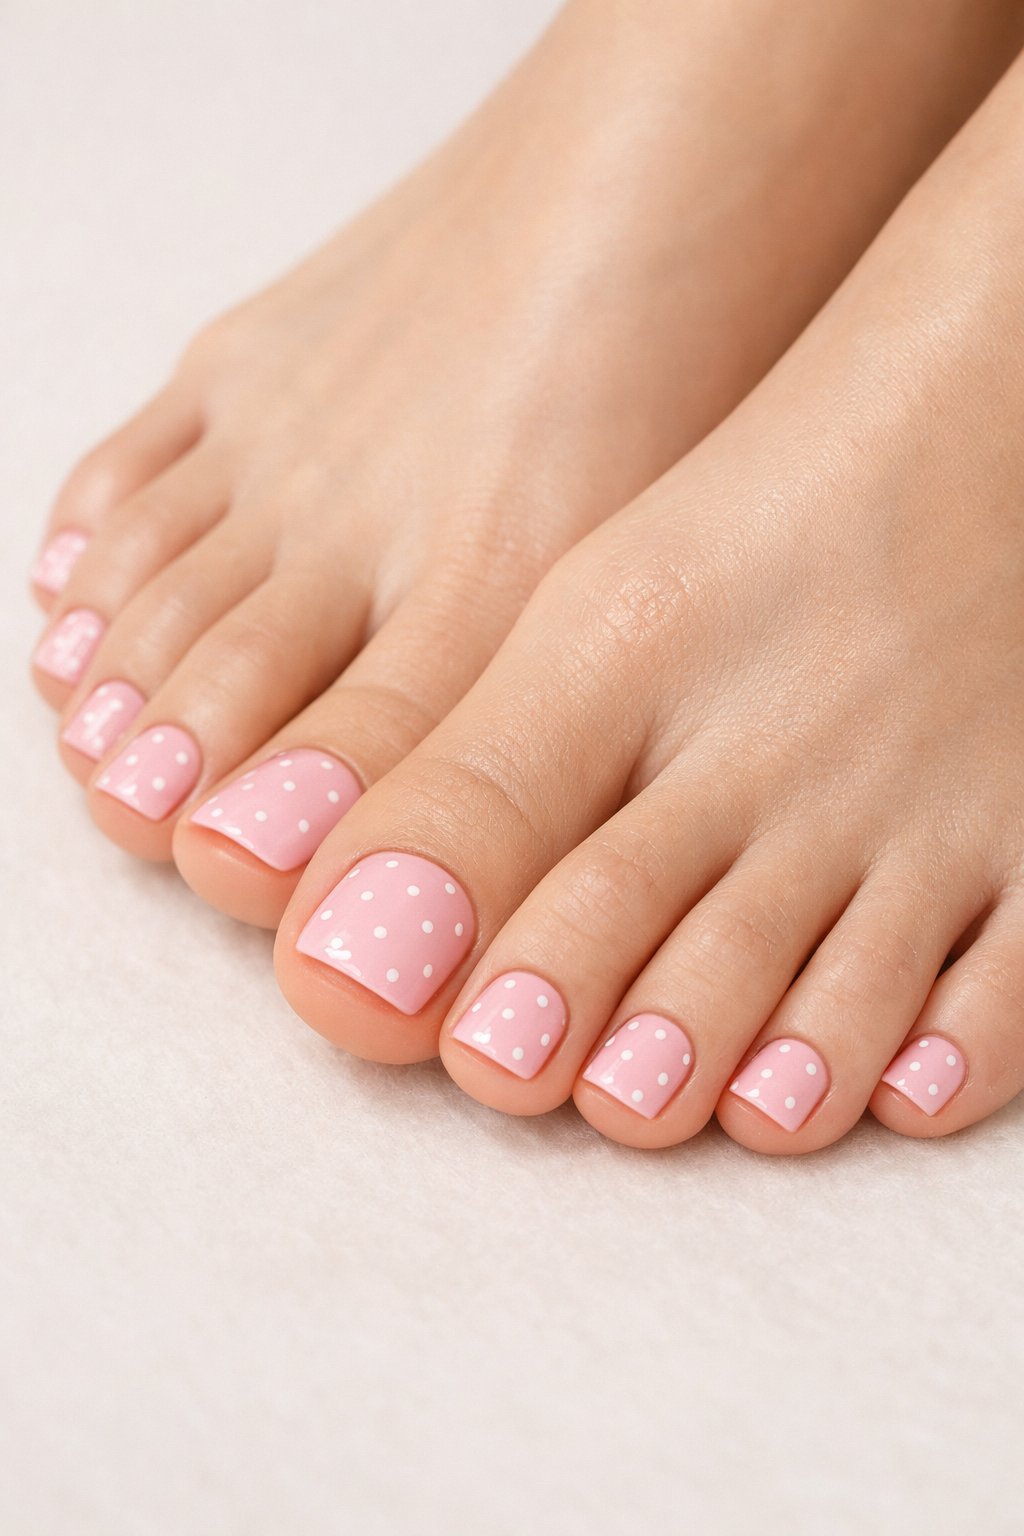
Pale pink keeps things gentle and goes with anything you wear. Small white dots add just enough playfulness without taking over.
Use a toothpick or dotting tool for the dots—put them at the tips or in the center, whatever feels right. Add a glossy top coat so your dots don’t disappear after a few days in sandals.
Keep the dots the same size for a tidy look, or mix them up for a “hey, I did this myself” vibe.
Expert Tip from KidsCareIdeas: “If your dots smear, wait a minute after painting the base. Press a dotting tool gently and finish with a quick-dry top coat.”
3. Black Toenails with Neon Green Polka Dots – Night Owl Vibes
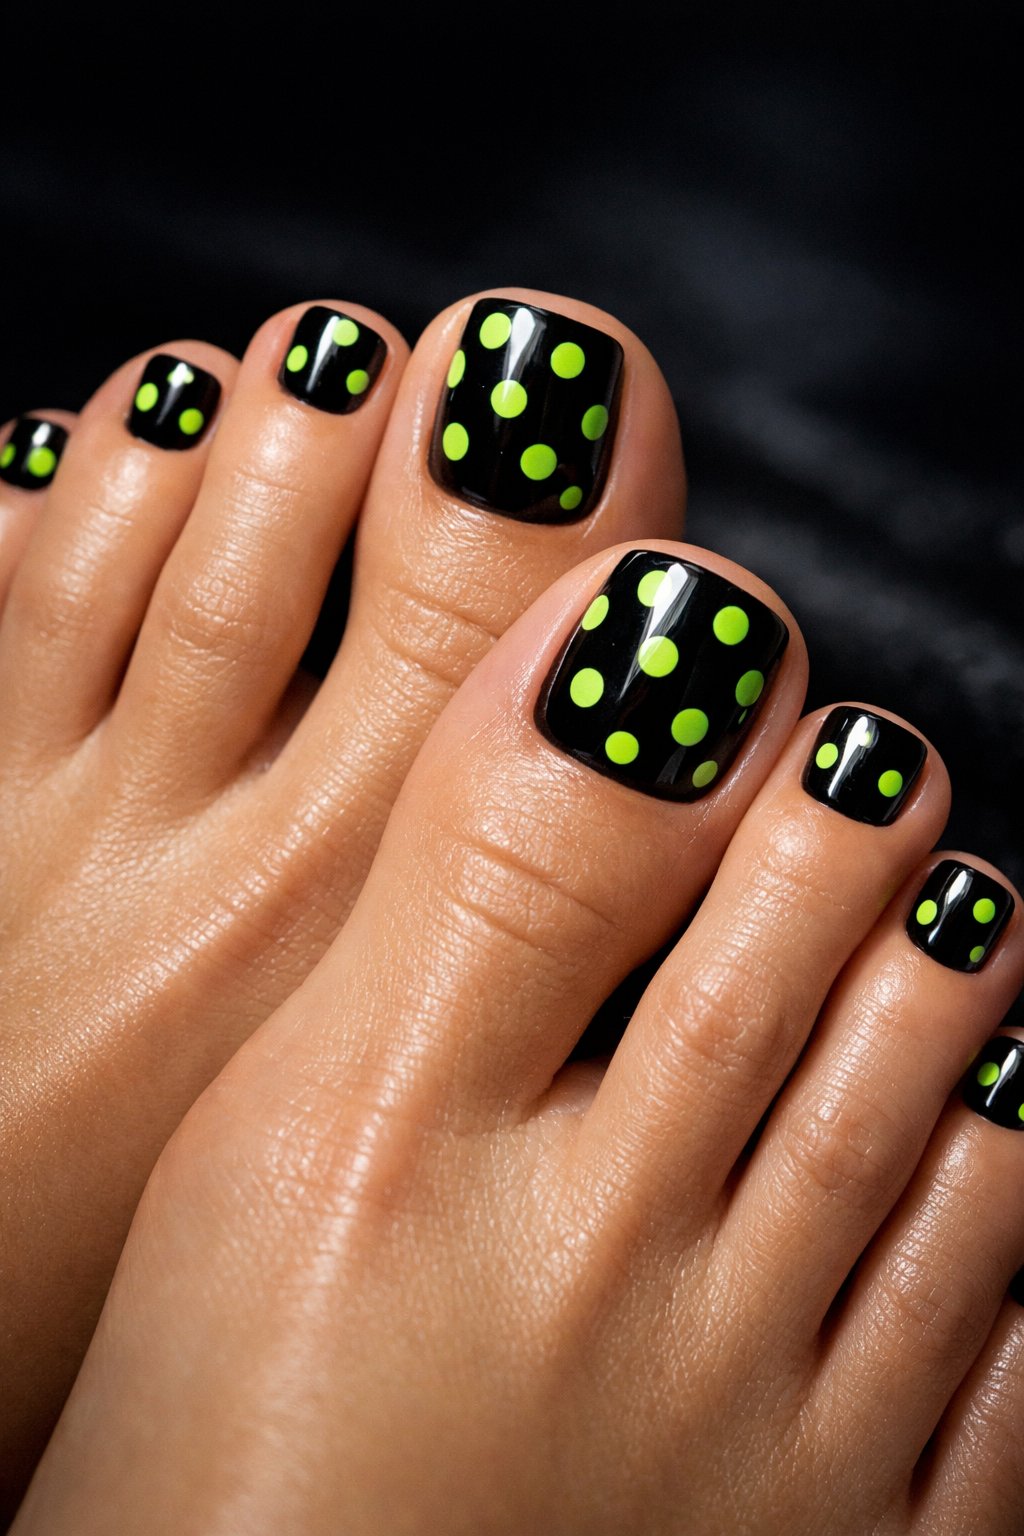
Neon green on black? The contrast is wild and perfect for nights out. Keep the black base smooth so the green really shines.
Dot with a tool or the end of a bobby pin. You can scatter the dots or line them up—totally your call.
Seal it all with a quick-dry top coat. This one’s for anyone who likes a cheeky, modern twist.
Expert Tip from KidsCareIdeas: “Apply a base coat to prevent staining, then let each layer dry before dotting to avoid smudges.”
4. Matte Navy Base with Silver Dots – Subtle Sparkle
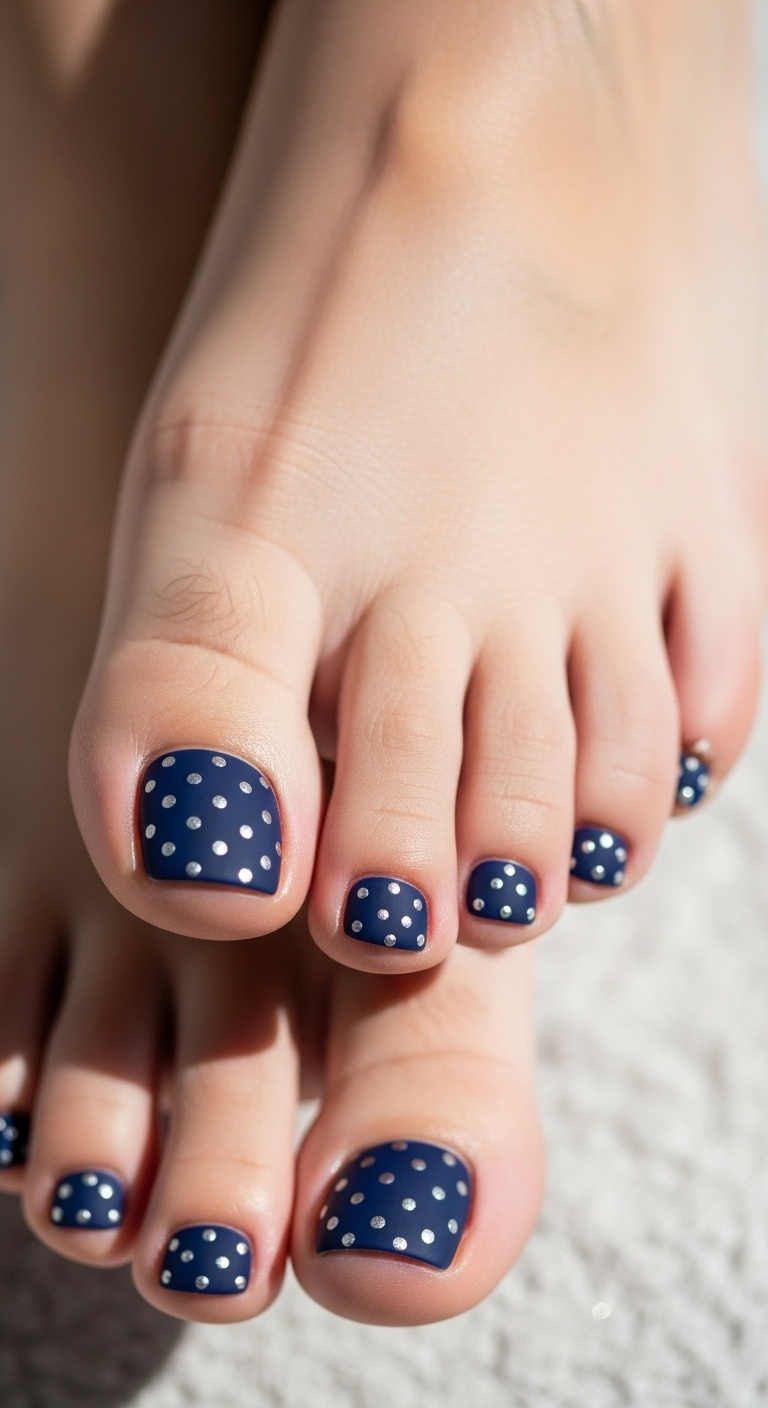
Deep matte navy makes silver dots stand out without looking flashy. The matte finish keeps things cool and calm, while silver adds just a little sparkle.
Dot with a tool or bobby pin. Put dots by the cuticle or scatter them—either way, it looks chic.
Finish with a matte topcoat so everything stays put and soft. The silver still catches light, but it won’t blind anyone.
Expert Tip from KidsCareIdeas: “Apply dots when the base is almost dry to avoid smudging. Seal with a thin matte topcoat for long-lasting contrast.”
5. Bright Yellow with Random Sized Polka Dots – Sunshine Toes
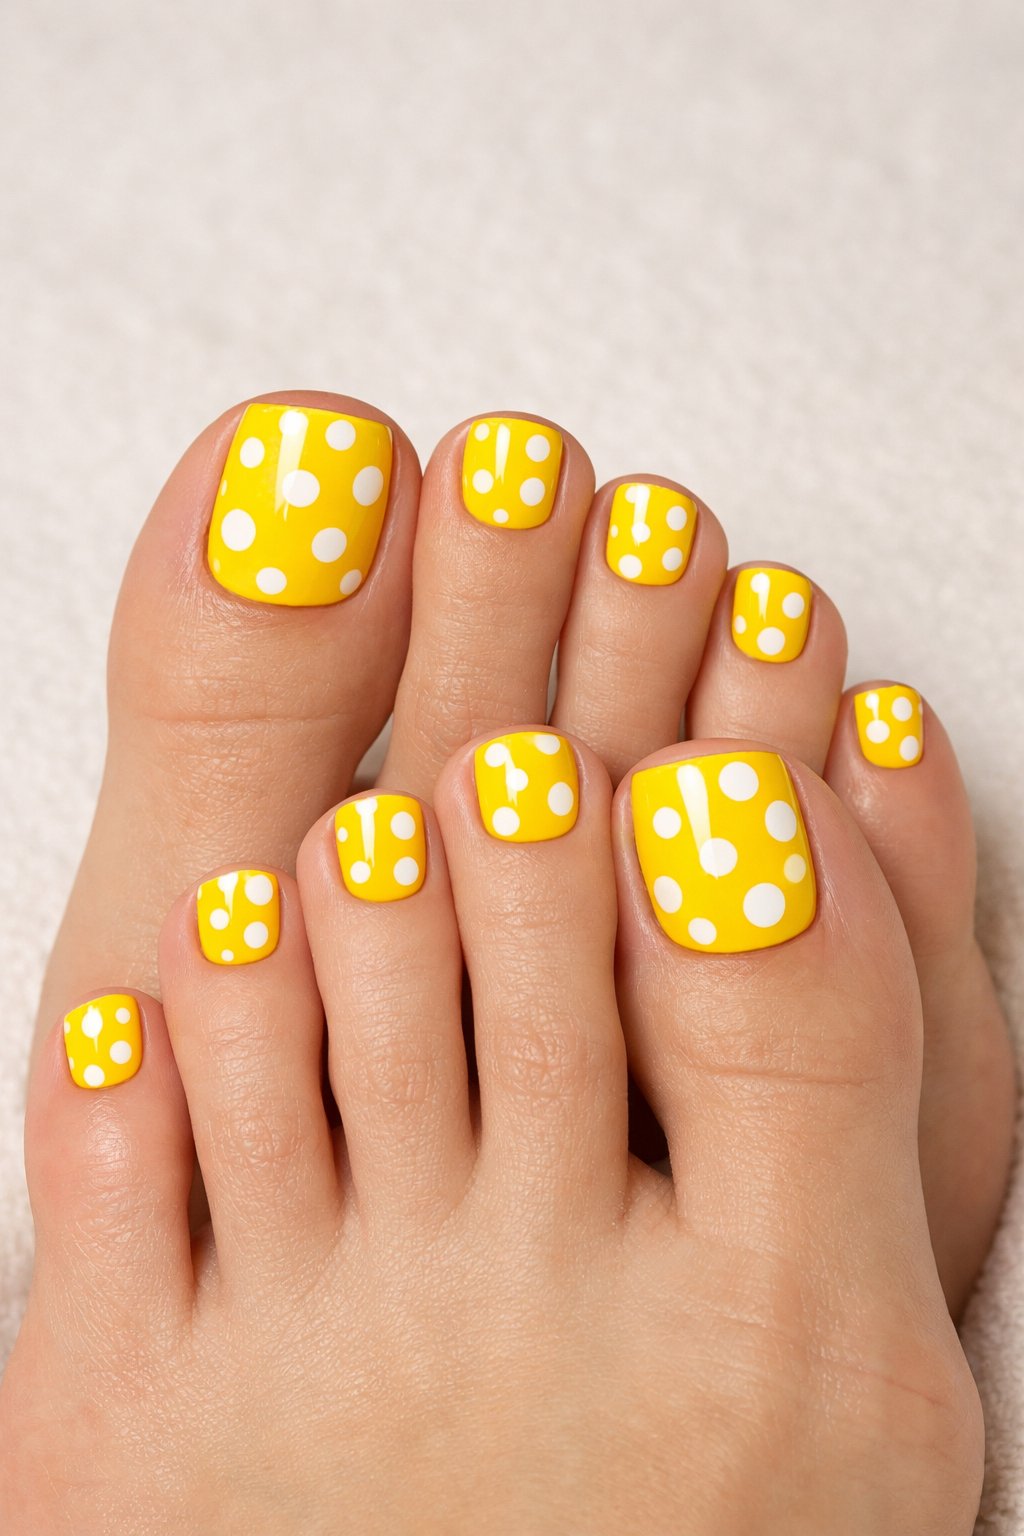
Sunny yellow polish will make you smile every time you look down. Use a dotting tool or bobby pin to add dots in all sorts of sizes.
Try white, coral, or mint for the dots if you want a little extra pop. Let each dot dry before adding another—trust me, patience is worth it.
This look hides chips and makes any sandals look instantly happier. It’s quick and cheerful, perfect for a busy week.
Expert Tip from KidsCareIdeas: “Start with thin coats of yellow to avoid streaks, then build color. Place larger dots first, then fill gaps with smaller ones.”
6. Clear Glossy Polish with Multicolor Dots – Confetti Party
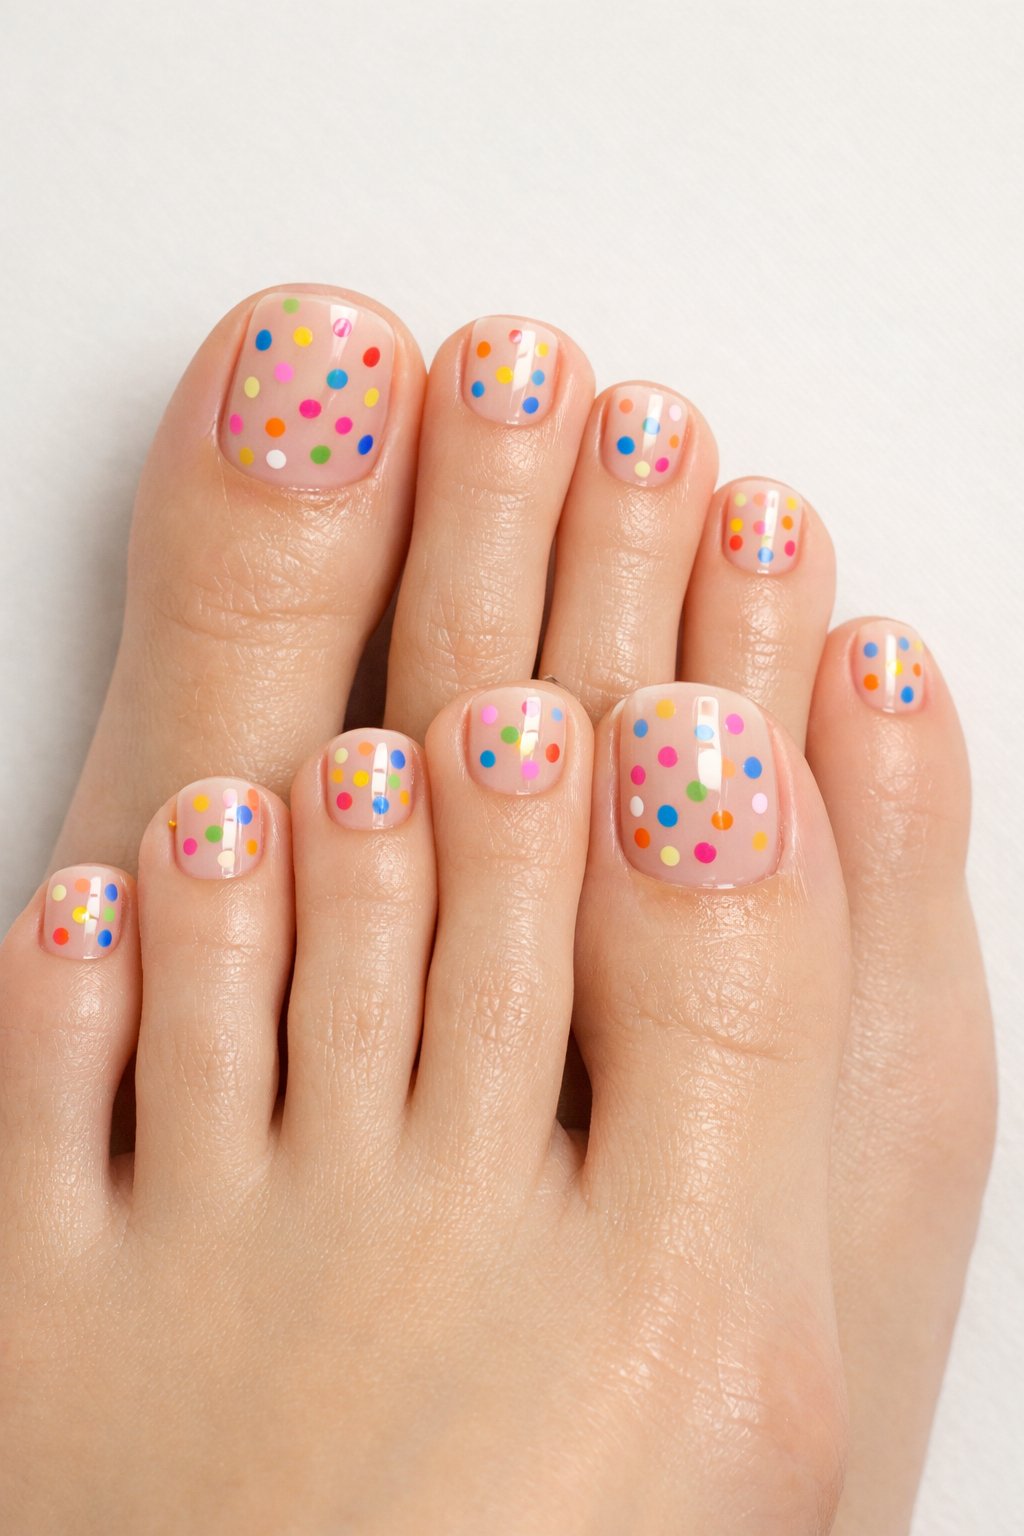
Paint your nails clear and glossy for a shiny base. Then grab a toothpick or dotting tool and go wild with colorful dots.
Scatter dots in different sizes and colors—think confetti after a party. Make some nails crowded with dots, others more spaced out.
Seal it all with another clear coat to keep the dots around longer. This one’s super easy and works great for short nails.
Expert Tip from KidsCareIdeas: “Use a washable surface under your hand to catch spills and dot mistakes for easy cleanup. Let each dot dry a minute before sealing to avoid smudges.”
7. Coral Base with White Dots and Gold Accents – Beach Babe
Coral polish gives you that warm, “just got back from the beach” glow. Keep it glossy for extra shine.
Add white dots with a dotting tool or bobby pin. Space them unevenly for a relaxed, beachy feel.
Throw in a thin gold stripe or a tiny gold stud near the cuticle if you want some glam. Top it off with a clear coat for protection.
Expert Tip from KidsCareIdeas: “Use fast-dry topcoat layers to prevent smudges and keep dots crisp.”
8. Lilac Nails with Black Dots – Moody and Mysterious
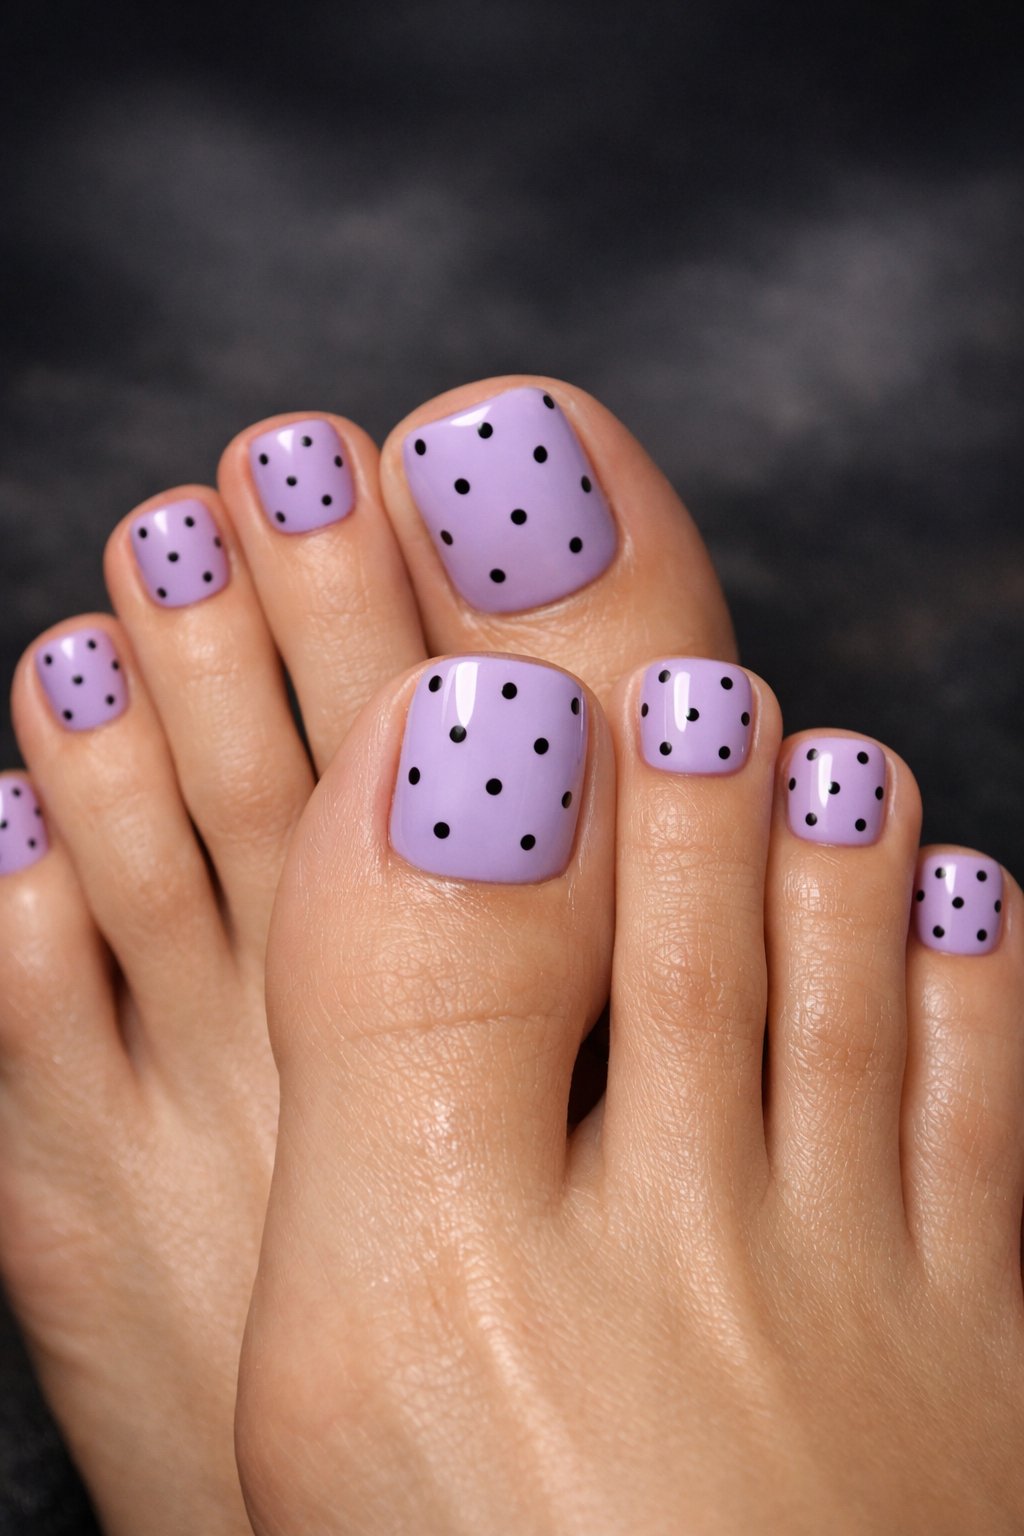
Soft lilac polish keeps things calm and cool. Add small black dots for a bit of edge.
Scatter the dots unevenly for a handmade, artsy vibe. Use a dotting tool or bobby pin for control.
Finish with a glossy top coat so the black stands out. Try different dot sizes if you want to mix things up.
Expert Tip from KidsCareIdeas: “Start with two thin coats of lilac for full color. Use quick-dry top coat to seal dots and prevent smudges.”
9. Ombre Blue with White Polka Dots – Ocean Depths
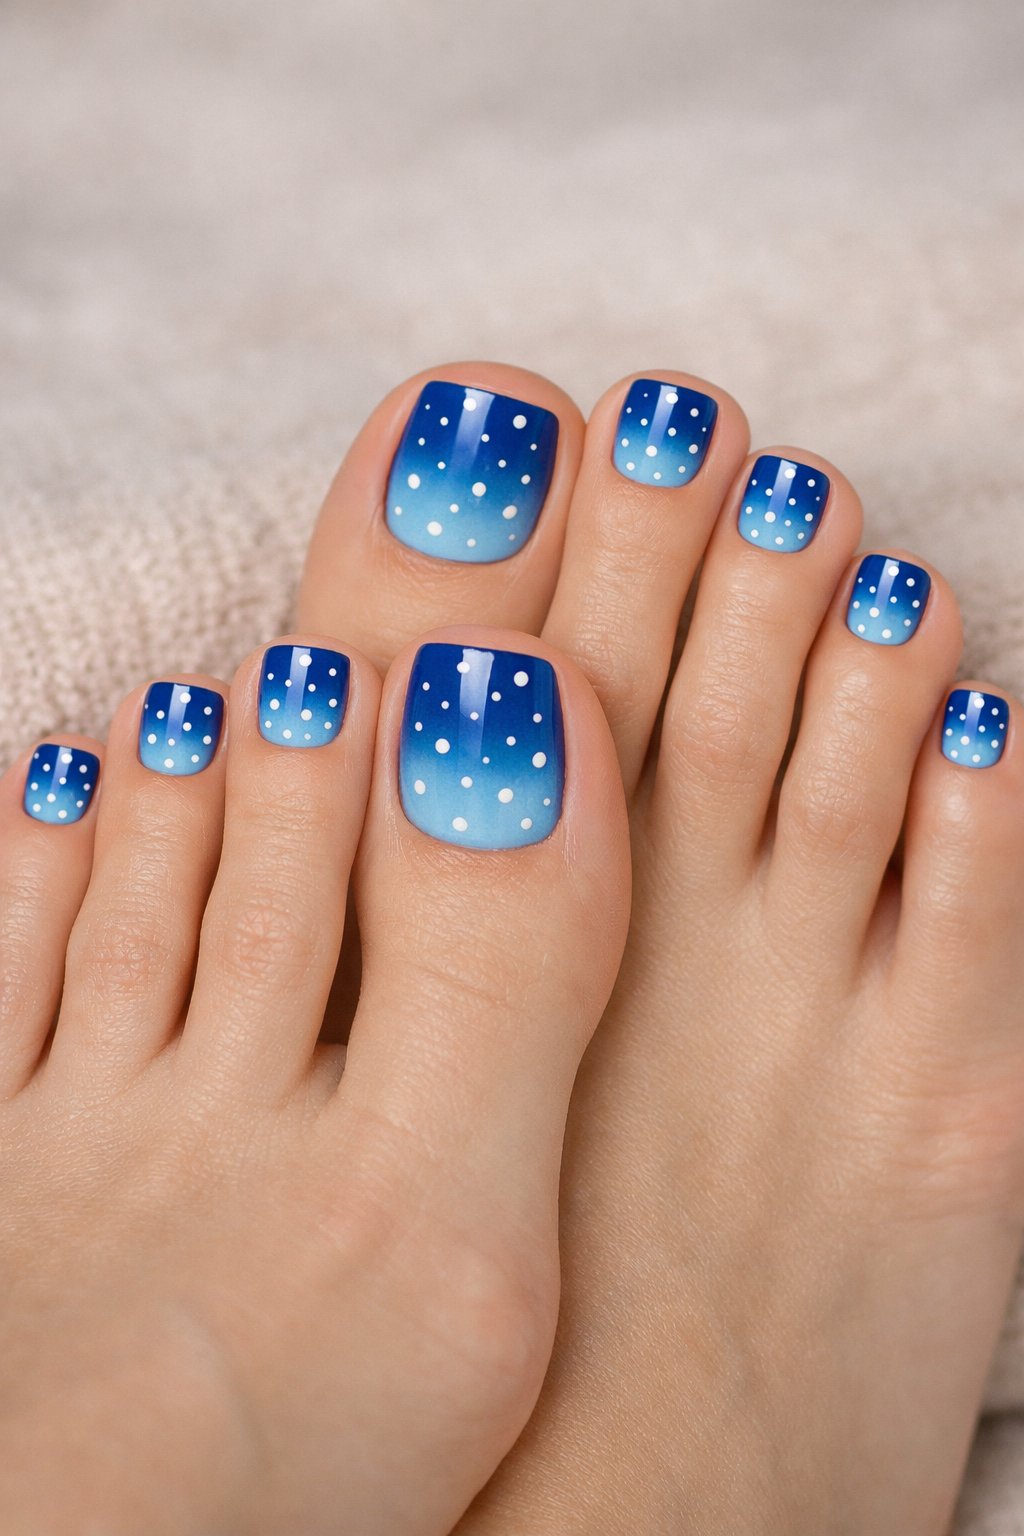
Blend three blue shades from light to dark for a look that’s all ocean. Use a sponge to tap on the colors and keep the fade soft.
Add white dots with a dotting tool or toothpick. Place them randomly for a bubbly, underwater feel.
Top it off with a glossy coat to make the colors pop. Let each layer dry before moving on, or you’ll end up with a smudge-fest.
Expert Tip from KidsCareIdeas: “Practice the ombre on a spare nail tip first to get the fade right. Use a peel-off base coat to remove polish easily.”
10. Glossy Mint Green with Tiny Black Dots – Mint Condition
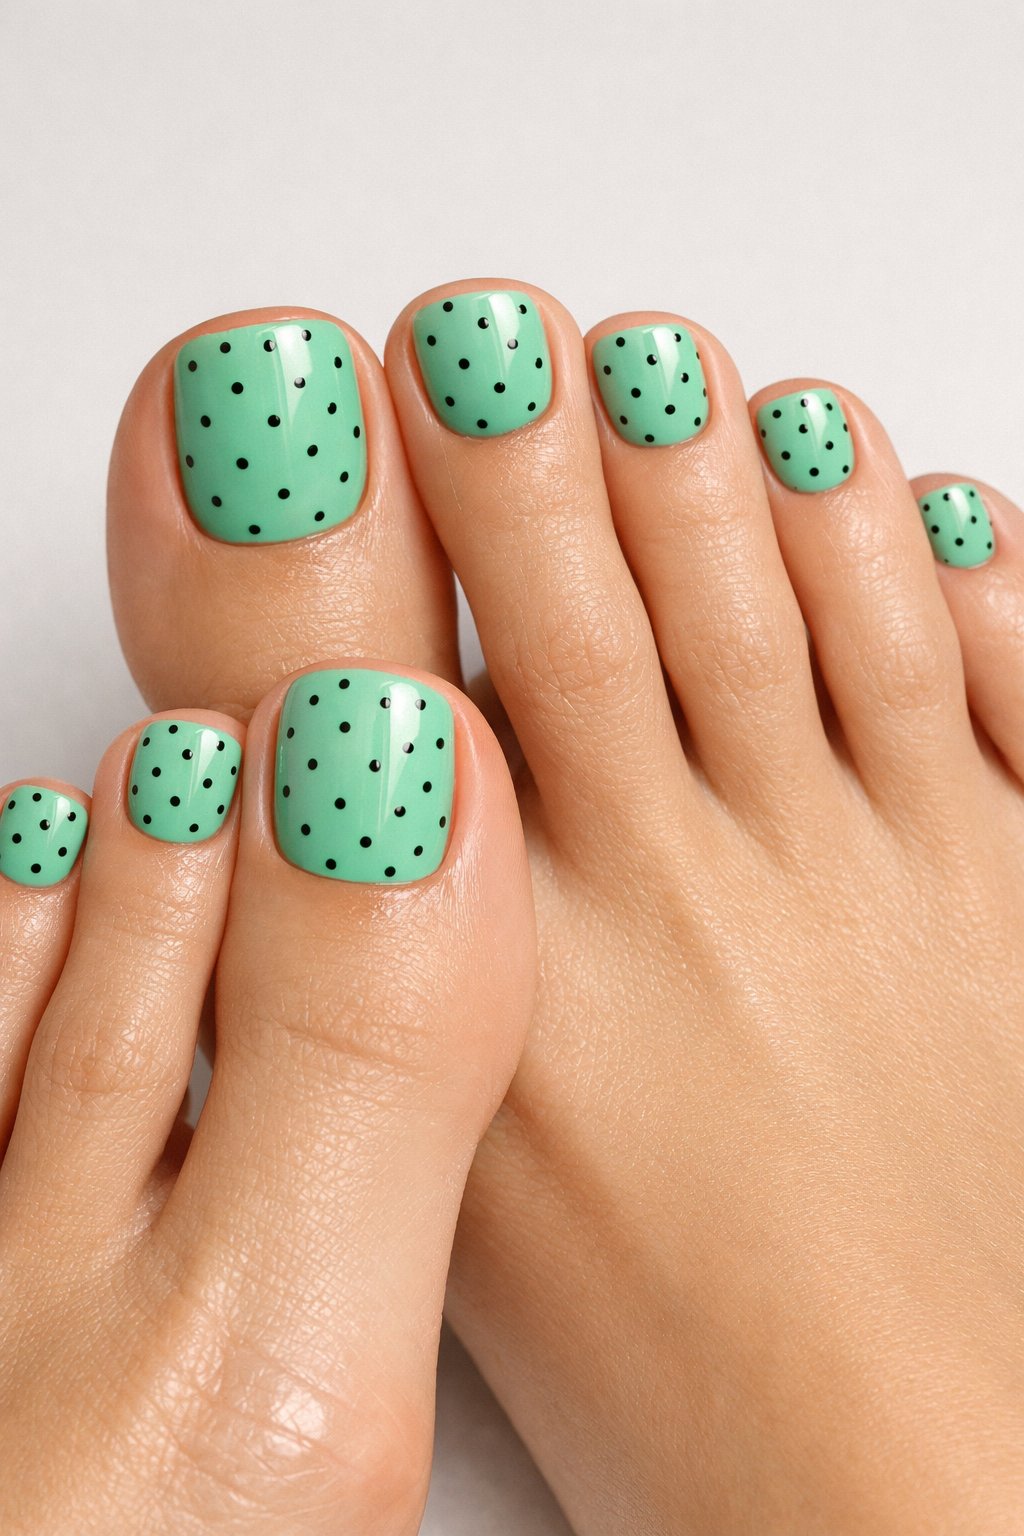
Mint green looks fresh on any toes—short, long, doesn’t matter. A glossy topcoat gives you that “I just left the salon” look.
Dot with a tiny tool or bobby pin tip for neat black dots. You can space them out or go random; both are cute.
This style matches with neutral sandals or even a fancy black shoe. It hides chips, so you won’t stress about touch-ups.
Expert Tip from KidsCareIdeas: “Apply two thin coats of mint polish and let each dry fully before dotting to avoid smudges. Finish with a high-shine topcoat to protect the dots and add lasting gloss.”
11. Neon Pink Base with White and Purple Dots – Electric Feel
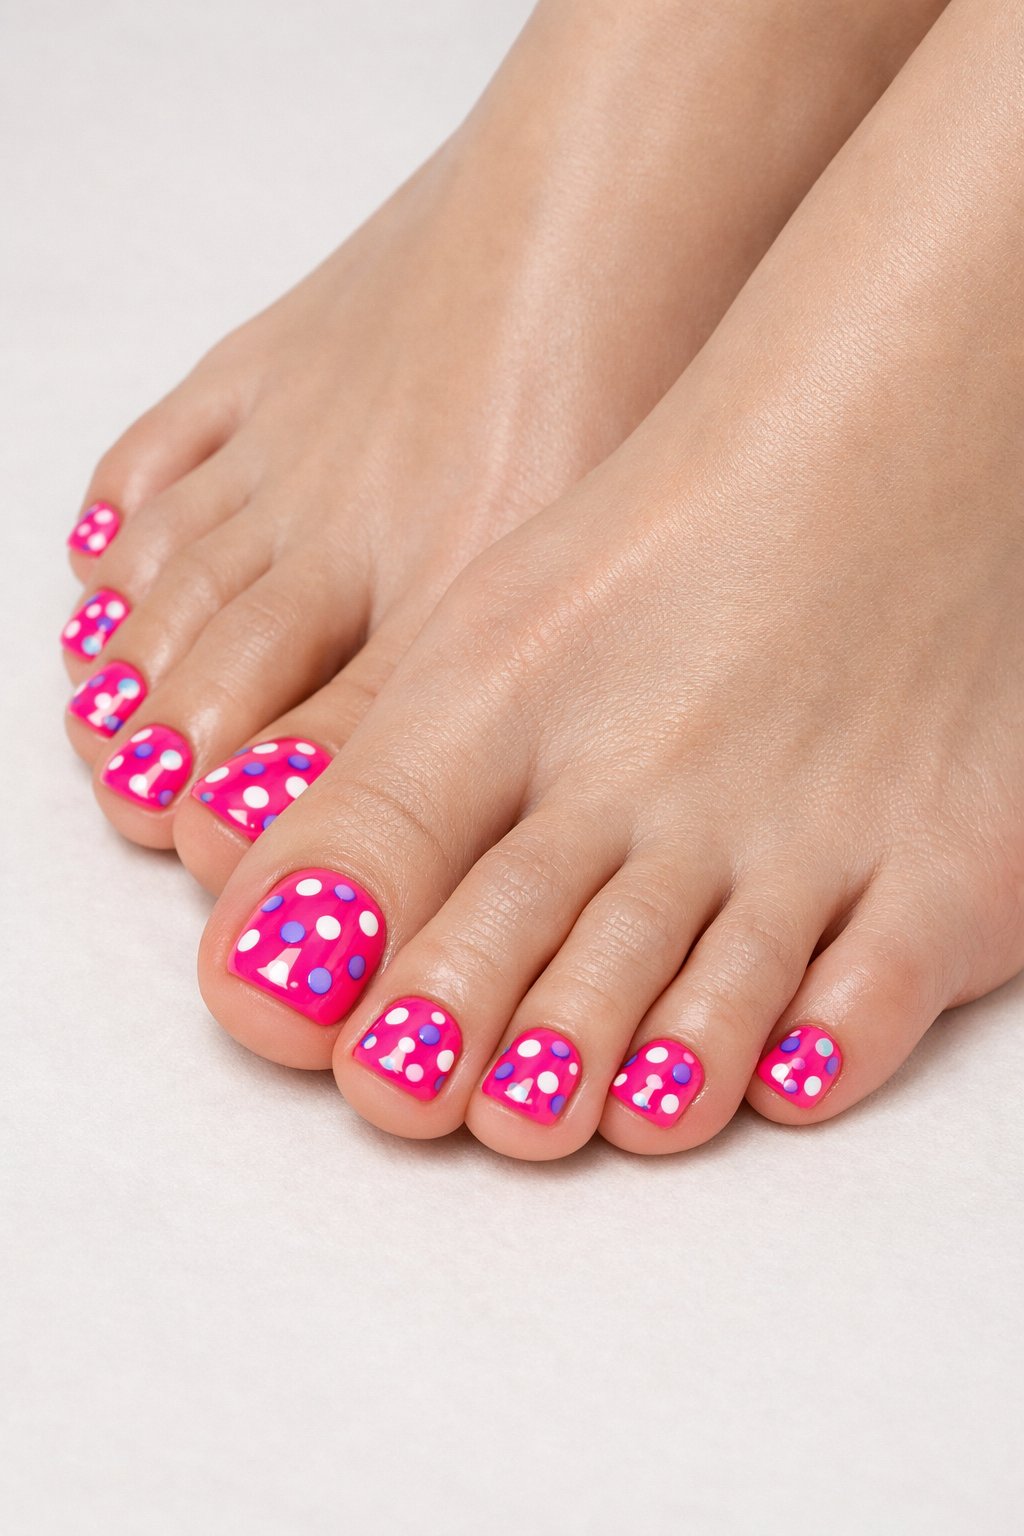
Neon pink is for anyone who wants their toes to shout “look at me!” It’s bright and fun, no extra effort needed.
Add white and purple dots with a dotting tool or bobby pin. Scatter them for a playful, electric vibe.
Mix up the dot sizes to keep things interesting, but don’t go overboard. A glossy top coat keeps the neon glowing.
Expert Tip from KidsCareIdeas: “Apply two thin coats of neon polish for full coverage and let each dry well. Use a quick-dry top coat to prevent smudges and lock in shine.”
12. Chocolate Brown with Cream Polka Dots – Sweet and Simple
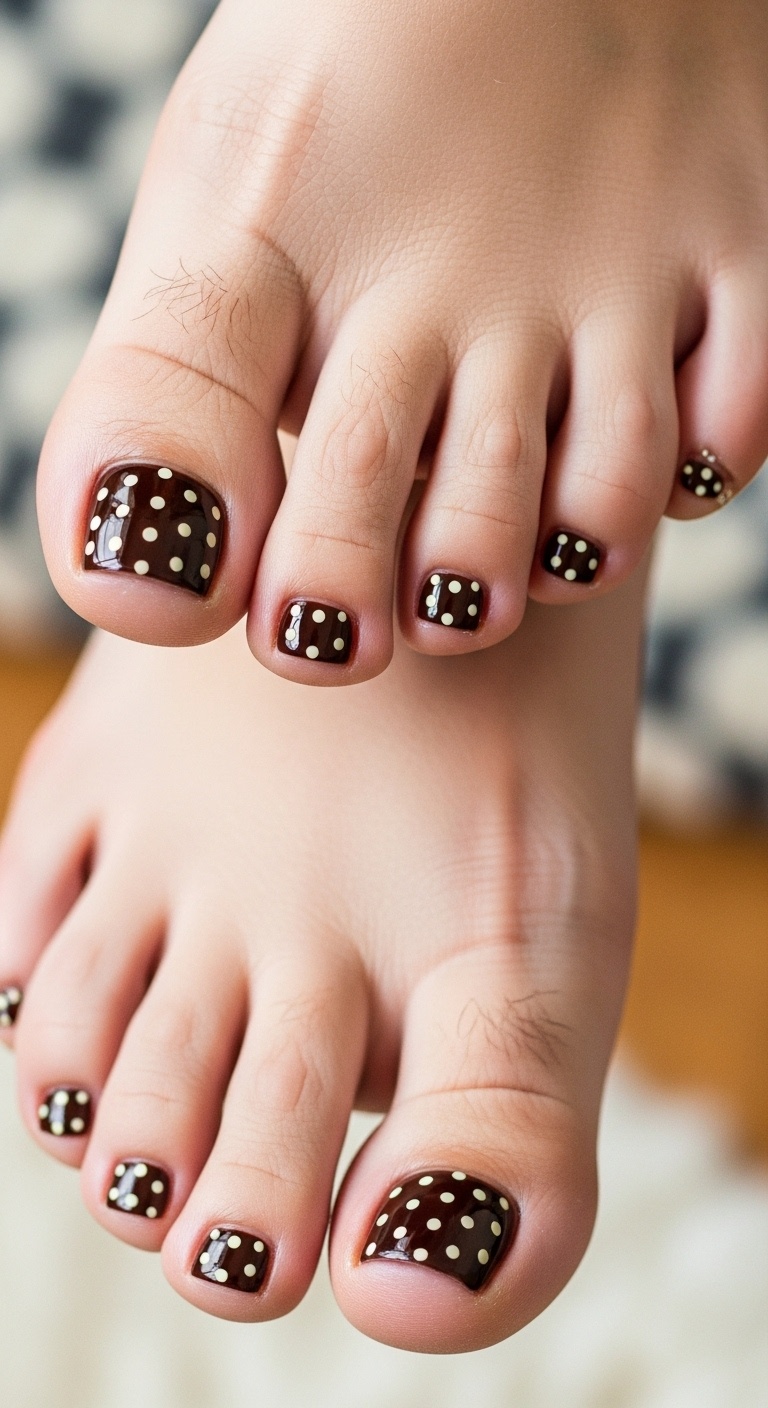
Rich chocolate brown gives you a cozy, grown-up look. Add small cream dots for contrast—they’re cute without being too loud.
Dot with a tool or bobby pin tip. Keep the spacing even for a tidy finish.
Seal with a glossy coat for shine. This combo is perfect for fall or lazy weekends.
Expert Tip from KidsCareIdeas: “Paint one accent nail with reversed colors—cream base, brown dots—to make the set more interesting.”
13. Rose Gold Base with White Dots and Glitter Overlay
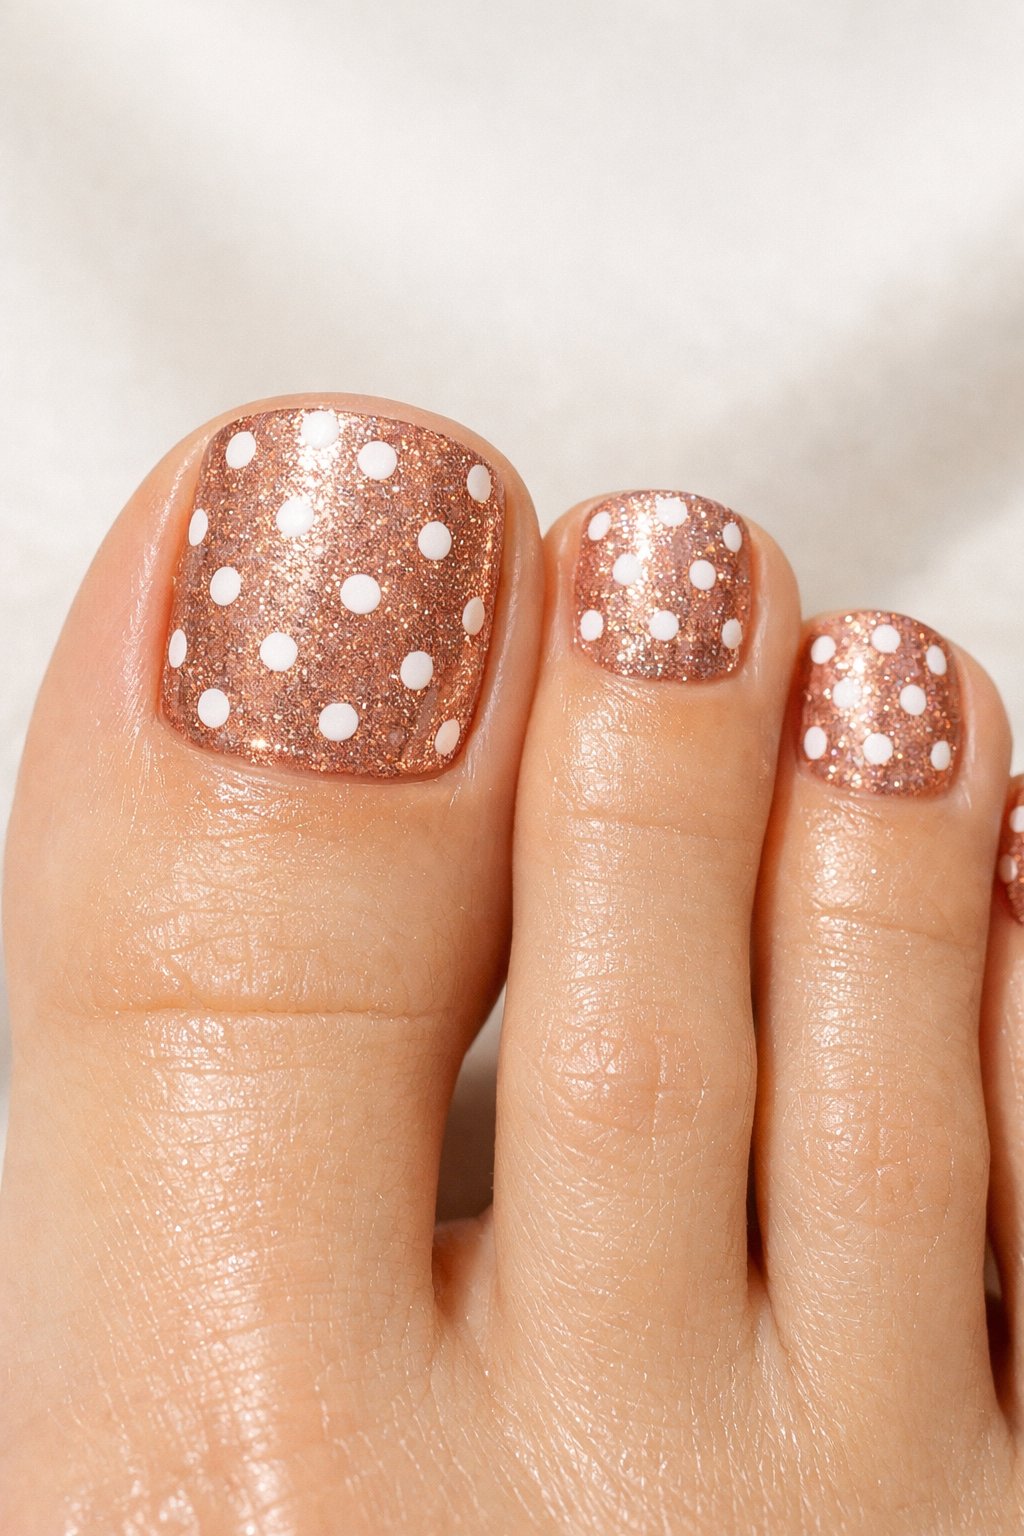
Smooth rose gold polish gives your toes a bit of glam. Let it dry before you start dotting.
Add small white dots with a tool or bobby pin. Mix up the sizes a little for fun.
Finish with a clear glitter top coat—more sparkle, less worry about mistakes. The glitter pulls the whole look together.
Expert Tip from KidsCareIdeas: “Apply two thin coats of rose gold for even color. Seal edges with top coat to prevent chipping.”
14. Matte Black with Red Dots – Bold and Beautiful
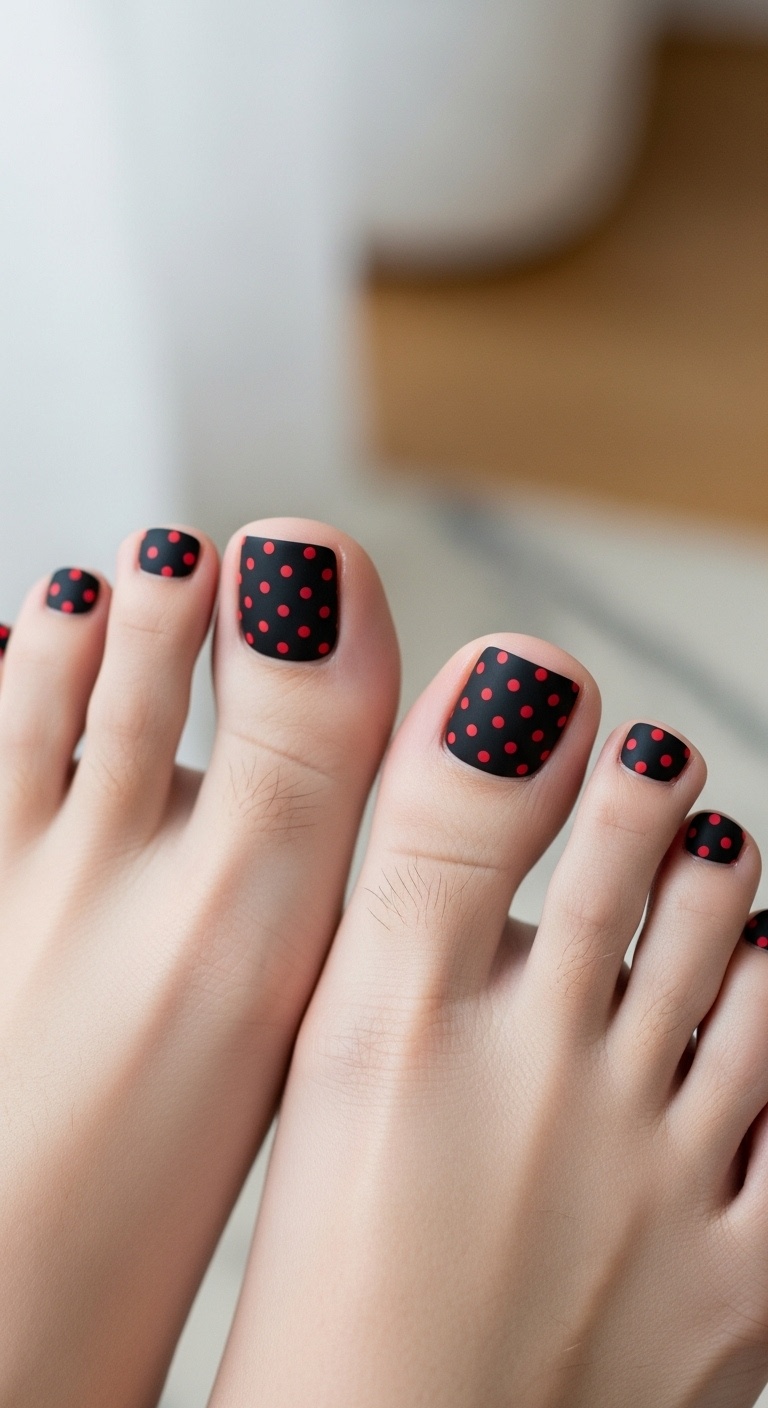
Matte black polish makes your toes look sleek and modern. Add red dots for a pop that’s bold but not over the top.
Dot with a tool or bobby pin, and try placing them by the cuticle or straight down the center.
This combo works for day or night—plus, it’s easy to fix if you chip a dot.
Expert Tip from KidsCareIdeas: “Apply a fast-dry matte topcoat to seal the design and prevent smudges.”
15. Orange Base with White Dots and Daisy Decals – Flower Power
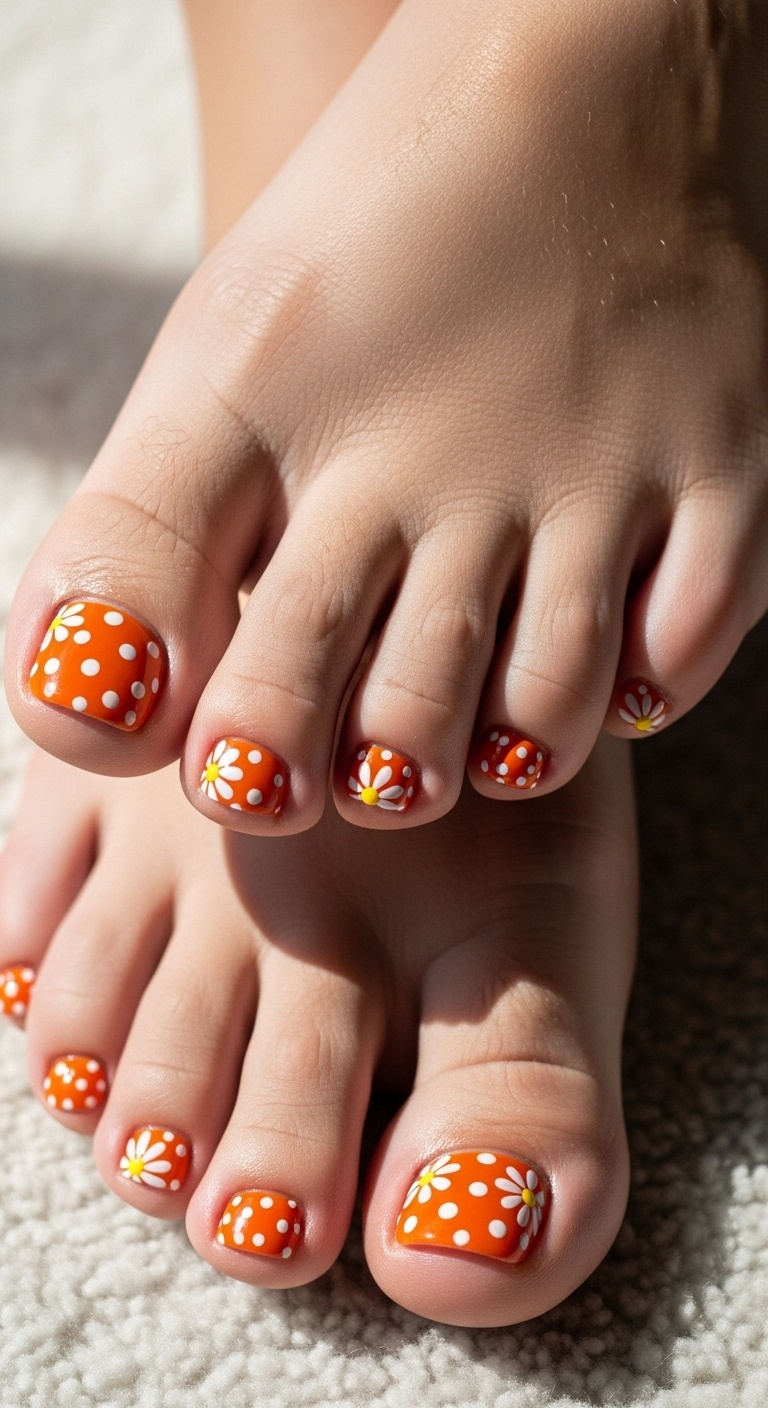
Grab a bright orange polish if you want your toes to scream “summer’s here!” Seriously, orange just brings the fun.
The white dots? They really stand out against the orange, and honestly, they make the whole thing look playful and cute.
Stick a couple of daisy decals on one or two toes if you want to mix it up. I like putting them near the cuticle, but you could totally go for the tips if you’re feeling wild.
Use a thin brush or a dotting tool to make those dots look tidy. Trust me, it’s way easier than trying to do it freehand.
Don’t forget the top coat—otherwise, those decals might wander off, and you want that shine to last as long as possible.
Expert Tip from KidsCareIdeas: “Press decals down gently before the top coat to avoid bubbles. Let each layer dry a bit to keep the design crisp.”
16. Ice Blue Nails with Silver Dots and Rhinestones – Frosty Glam
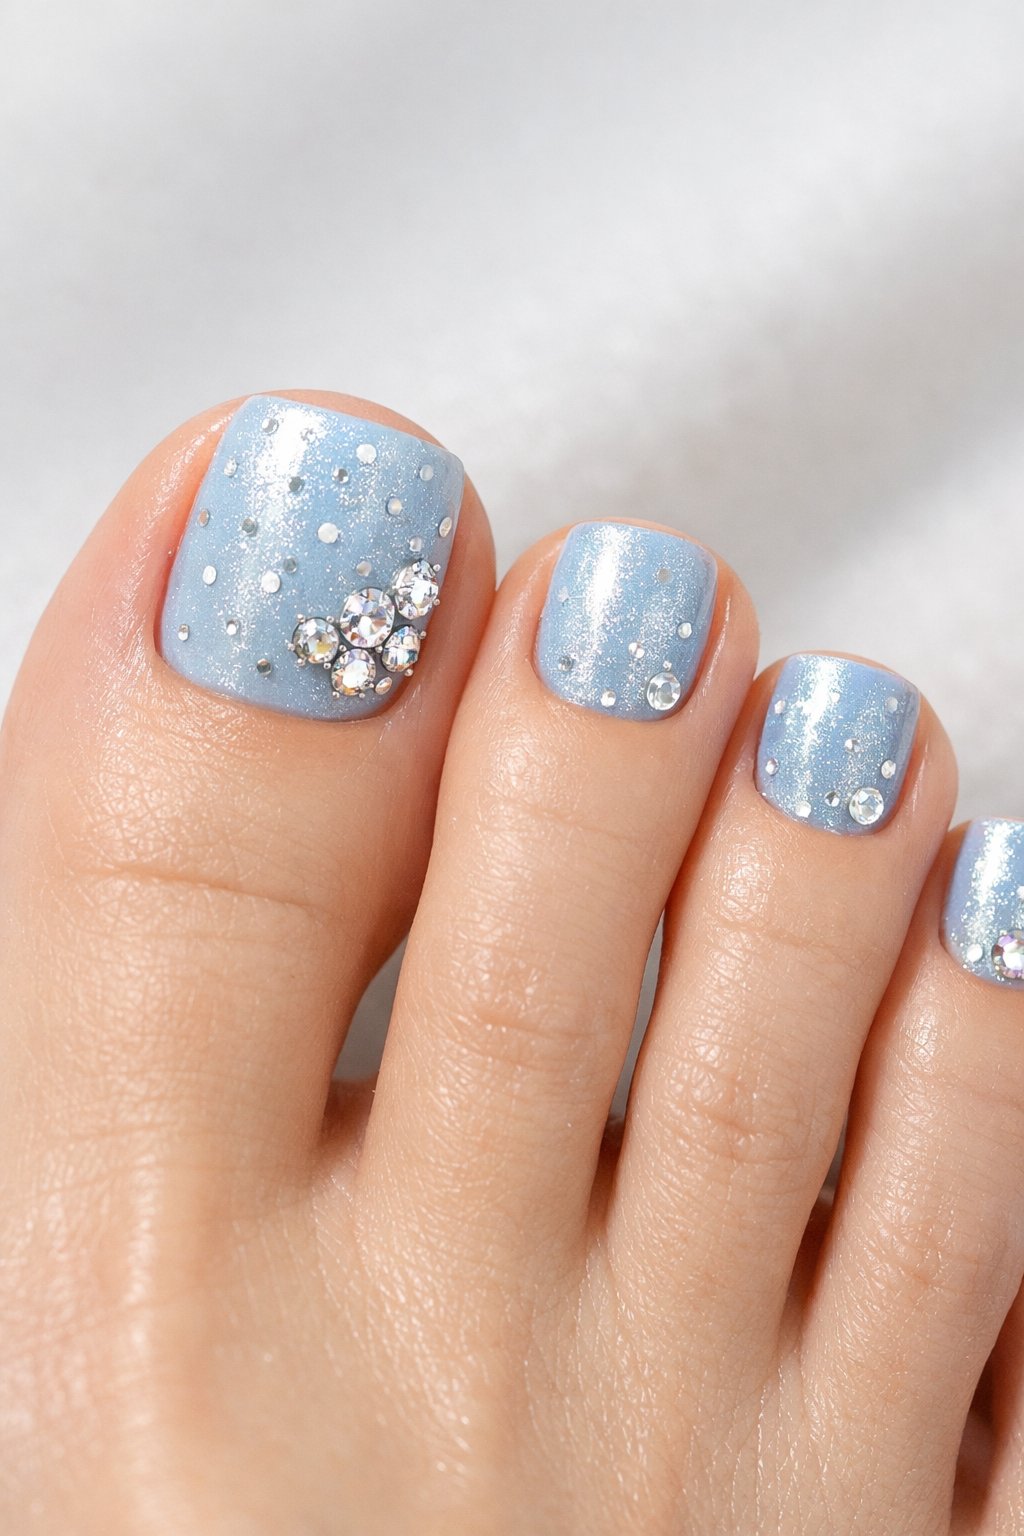
Start with a soft, icy blue polish. It gives your toes a clean, cool vibe, almost like you just walked out of a snow globe.
Add some tiny silver dots along the tips or near the cuticle. They add a little sparkle without making things too busy.
Toss on a few rhinestones—just a couple, maybe on your big toe or one of the smaller ones. They’ll catch the light and make your nails look extra fancy.
I use a toothpick or a dotting tool to keep those dots looking sharp. It’s a simple trick, but it works every time.
Seal everything in with a glossy top coat, so the rhinestones don’t bail on you halfway through the week.
Expert Tip from KidsCareIdeas: “Use a peel-off base for rhinestones so you can remove them without damage.”
17. Soft Gray with Different Sized White Dots – Understated Elegance
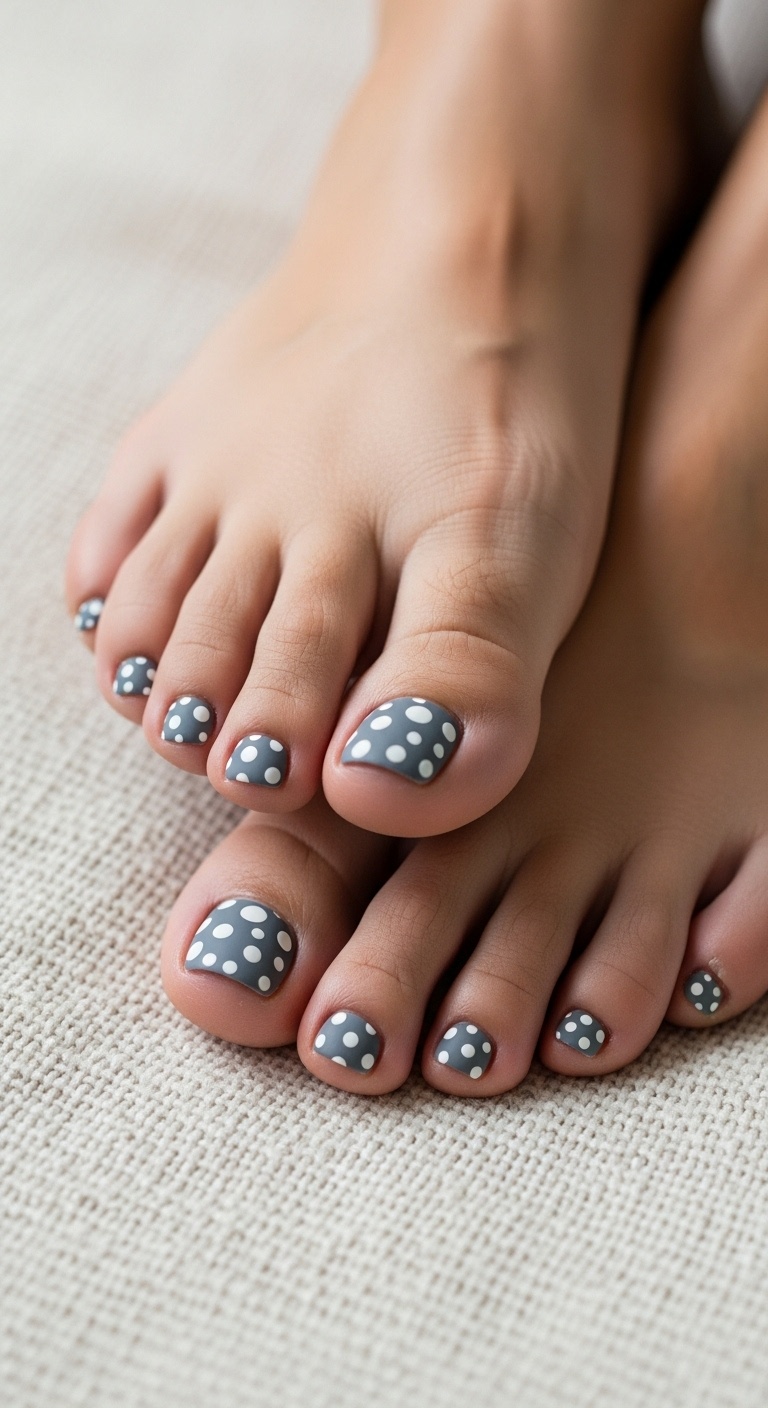
Let’s talk about soft gray polish for a second. It’s calm, it’s modern, and honestly, it goes with just about anything you wear.
Now, slap on some white dots—big, small, whatever mood you’re in—and suddenly your toes look playful, not boring.
I usually grab a dotting tool, but honestly, the rounded end of a bobby pin works just as well. I start with big dots near the cuticle, then toss in a few tiny ones toward the tip. It gives a little depth, like you planned it (even if you didn’t).
Don’t forget a glossy topcoat. It keeps those dots safe and turns up the shine.
Plus, this look hides those little chips that happen when you run into a chair leg or, I don’t know, chase your dog around the house. Works great for short or medium nails.
Expert Tip from KidsCareIdeas: “Paint one nail with only tiny dots for contrast; it creates a chic accent without extra work.”
