If you want nails that match March energy—think fresh, playful, and just a bit bold—you’re in the right spot.
Here are 18 easy nail ideas for spring, from soft pastels to pops of bright color and simple art you can mix up however you like.
You’ll find looks for everyday wear and a few that’ll make people do a double take. There’s ombré, tiny florals, glossy neutrals, and a hint of sparkle for when you want a little extra.

Pick a style that matches your mood. Try these at home or bring a screenshot to your next salon visit if you’re feeling fancy.
1. Soft pastel lilac tips

Go for a soft lilac on your tips for a fresh, simple twist on the classic French mani. Leave the base nude or sheer so the lilac really pops.
Use thin, steady strokes for a clean line. If your hand wobbles (hey, it happens), grab a guide sticker.
Finish with a glossy top coat to keep things shiny. Lilac fades in a way that isn’t too obvious, so you can touch up little chips instead of starting over.
Expert Tip from KidsCareIdeas: “Apply a fast-dry top coat every two days to keep tips smooth and shiny. Use a small angled brush dipped in remover to fix stray polish quickly.”
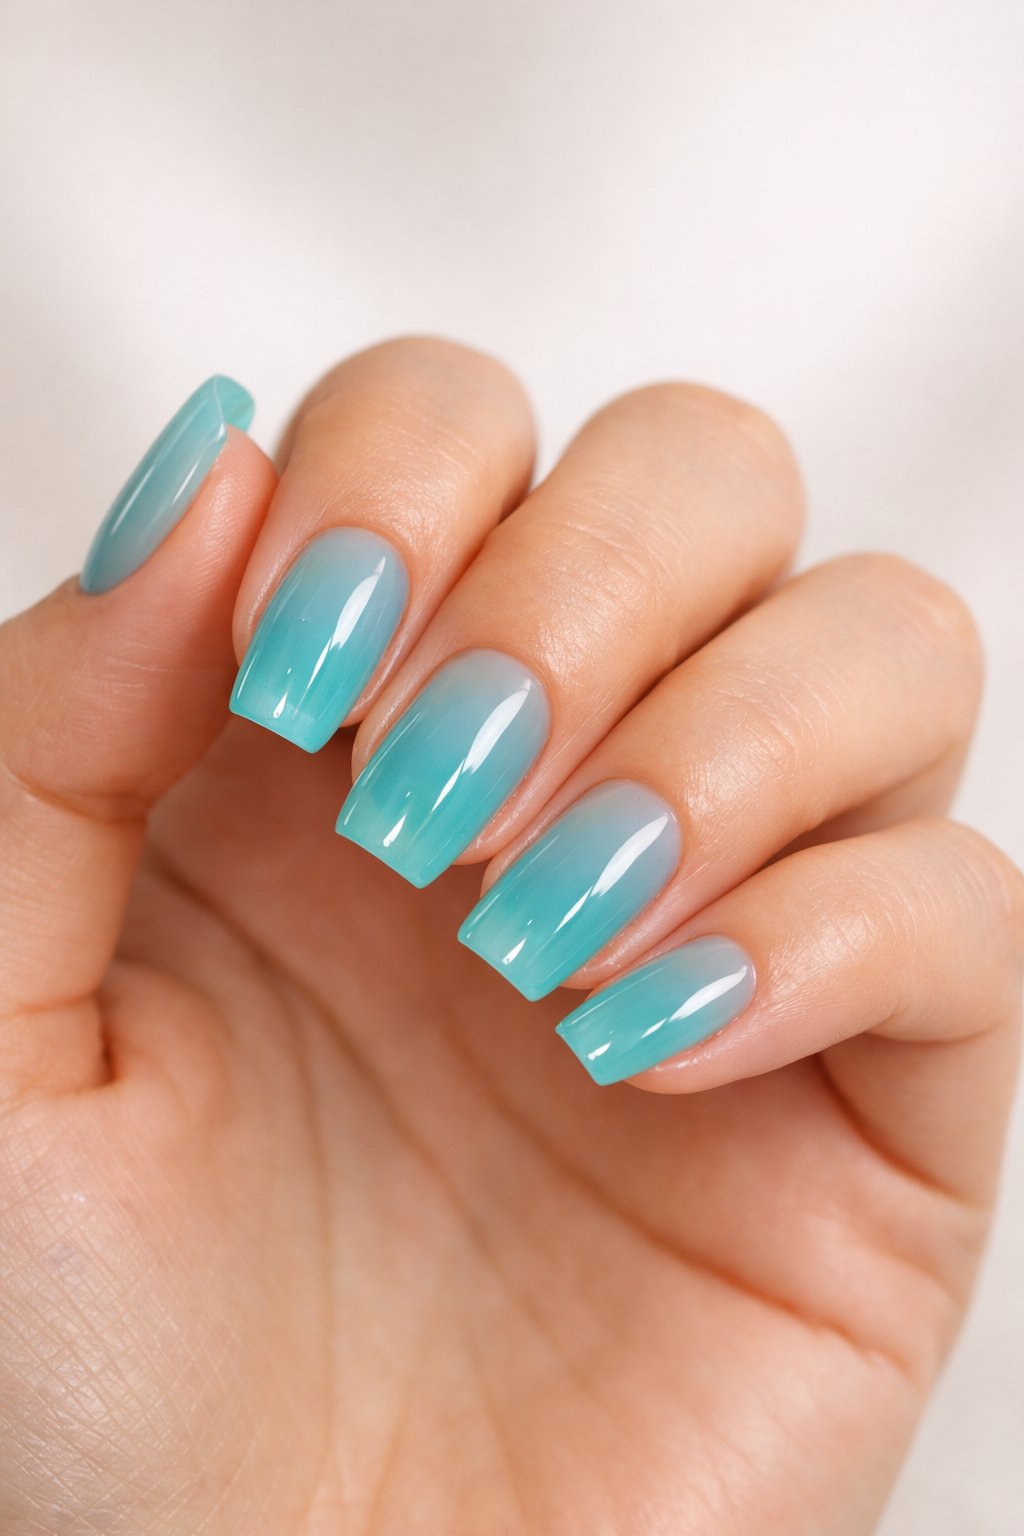
2. Mint green ombré effect
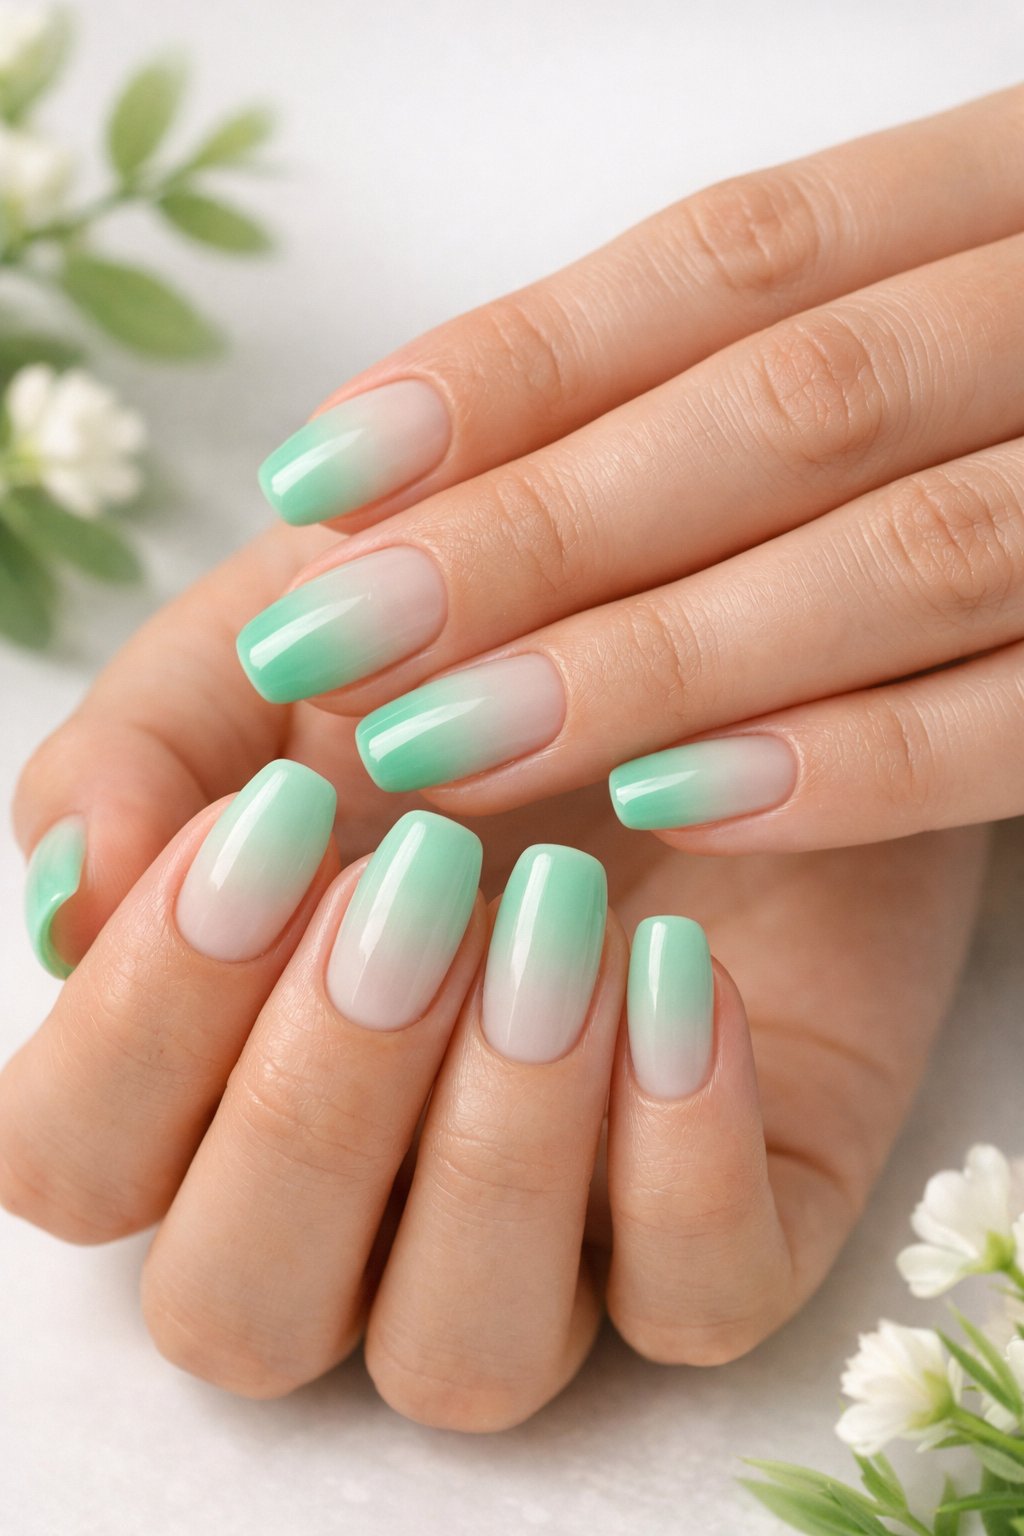
Mint green ombré nails just scream spring. Start with pale mint at the cuticle and blend into a deeper shade at the tips for a smooth gradient.
Use a sponge or brush to dab the colors together. Thin layers work best, especially if you’re using gel.
Add a tiny white dot or a bit of gold foil on one nail for something extra. Keep the rest shiny for a fresh vibe.
Expert Tip from KidsCareIdeas: “If the gradient looks patchy, lightly buff the nail between layers and reapply thin coats for a smoother blend.”
3. Classic French manicure with a twist—think pink glitter tips
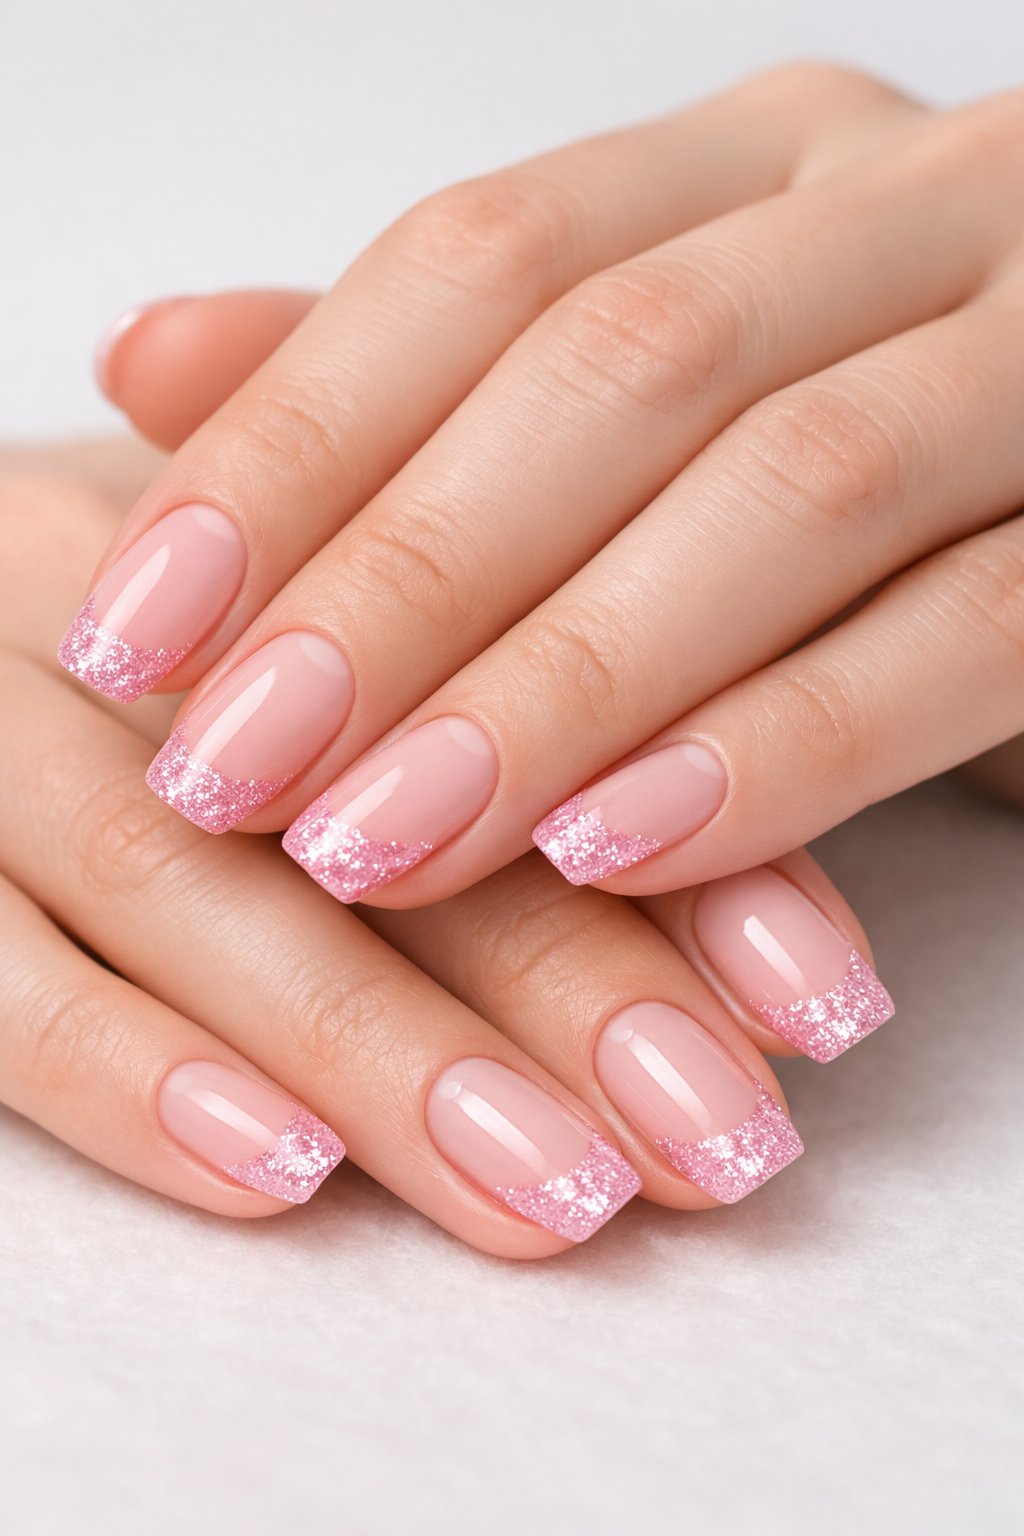
Give the French manicure a fun update with pink glitter tips. Start with a soft nude base and add slim white lines at the tips.
Swap out a couple of plain white tips for pale pink glitter. It adds sparkle but doesn’t take over the whole look.
Keep your lines thin and even. A glossy topcoat makes everything last longer and keeps the glitter in place.
Expert Tip from KidsCareIdeas: “Use a striping brush for neat glitter tips and remove excess with a small brush dipped in remover.”
4. Bright daffodil yellow accent nails
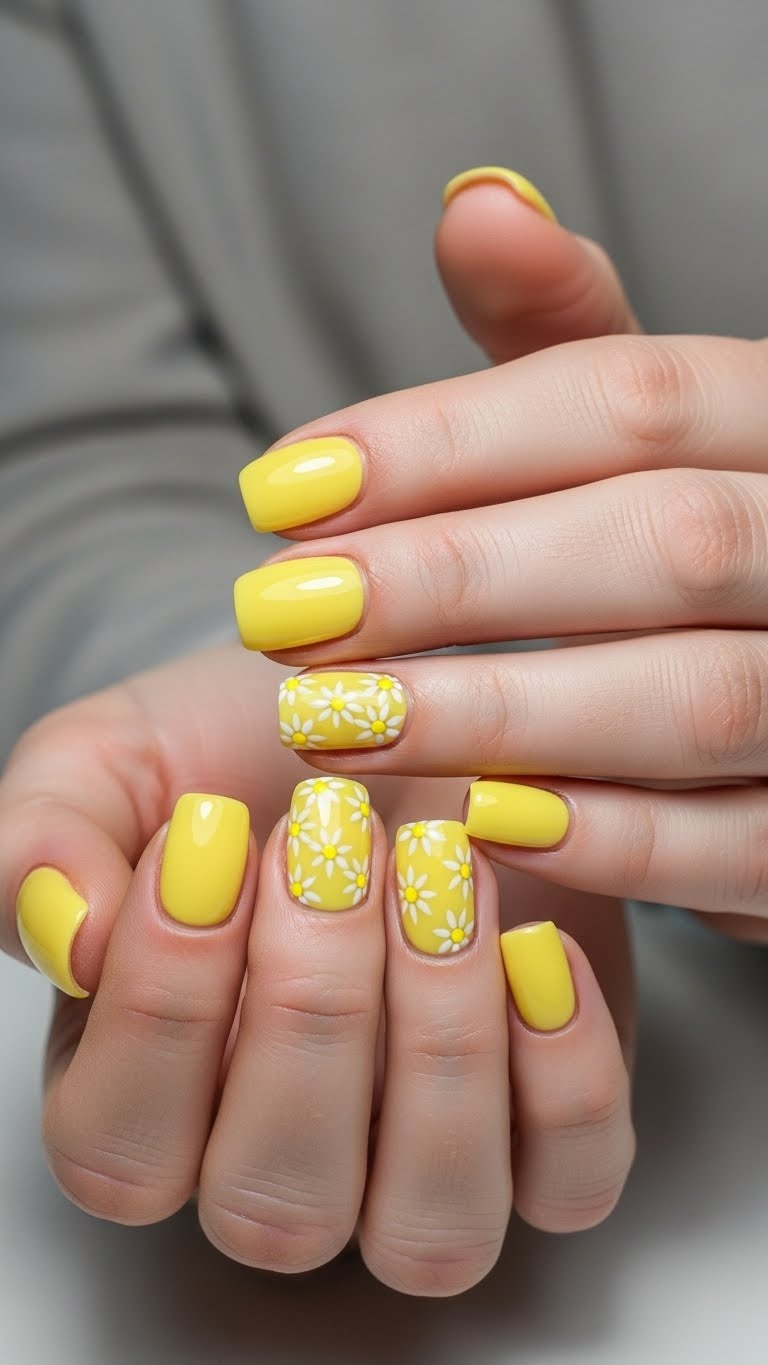
Pick a daffodil yellow that’s sunny but not blinding. Paint one or two accent nails on each hand to keep things balanced.
Add a small white dot or a skinny stripe for a bit of contrast. Glossy top coat keeps the yellow bright for longer.
Keep the rest of your nails neutral—soft beige or pale pink works great. The yellow stands out but won’t fight with your outfit.
Expert Tip from KidsCareIdeas: “Apply two thin coats of yellow instead of one thick coat to avoid streaks and bubbling.”
5. Subtle baby blue with tiny white daisies
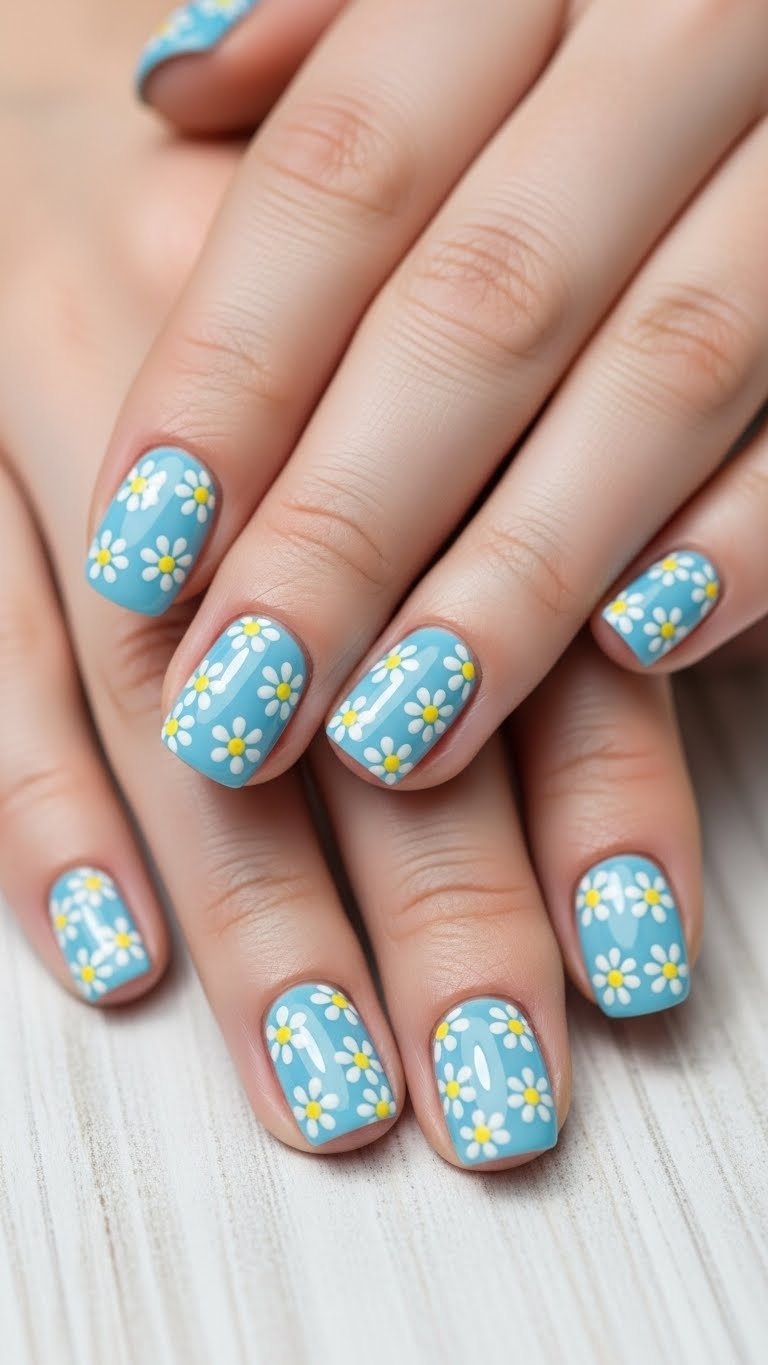
Pick a soft baby blue for your base. It’s calm, it’s fresh, and it works on short or medium nails.
Paint tiny white daisies near the cuticle or in a corner for a delicate touch. Use a dotting tool or toothpick for the petals, and a yellow dot in the center.
Leave most nails plain for a subtle look. A glossy topcoat helps the flowers last and keeps the blue looking crisp.
Expert Tip from KidsCareIdeas: “Use a thin brush for petal strokes and practice on paper first. Apply two thin coats of topcoat, letting each dry fully, to protect the daisy details.”
6. Earthy terracotta matte finish
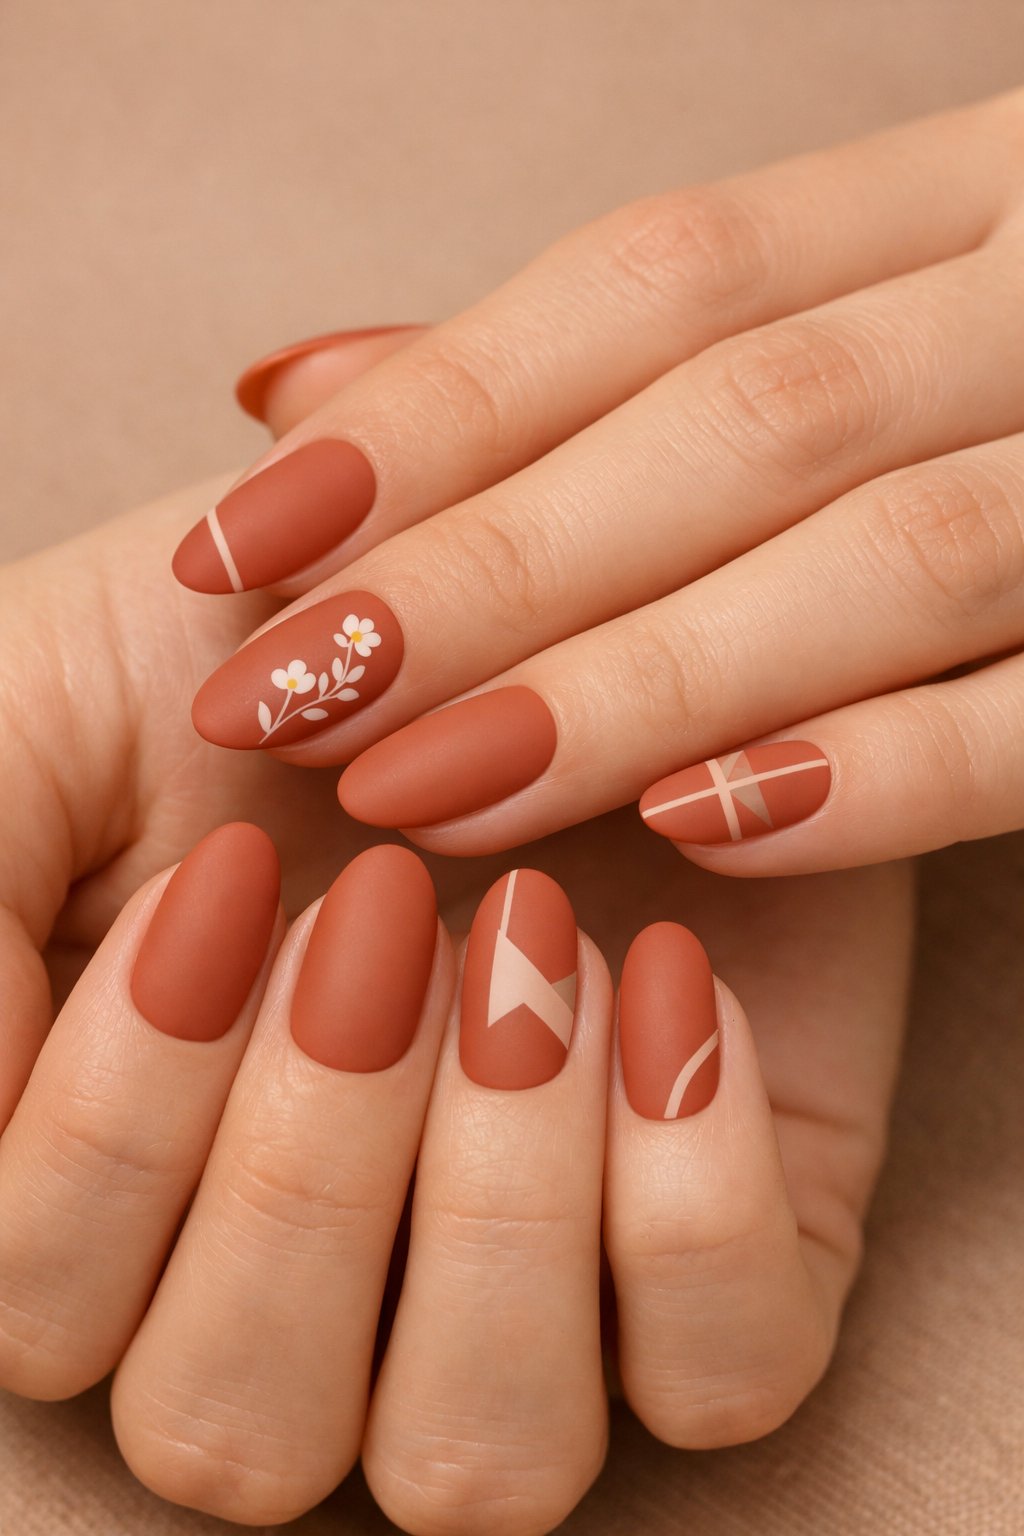
Terracotta nails bring a warm, earthy vibe that looks good on everyone. The matte finish keeps it modern and not too shiny.
Paint each nail a soft clay color. Stick a tiny gold dot on your ring finger if you want a little something extra.
Try mixing light and deep terracotta shades for more depth. Matte topcoat keeps chips away and feels velvety.
Expert Tip from KidsCareIdeas: “Use a peel-off base coat under matte polish to make removal easier and gentler on your nails.”
7. Sheer Neutral base with gold foil flecks
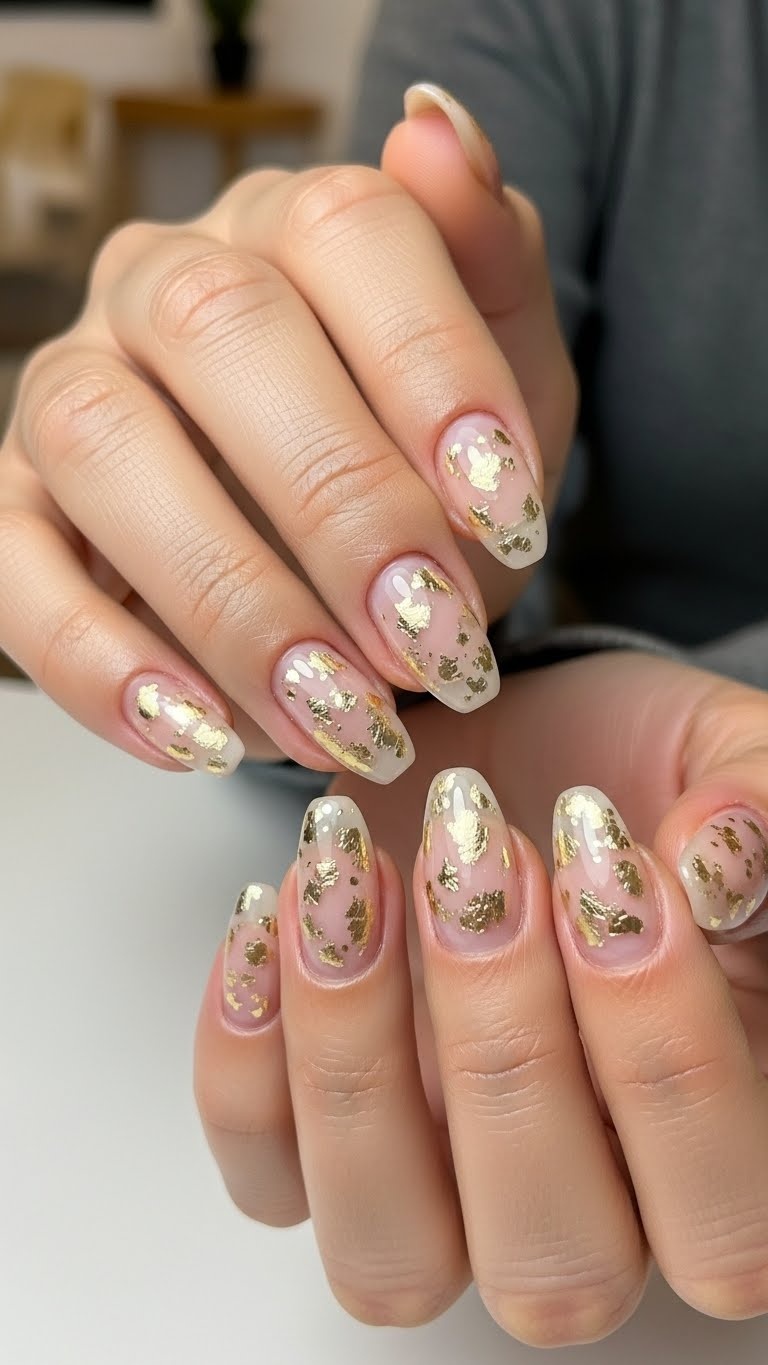
Go with a sheer Neutral polish for a clean, natural nail look. Gold foil flecks pop against the soft base without being too much.
Press the foil on lightly and scatter it for a chic, random look. Place pieces near the cuticle or tip for some variety.
Seal everything in with a glossy topcoat. It smooths the foil and gives a nice shine.
Expert Tip From KidsCareIdeas: “Press foil gently with a silicone tool to avoid wrinkles and help it stick. Finish with two thin topcoats for extra durability.”
8. Vibrant coral swirl patterns
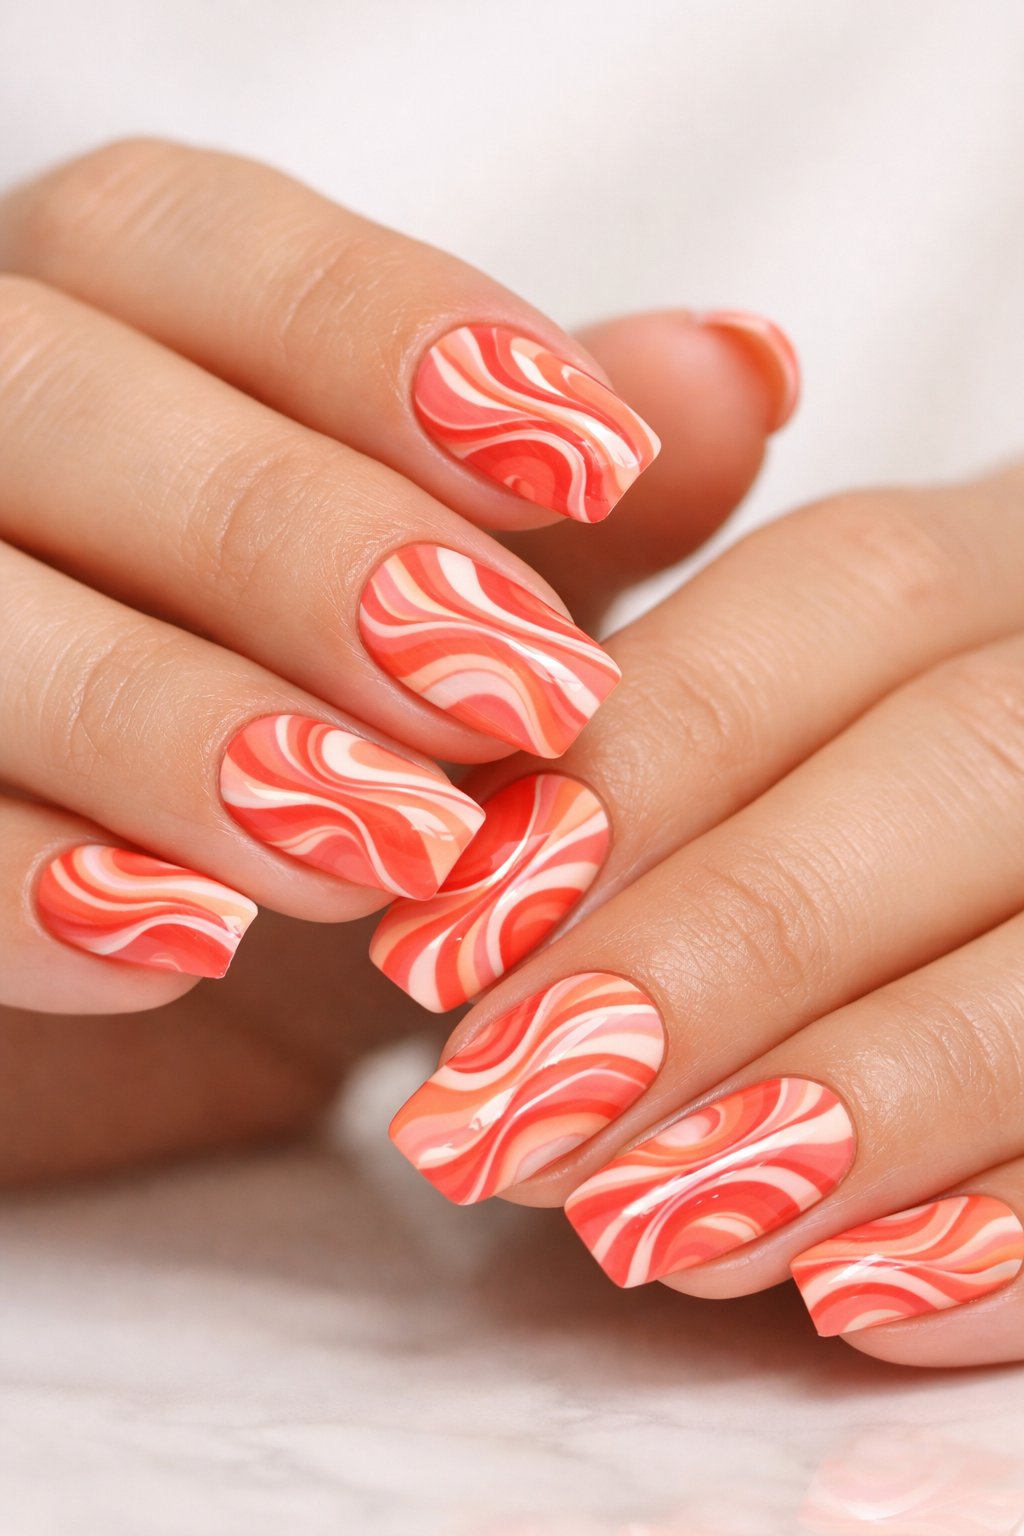
Grab a bright coral for your base. Add white or gold swirls with a thin brush for some movement and contrast.
Change up the swirl size on each nail to keep things playful. Use a dotting tool to start the curve, then drag the polish into a wave.
A glossy topcoat protects your swirls and adds shine. This works on both short and almond-shaped nails.
Expert Tip from KidsCareIdeas: “Practice swirls on plastic first to steady your hand and save polish. Use a fast-dry topcoat to keep the swirl edges crisp.”
9. Glossy pale peach with tiny pearl studs
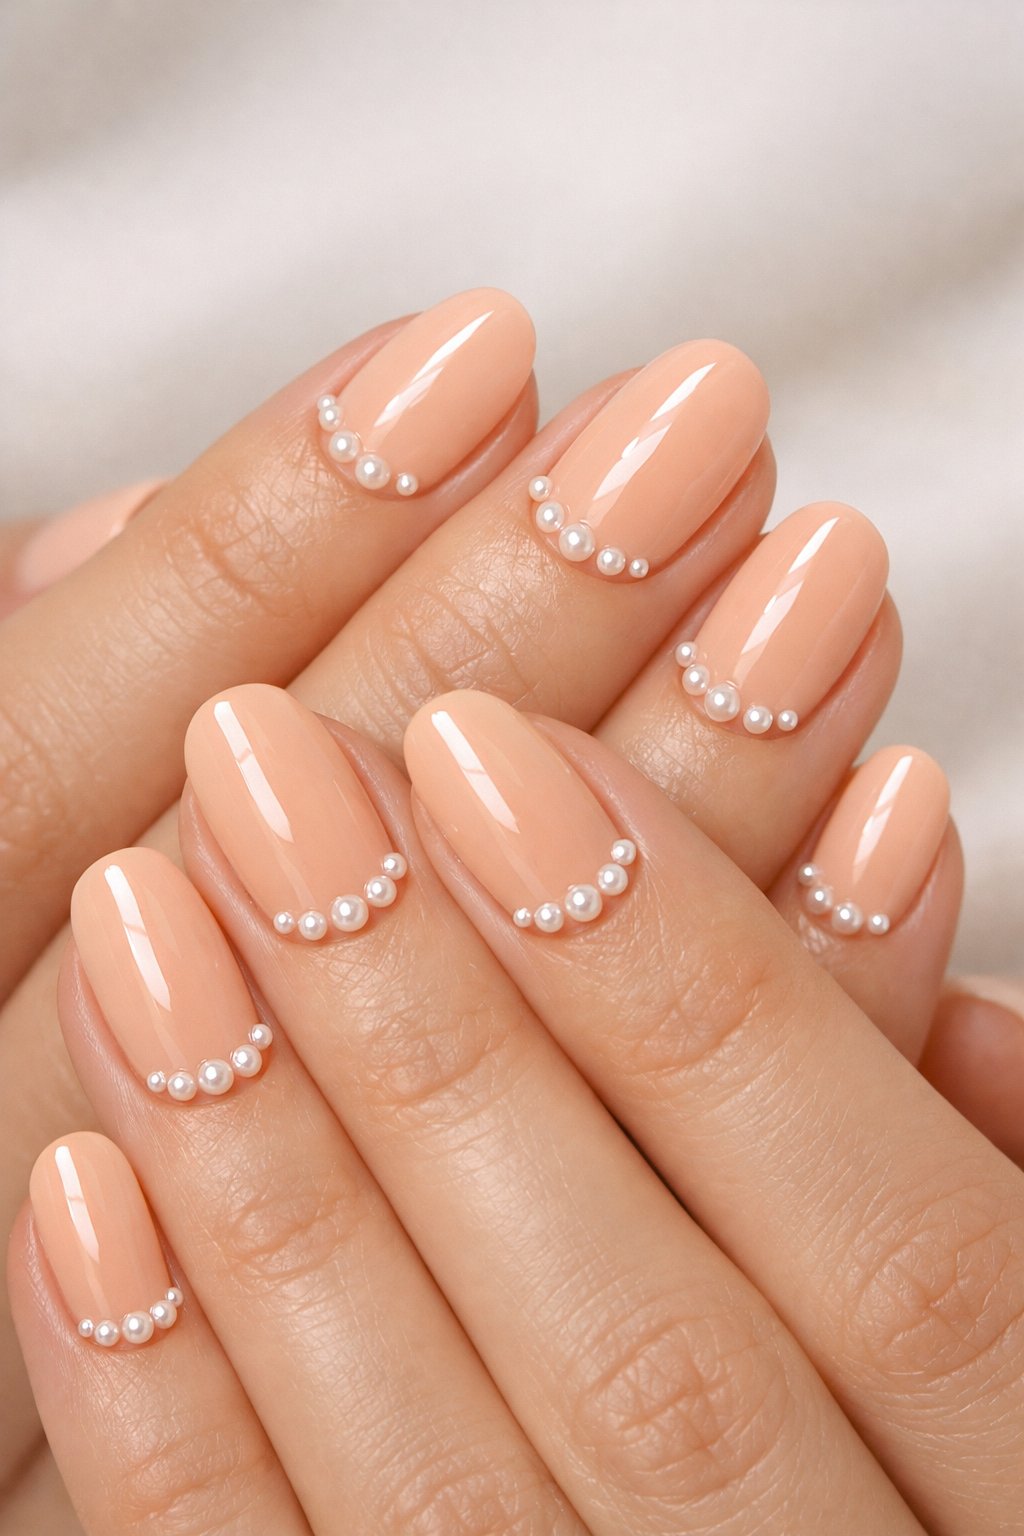
Pick a pale peach polish for a soft, tidy base. The glossy finish makes your nails look a little dressy without much effort.
Stick tiny pearl studs near the cuticle or the tip for a delicate accent. Use a dab of clear top coat or nail glue to hold them on.
This look works for short or medium nails and feels right for school events or family photos. It’s quick to do and easy to fix up later.
Expert Tip from KidsCareIdeas: “Apply a thin layer of top coat over the pearls to lock them in place and prevent snagging. If a pearl pops off, a little nail glue fixes it fast.”
10. Jelly nail look in translucent aqua
Try translucent aqua jelly nails for a soft, glassy look. The color feels fresh and lets light through, making short nails look longer.
Apply thin layers of jelly polish, letting each dry for that see-through effect. Pop on tiny silver flakes or a marble accent on one nail if you want a little sparkle.
This style suits both square and rounded tips. It’s low-maintenance and resists chips when you finish with a clear topcoat.
Expert Tip from KidsCareIdeas: “Use three thin layers of jelly polish for depth without stickiness.”
11. Spring cherry blossom nail art
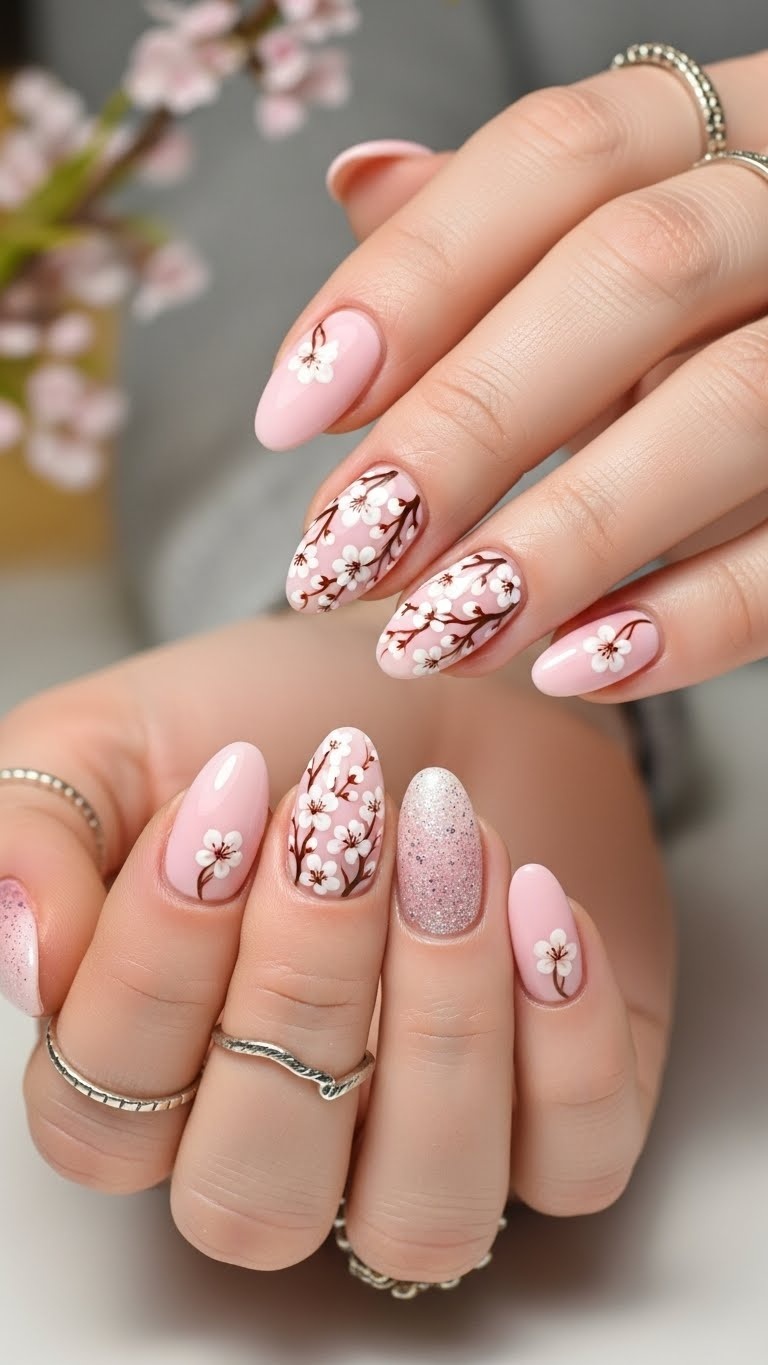
Go for soft pink nails with tiny white blossoms for a gentle spring vibe. Use a pale pink base and dot on five-petal flowers with a thin brush or toothpick.
Add gold or brown dots in the centers for contrast. Try a couple of accent nails with branches if you want to mix it up.
A glossy topcoat keeps the flowers looking fresh. This style works on short or medium nails and flatters every skin tone.
Expert Tip from KidsCareIdeas: “Practice the flower shape on paper first to get consistent petals.”
12. Minimalist white line art
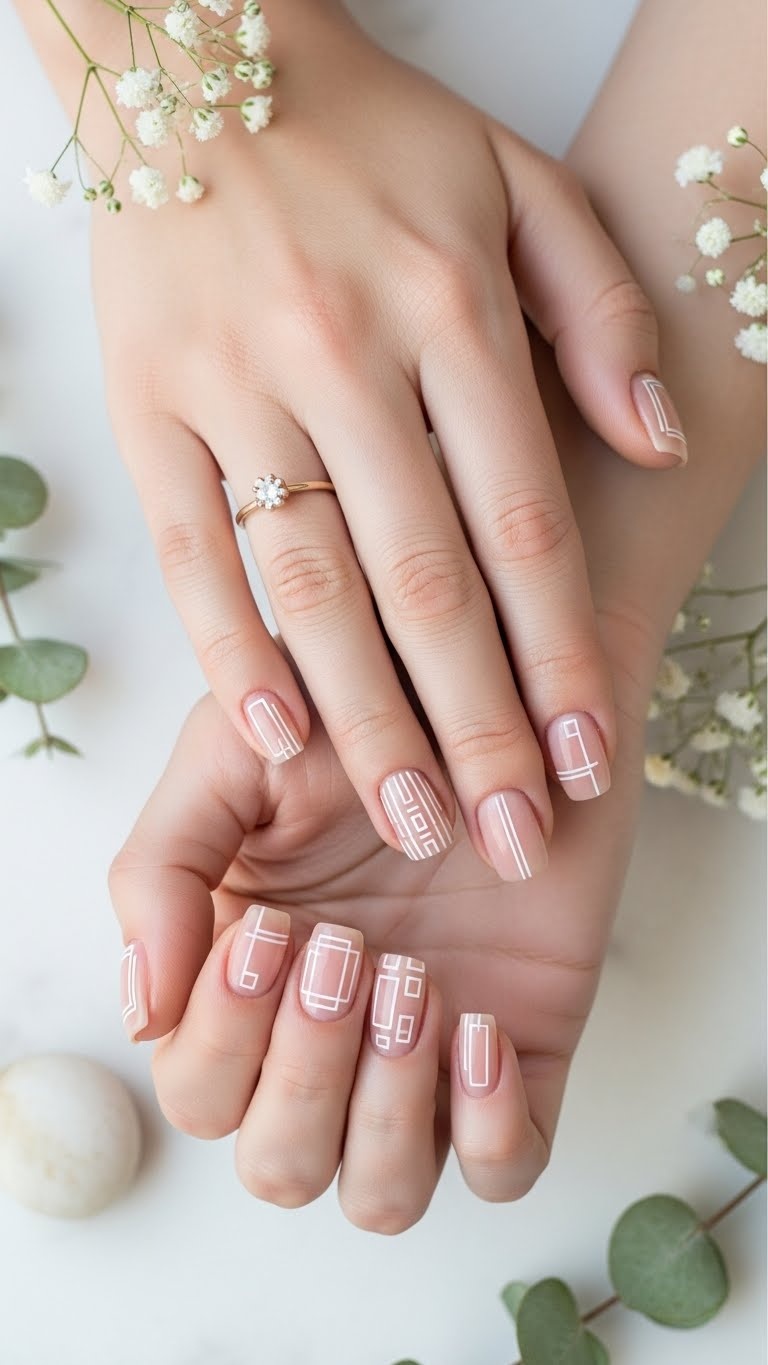
Pick a nude base that matches your skin for a clean look. Thin white lines stand out but don’t feel too bold—try tiny flowers, waves, or simple shapes.
Use a fine brush or nail pen for steady lines. Work on one nail at a time and let each line dry to avoid smudges.
This design works on short or medium nails. A glossy topcoat will protect your art and add a little shine.
Expert Tip from KidsCareIdeas: “Practice lines on paper first to steady your hand. Use a dotting tool to start shapes, then connect with light strokes.”
13. Gradient sunset shades from orange to lavender
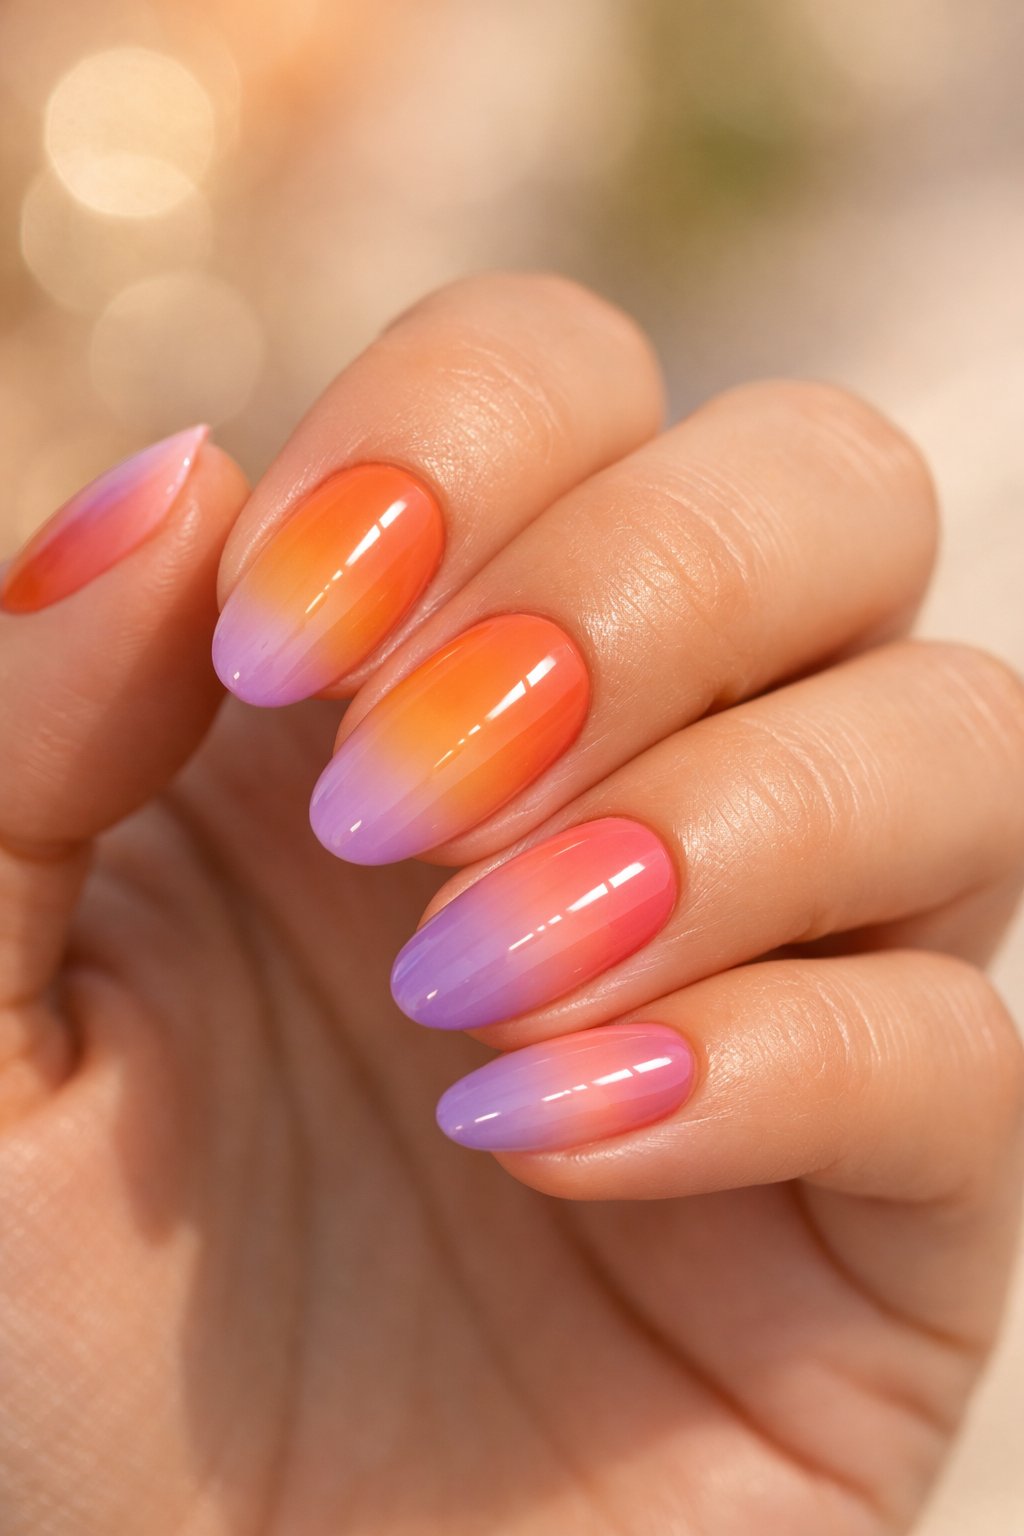
Try a soft ombré that looks like a sunset. Start with bright orange at the cuticle and blend into pale lavender at the tips.
Dab on thin layers with a sponge, letting each dry so the colors don’t get muddy. A glossy top coat adds shine and smooths the gradient.
This look works for any nail length and pairs nicely with gold or white accents. You can swap out the orange or lavender for your favorite shades.
Expert Tip from KidsCareIdeas: “Use a makeup sponge and a small brush to clean edges for a neat finish.”
14. Playful polka dots in pastel colors
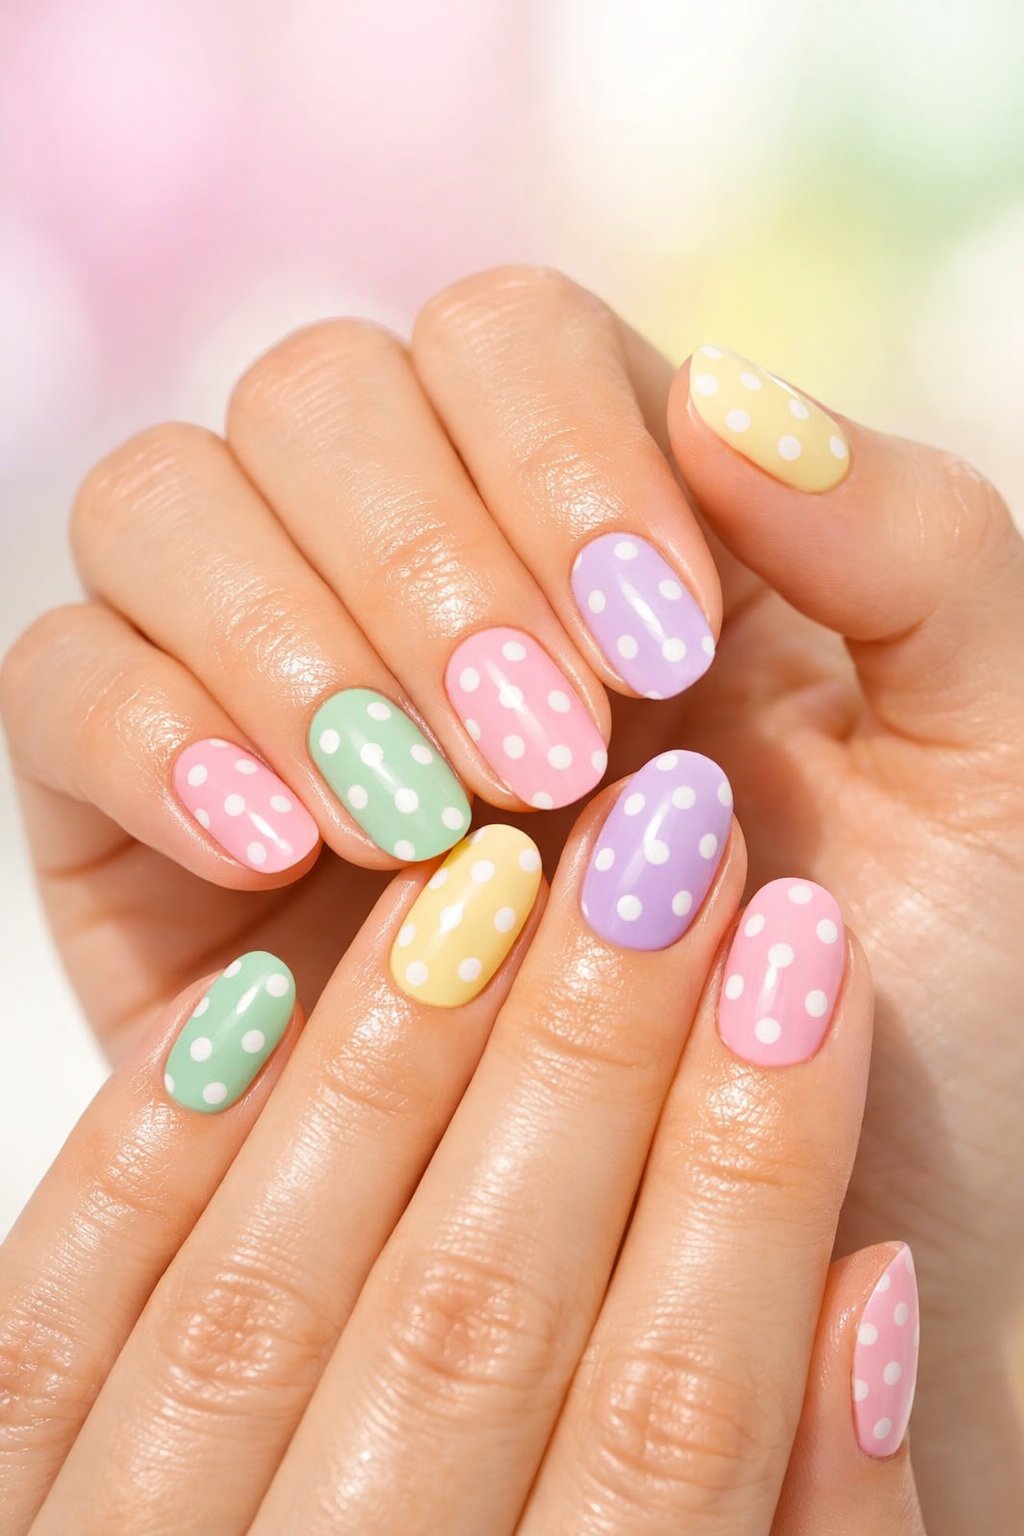
Pick two or three pastels—mint, baby pink, lavender—whatever makes you happy. Use a dotting tool or the end of a bobby pin to make even dots.
Keep the base a neutral pastel and scatter your dots on one or two accent nails. Mix up the sizes for a fun, modern feel.
Finish with a glossy topcoat for shine and to protect your masterpiece. Kids and adults both can rock this look.
Expert Tip from KidsCareIdeas: “Start with thin layers of polish to avoid smudges, and let each coat dry fully before dotting.”
15. Metallic rose gold chrome nails
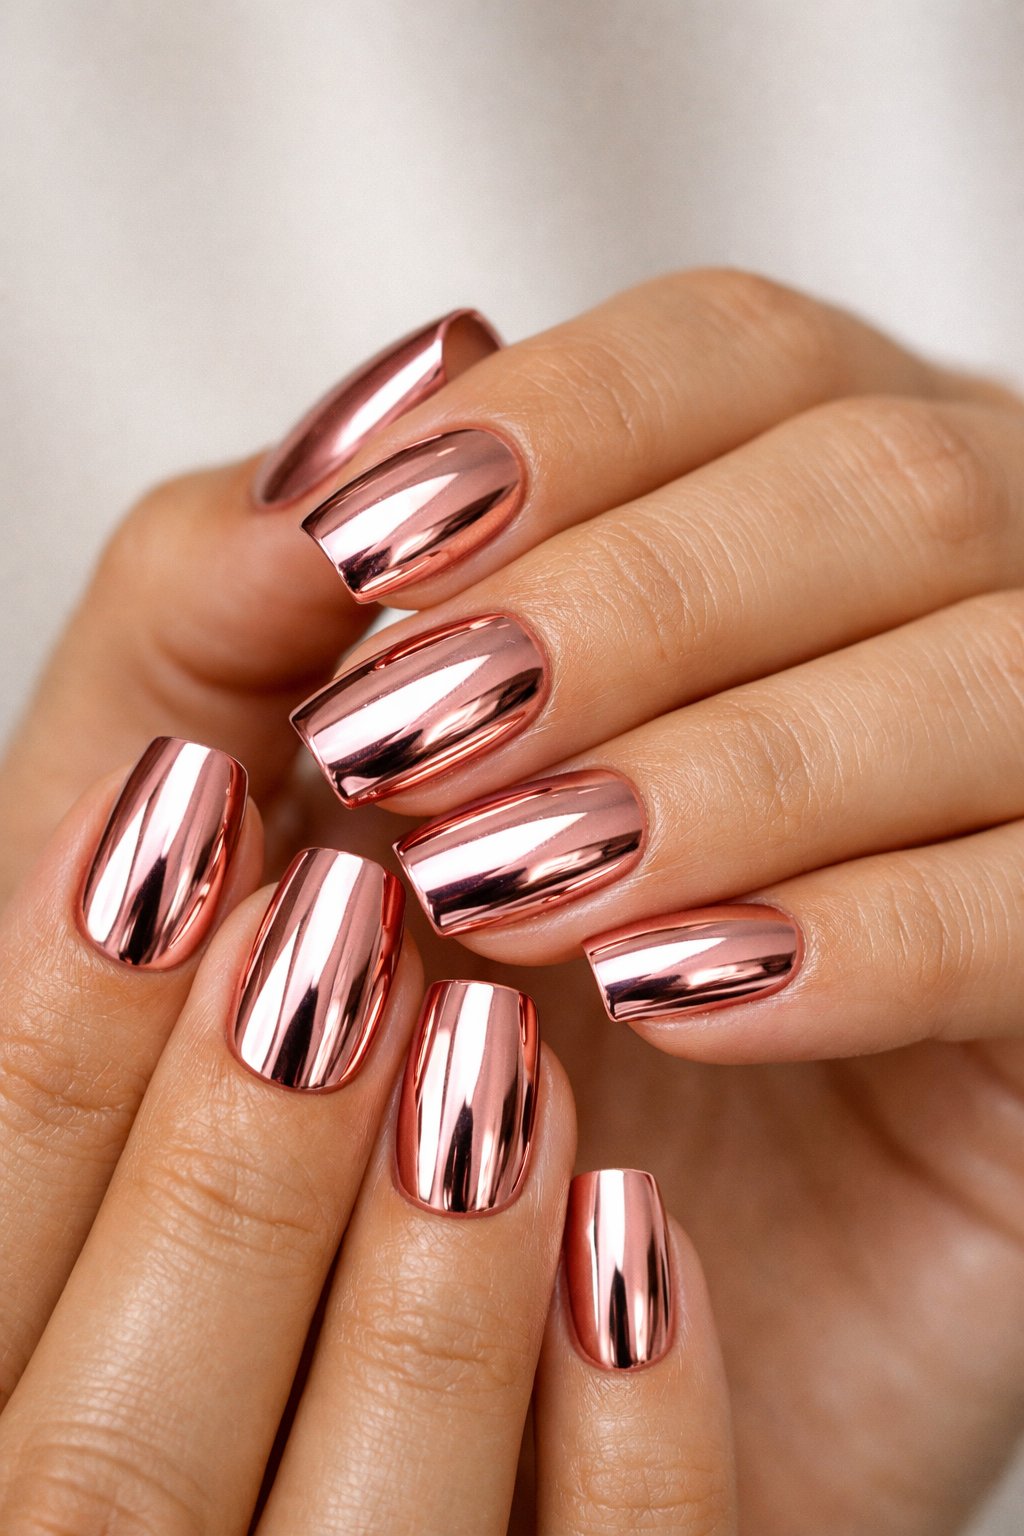
Let’s be real, rose gold chrome nails just look fancy. They shine like a mirror but still feel cozy and soft, not cold and harsh.
You can rock this shade whether you keep your nails short or go full glam with long tips. It somehow flatters every skin tone—how does it do that?
I usually start with a rose gold-ish base, then rub chrome powder on top of the cured gel. A glossy top coat locks in all that shine and keeps chips away.
If you want to mix things up, sprinkle in a bit of fine glitter for a dreamy sparkle. Or, swipe on a matte top coat for just one accent nail—hello, instant contrast.
Expert Tip from KidsCareIdeas: “Apply a thin base and cure well to avoid bubbling under the chrome. Use a sticky-tack remover wipe before top coat for extra smoothness.”
16. Soft peach with delicate leaf stamping
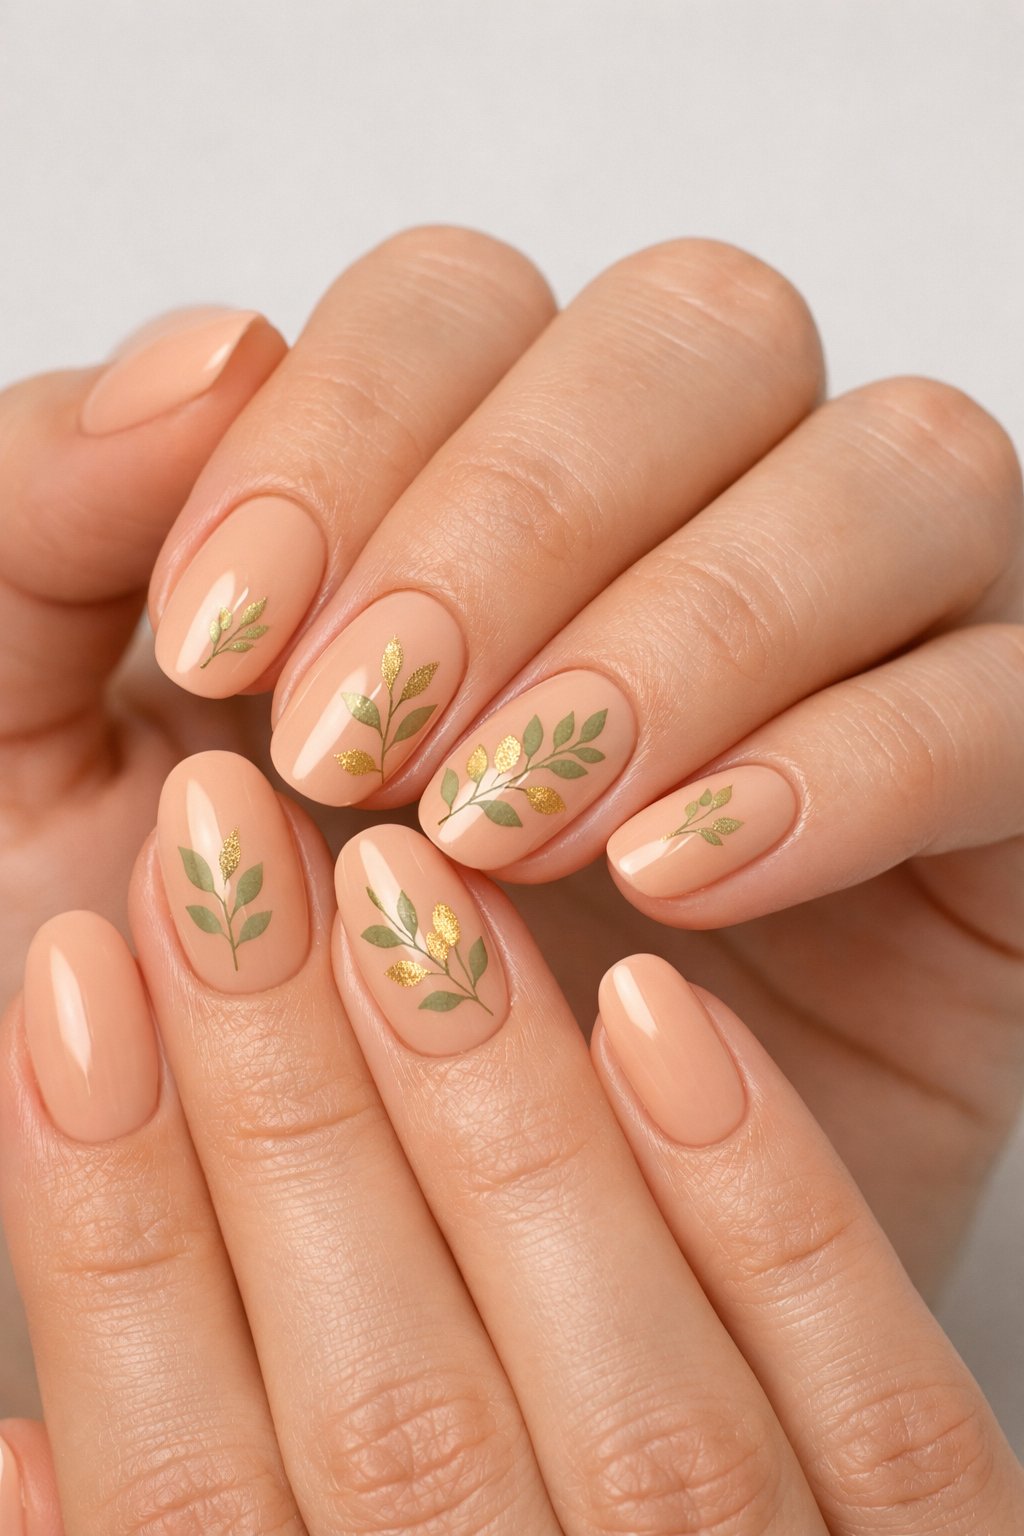
I love a soft peach nail for spring. It’s warm, gentle, and pretty much flatters everyone.
Keep those polish coats light and even for that smooth, pro finish. If you want to add a little art, grab a tiny stamping plate or a fine brush and pop on some cute green leaves.
Stamping makes the design look crisp and tidy way faster than freehand. That’s my kind of shortcut.
Finish it off with a shiny topcoat so your leaves stay put and your nails gleam. Let each coat dry for a bit—trust me, nobody wants smudges.
Expert Tip from KidsCareIdeas: “Use a quick-dry topcoat and press the stamper gently to keep leaf edges sharp.”
17. Cloud-inspired light blue and white marbling
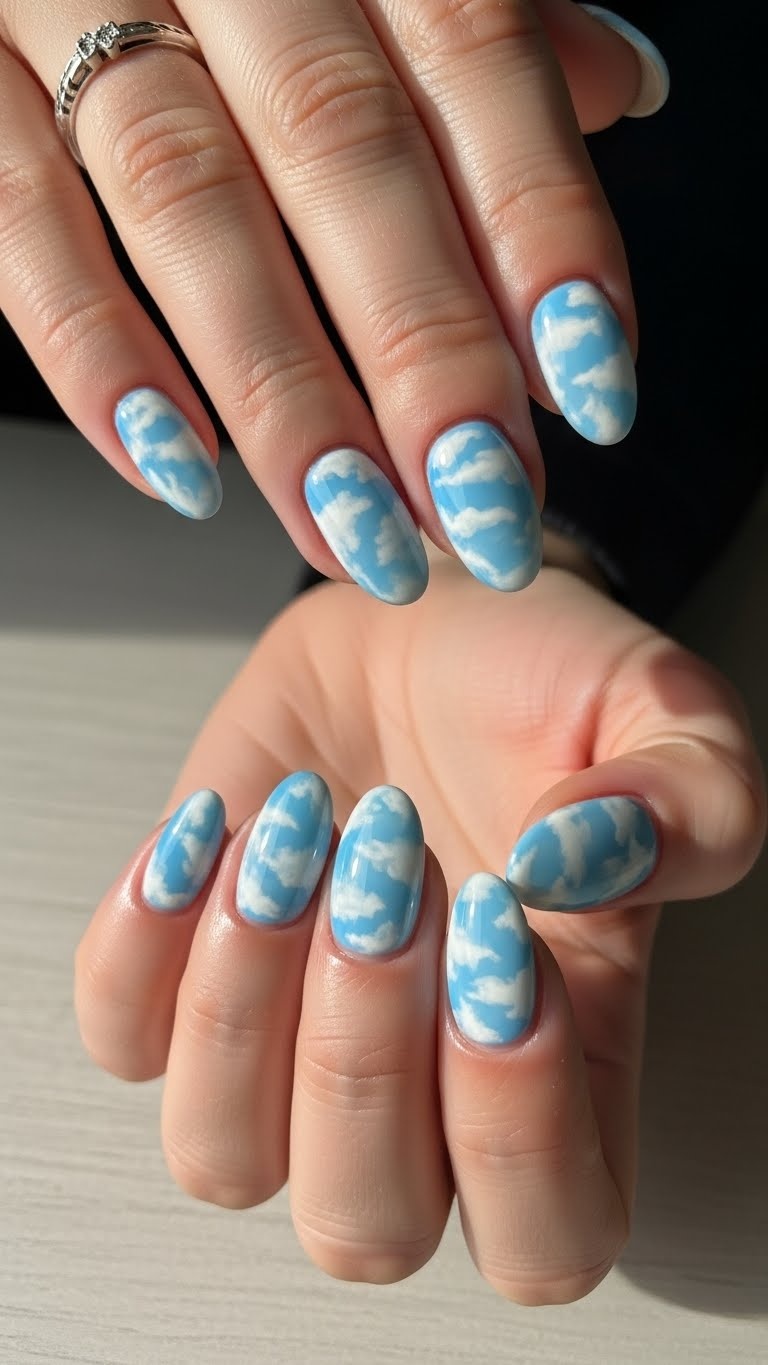
Cloud nails are so dreamy, right? I grab a soft blue and a white polish, then dab tiny drops onto a wet base.
Swirl them together with a toothpick or skinny brush. Don’t overthink it—the more random, the better! That’s what makes the clouds look real.
A glossy top coat smooths everything out and makes the colors pop. If any lines look too harsh, I just pat them with a makeup sponge for a softer fade.
I always practice on a nail wheel first to get the swirl just right. Sometimes, I mess up, but hey, that’s how you get better.
Expert Tip from KidsCareIdeas: “Work one nail at a time to keep polish wet enough to marble well.” “Seal with two thin top coats for lasting shine and no dragging.”
18. Lavender nails with tiny bee decals

Grab a soft lavender polish—trust me, it always feels fresh and sweet.
This shade flatters just about every skin tone and brings out that gentle spring mood.
Stick on a couple of tiny bee decals near the cuticle, or maybe just on one accent nail if you’re feeling quirky.
Try placing them a bit off-center; it adds a playful, almost “oops, did a bee just land here?” kind of charm.
Swipe on a glossy topcoat to lock everything in and make those bees shine.
If you’re up for painting bees by hand, grab a thin brush and dab on some white for the wings.
Expert Tip from KidsCareIdeas: “Go for water-slide decals if you want crisp little bees and to save some time. Press them down gently and don’t forget to topcoat twice so they last longer.”
