The holidays are here, and honestly, it’s the best excuse to add a little sparkle to your look. Nails are the perfect spot to show off your festive side without looking like you fell into a tinsel factory.
If you want nails that look classy and festive, going for elegant designs is the way to do it.

There are tons of simple, pretty ideas that fit any mood or event this season.
1. Classic French Tip with a Holiday Twist
You know the French tip—white ends, pink base? Swap the white for sparkly gold or deep red. Suddenly, you’ve got that same clean look, but with a holiday upgrade.
Try tossing in a tiny snowflake or a couple of holly dots near the tips. It’s a small detail, but it shows you care about the little things.
This style works for any party or dinner because it’s festive but not too much. If you want classy Christmas nails that don’t scream for attention, this is it.
Expert Tip from KidsCareIdeas: “Use a thin brush for those crisp tips and details. Your nails will look neat, like you just left the salon.”
2. Matte Red with Gold Glitter Accent

Matte red is a classic that just works. It’s bold, but not blindingly shiny. Add gold glitter on one or two nails, and suddenly you’ve got holiday sparkle that still feels grown-up.
Stick with glitter on the ring finger or thumb if you want to keep things balanced. That way, your nails look festive but not over-the-top.
A matte top coat over red polish is easy to do and feels super smooth. The gold glitter gives just enough shine to catch the eye.
Expert Tip from KidsCareIdeas: “Start with a base coat under matte polish to protect your nails. Use a clear top coat over glitter so it stays put.”
3. Snowflake Stamping on Icy Blue
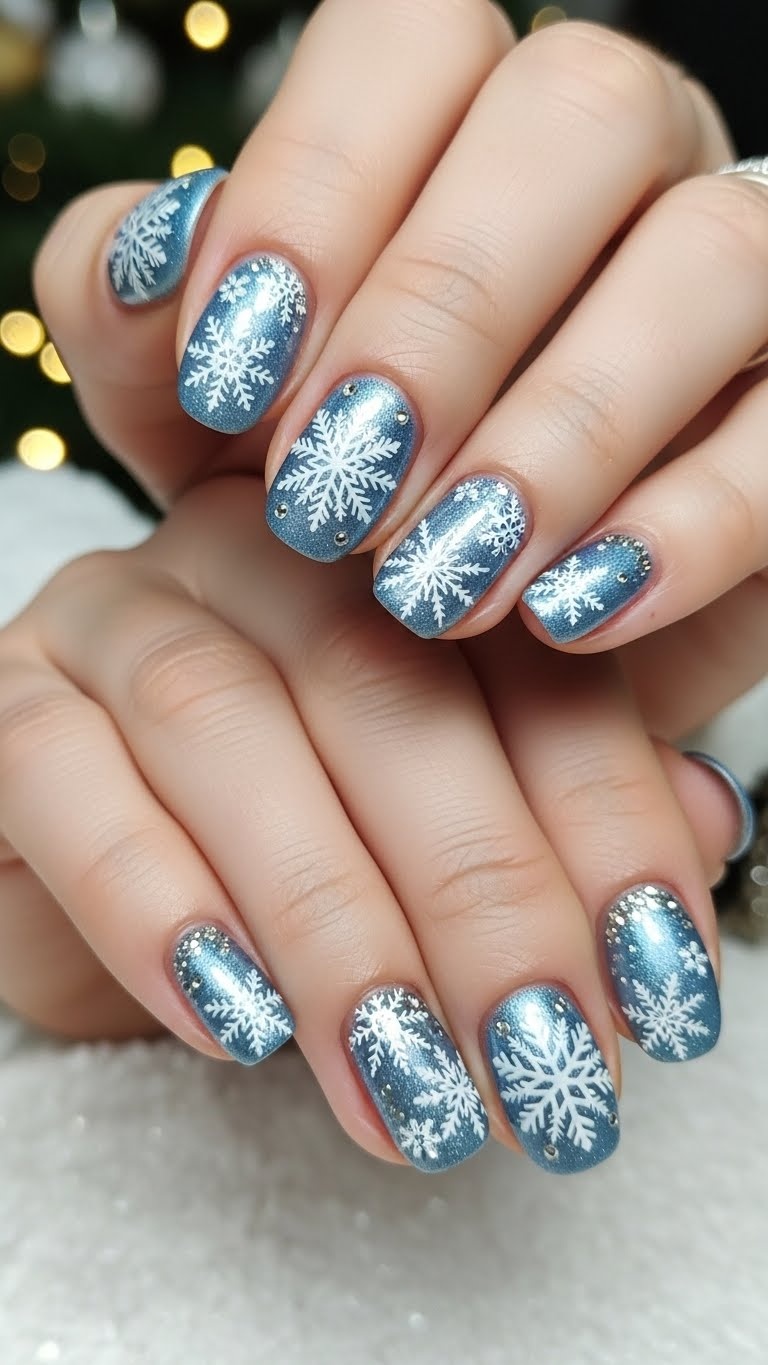
Grab a pale blue polish for a chilly, wintery base. It looks like frosty ice—very on theme. Once it’s dry, use a stamping plate with snowflake designs.
Pick white for the snowflakes. It pops against the blue. Don’t stress about making them perfect; real snowflakes aren’t either.
This look is simple, elegant, and not too showy. Stamping saves time and keeps things neat compared to painting each snowflake by hand.
Expert Tip from KidsCareIdeas: “A clear stamper helps you line up the designs just right. Wipe the stamping plate after each use so your snowflakes stay crisp.”
4. Deep Green with Tiny White Dots (Hello, Snow!)
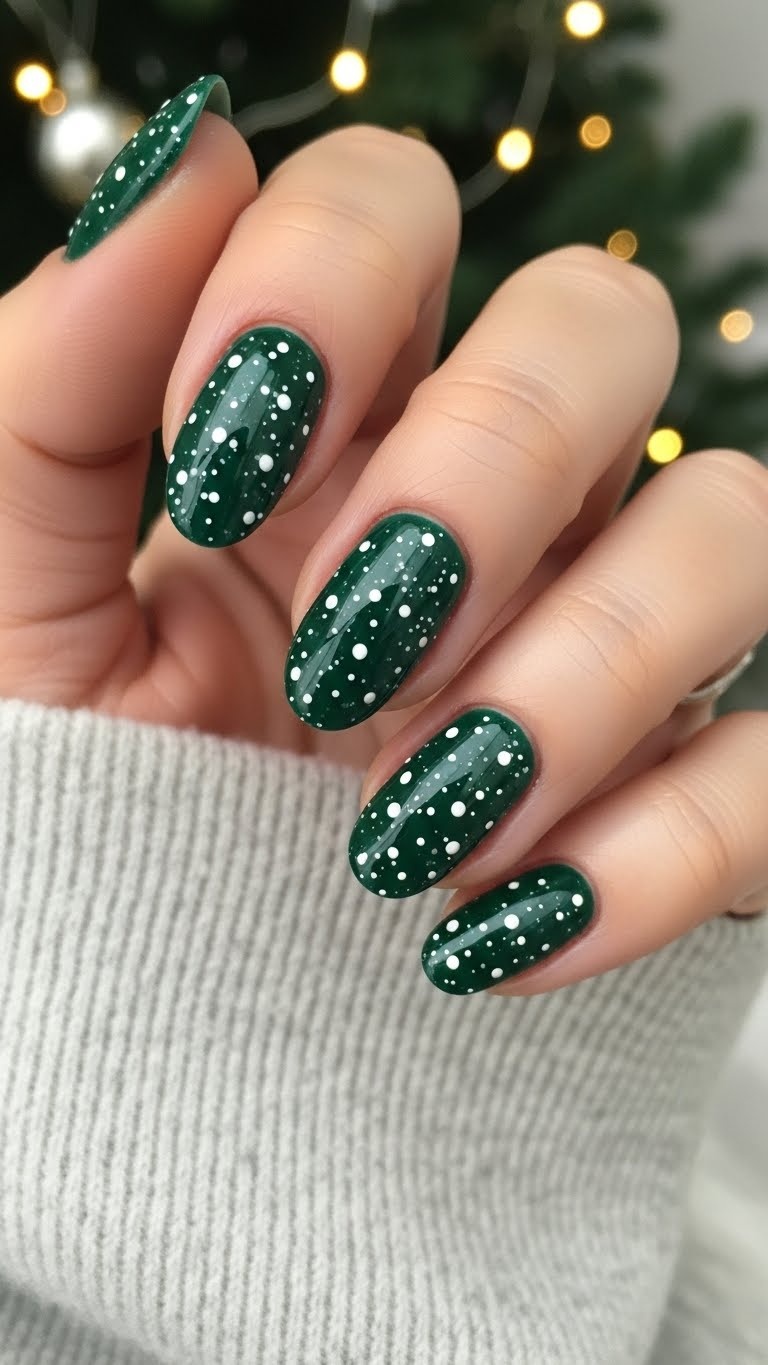
Deep green nails just say “Christmas” without shouting. They look rich and festive but not wild.
Dot on some tiny white spots to look like falling snow. It’s an easy way to get that winter vibe.
Don’t worry about perfect dots. A little randomness makes it feel more real.
Short nails or long, this design works for everyone.
Expert Tip from KidsCareIdeas: “Toothpicks make the best dotting tools. Space out your dots so your nails don’t look crowded.”
5. Candy Cane Stripes on a Nude Base
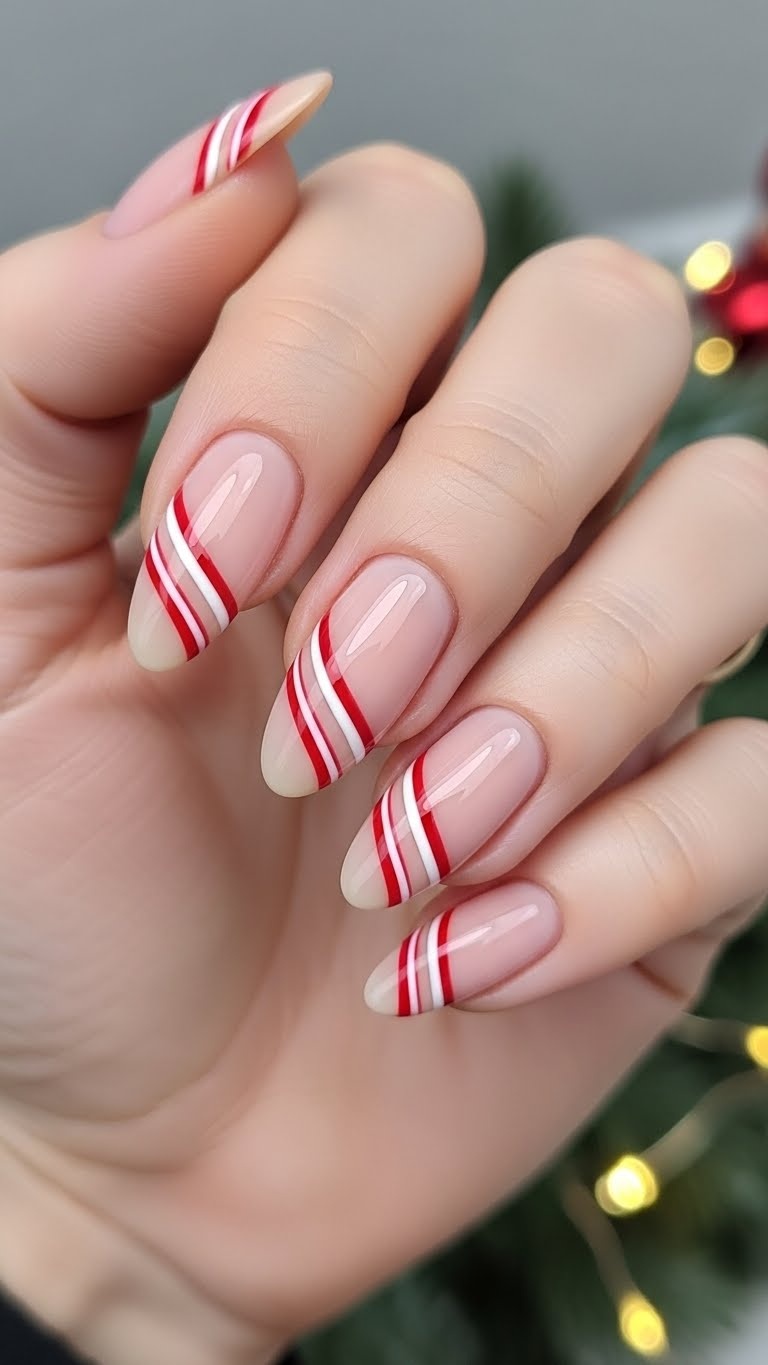
Candy cane stripes are a holiday classic. Start with a nude or soft pink base for a gentle, pretty look. Then add skinny red and white stripes on top.
That contrast between the nude and the stripes makes your nails pop without being too much. Play around with the thickness or direction of the stripes if you’re feeling creative.
This style looks good whether your nails are short or long. It’s festive but still feels chic.
Expert Tip from KidsCareIdeas: “A fine brush keeps your stripes sharp. If you mess up, a Q-tip with a dab of remover fixes it in seconds.”
6. Sparkly Silver with Rhinestone Clusters
If you want some sparkle but still want to look put together, go for a sparkly silver polish. It catches the light and feels festive, but never tacky.
Stick a few rhinestone clusters on one or two nails for a little extra wow. Put them near the cuticle or at the tip—either way, they’ll stand out.
Rhinestones add texture and shine without needing bright colors. Just use strong nail glue so they stay put through all the holiday fun.
This look fits any party or dinner. It’s a little fancy, a little simple.
Expert Tip from KidsCareIdeas: “Seal rhinestones with a top coat to keep them secure. Pick a silver polish with fine glitter for the best finish.”
7. Dark Burgundy Velvet Finish
A deep burgundy velvet finish gives your nails a cozy, rich look. It’s like wrapping your fingertips in a soft holiday ribbon.
This finish is matte, so your nails stand out without being shiny. It’s simple, classy, and perfect for the season.
You can wear it on every nail or toss in some gold glitter on one or two for a bit of sparkle.
Expert Tip From KidsCareIdeas: “A matte top coat is the secret to that velvet look. It keeps your nails soft and smooth all day.”
8. Subtle Gold Foil Flakes on Sheer Pink
Want something classy but still festive? Try a sheer pink base so your natural nails peek through. Then, tap on a few gold foil flakes. They catch the light in a soft, pretty way.
This look is perfect if you like simple nails with a touch of sparkle. Gold flakes go on easily and dry fast. You can wear this with any outfit and look polished.
Expert Tip from KidsCareIdeas: “Seal with two layers of clear topcoat to keep those gold flakes in place and add shine.”
9. Plaid Patterns That Scream Christmas Sweater
Plaid nails bring cozy Christmas sweater vibes to your hands. Mix up red, green, white, and maybe a bit of gold for a fun pattern. It’s like your nails are wearing mini sweaters—without the itch.
Start with one solid color, then use thin lines to make the plaid. Don’t stress about perfect lines; the charm is in the homemade feel. Add a few dots or snowflakes between the lines if you want more holiday spirit.
Plaid nails work with any outfit. They’re simple, stylish, and just the right amount of festive.
Expert Tip from KidsCareIdeas: “Thin nail art brushes or striping tape keep your lines clean. Use a good top coat so your design lasts.”
10. Glossy Black with Metallic Red Tips
If you want nails that are simple but still pop, try a shiny black base. The gloss makes them look sleek.
Add metallic red tips for a festive touch that’s not too much. This combo works with any outfit, day or night.
Keep your nails natural-shaped or a little rounded for a classic look.
It’s easy to do at home, or your nail artist can help with a clean color line. Contrast is the name of the game here.
Expert Tip from KidsCareIdeas: “A quick-dry top coat keeps the shine and stops chips. Metallic polish needs sealing to last.”
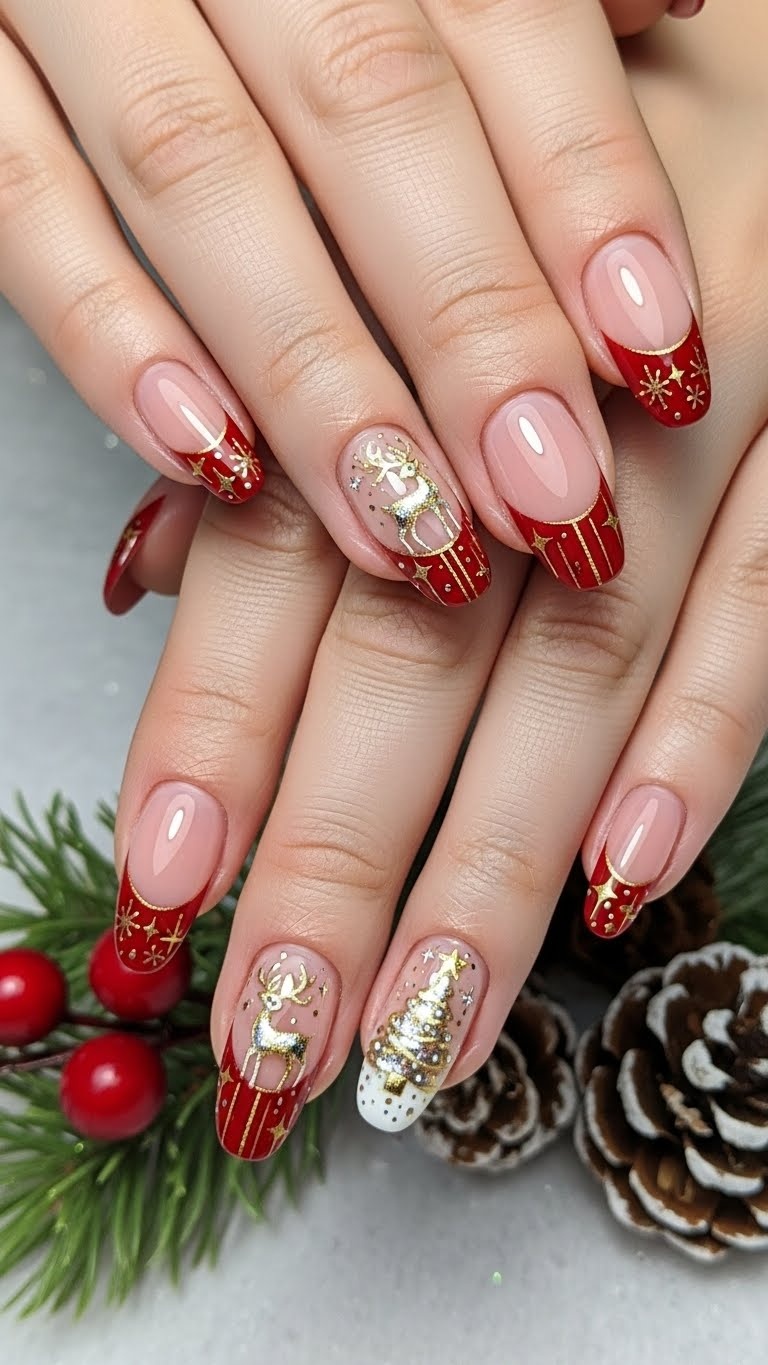
11. Tiny Christmas Tree Decals on Each Nail
Want a festive look that’s easy and cute? Tiny Christmas tree decals are perfect. Pop one on each nail for a fun, matching design. These little trees bring holiday cheer without going wild.
Pick a neutral or classic red base so the green trees stand out. Decals are easy to apply yourself, or you can get them at a salon. They last longer than hand-painted trees and look super tidy.
This style fits any nail shape and is quick to change up if you get bored. You’ll be ready for every holiday party.
Expert Tip from KidsCareIdeas: “Peel decals gently so they don’t tear. Use a top coat to keep them glossy and safe.”
12. Shimmering Rose Gold with White Snowflakes
If you want nails that look fancy and festive, go for shimmering rose gold. The soft pink shine is classy and flatters any skin tone.
Add little white snowflakes for that Christmas touch. They don’t need to be perfect—dots and lines work just fine.
This combo isn’t too bold but still says you’re feeling the holiday spirit. It’s great for parties or just everyday winter style.
Expert Tip from KidsCareIdeas: “Use a thin brush or nail sticker for snowflakes. A clear topcoat keeps your design sparkling.”
13. Glossy Navy Blue with Silver Stars
Deep navy blue nails look classy and a bit different from the usual holiday colors. Add tiny silver stars for a bit of sparkle that’s not too much.
The stars catch the light and make your nails shine. This look works for both day and night. You can try little dots or bigger stars, whatever you’re feeling.
Finish with a clear glossy top coat for a smooth, long-lasting shine.
Expert Tip from KidsCareIdeas: “A toothpick or dotting tool helps you place stars neatly. Always use a top coat to keep the shine and stop chips.”
14. Glitter Ombre from Base to Tip
Glitter ombre nails start with a solid color at the base and fade into sparkles at the tip. It looks fancy but is easy to do at home with a sponge. Dab glitter polish from the middle to the tip for a smooth fade.
Pick glitter that matches your base for a subtle look, or go bold with a contrasting color. This style works on any nail length and with matte or shiny finishes.
Expert Tip from KidsCareIdeas: “A clear topcoat keeps the glitter in place and stops chipping. Let each layer dry before adding the next for the best results.”
15. Red Velvet Nails with Pearl Accents
Red velvet nails feel rich and cozy, just like a slice of cake. The deep red color makes your hands look warm and festive.
Add small pearl dots to a few nails for a classy touch. Pearls aren’t too flashy, but they catch the light perfectly. It’s an easy way to make your nails look special.
Switch up the size of the pearls or place them near the cuticle for a neat finish. You’ll look like you spent ages on your nails, but it’s actually pretty quick.
Expert Tip from KidsCareIdeas: “A matte topcoat makes the velvet effect stand out. Stick pearls on while the polish is tacky so they stay put.”
Choosing the Perfect Christmas Nail Palette
Picking your Christmas nail colors sets the mood for your whole look. Go for shades that feel festive but also fit your style. Do you want classic colors, or do you love a bit of sparkle?
Classic Holiday Hues Explained
Red, green, and white are the go-to Christmas colors. Red is bold and festive—great if you want your nails to stand out. Green feels fresh and natural, while white is like snow on your fingertips.
You can mix these up or use them solo. A deep red polish looks elegant by itself. Or try green nails with tiny white dots for a snowy look. These shades never go out of style and match any holiday outfit.
Metallics and Shimmers: A Festive Upgrade
If you want to make things more fun, add metallics like gold, silver, or rose gold. These shades catch the light and bring a party vibe. Shimmers with glitter or fine sparkles make your nails look special without being too much.
Try a metallic base with matte tips for a cool twist. Silver glitter over red is a mix of classic and modern. These options make your nails pop at any gathering or even just hanging out.
Tips for Long-Lasting Elegant Holiday Nails
Want your nails to last through every holiday event? Focus on prepping and finishing. These steps help your polish stick and stay shiny.
Prepping Your Nails Like a Pro
Before you grab your favorite polish, make sure your nails are clean and dry. Wipe them with nail polish remover to get rid of old polish and oils. This helps the new color stick better.
Shape your nails with a file. Rounded or square tips both look elegant. Buff the surface lightly to smooth out any ridges so your polish goes on even.
Gently push back your cuticles—don’t cut them. Healthy cuticles protect your nails and help your manicure last. Wash your hands to get rid of dust and oils before you start painting.
Topcoats and Tricks for Shine and Strength
Once you’ve got your color on, it’s time to lock it in with a solid topcoat. I always reach for a gel-like, quick-dry topcoat because it gives that glassy shine and keeps chips at bay.
Try brushing on a fresh topcoat every couple of days. It brings back the shine and keeps your nails protected. If you notice a tiny chip, just swipe on another layer—no one will ever know.
Want your nails to last longer? Skip the hot water and steer clear of those strong cleaners. I throw on gloves for dishes or cleaning—honestly, it saves so much hassle.
Keep a little nail oil nearby and rub it into your cuticles when you remember. It stops them from getting dry and helps keep your nails from peeling. Just a bit of TLC, and your manicure can look fresh way longer.
