Winter nails can totally change your vibe with just a few swipes of polish. Whether you like subtle frosty shades or want to go bold with cobalt, you’ll find something here that fits your mood—and maybe even your plans for the week.
Let’s talk easy ways to mix matte, shimmer, and a bit of nail art for cozy, long-lasting blue nails.
Turn these ideas into a salon request or just have fun with a DIY session at home. Your hands will look ready for snowy days, parties, or even just running errands.
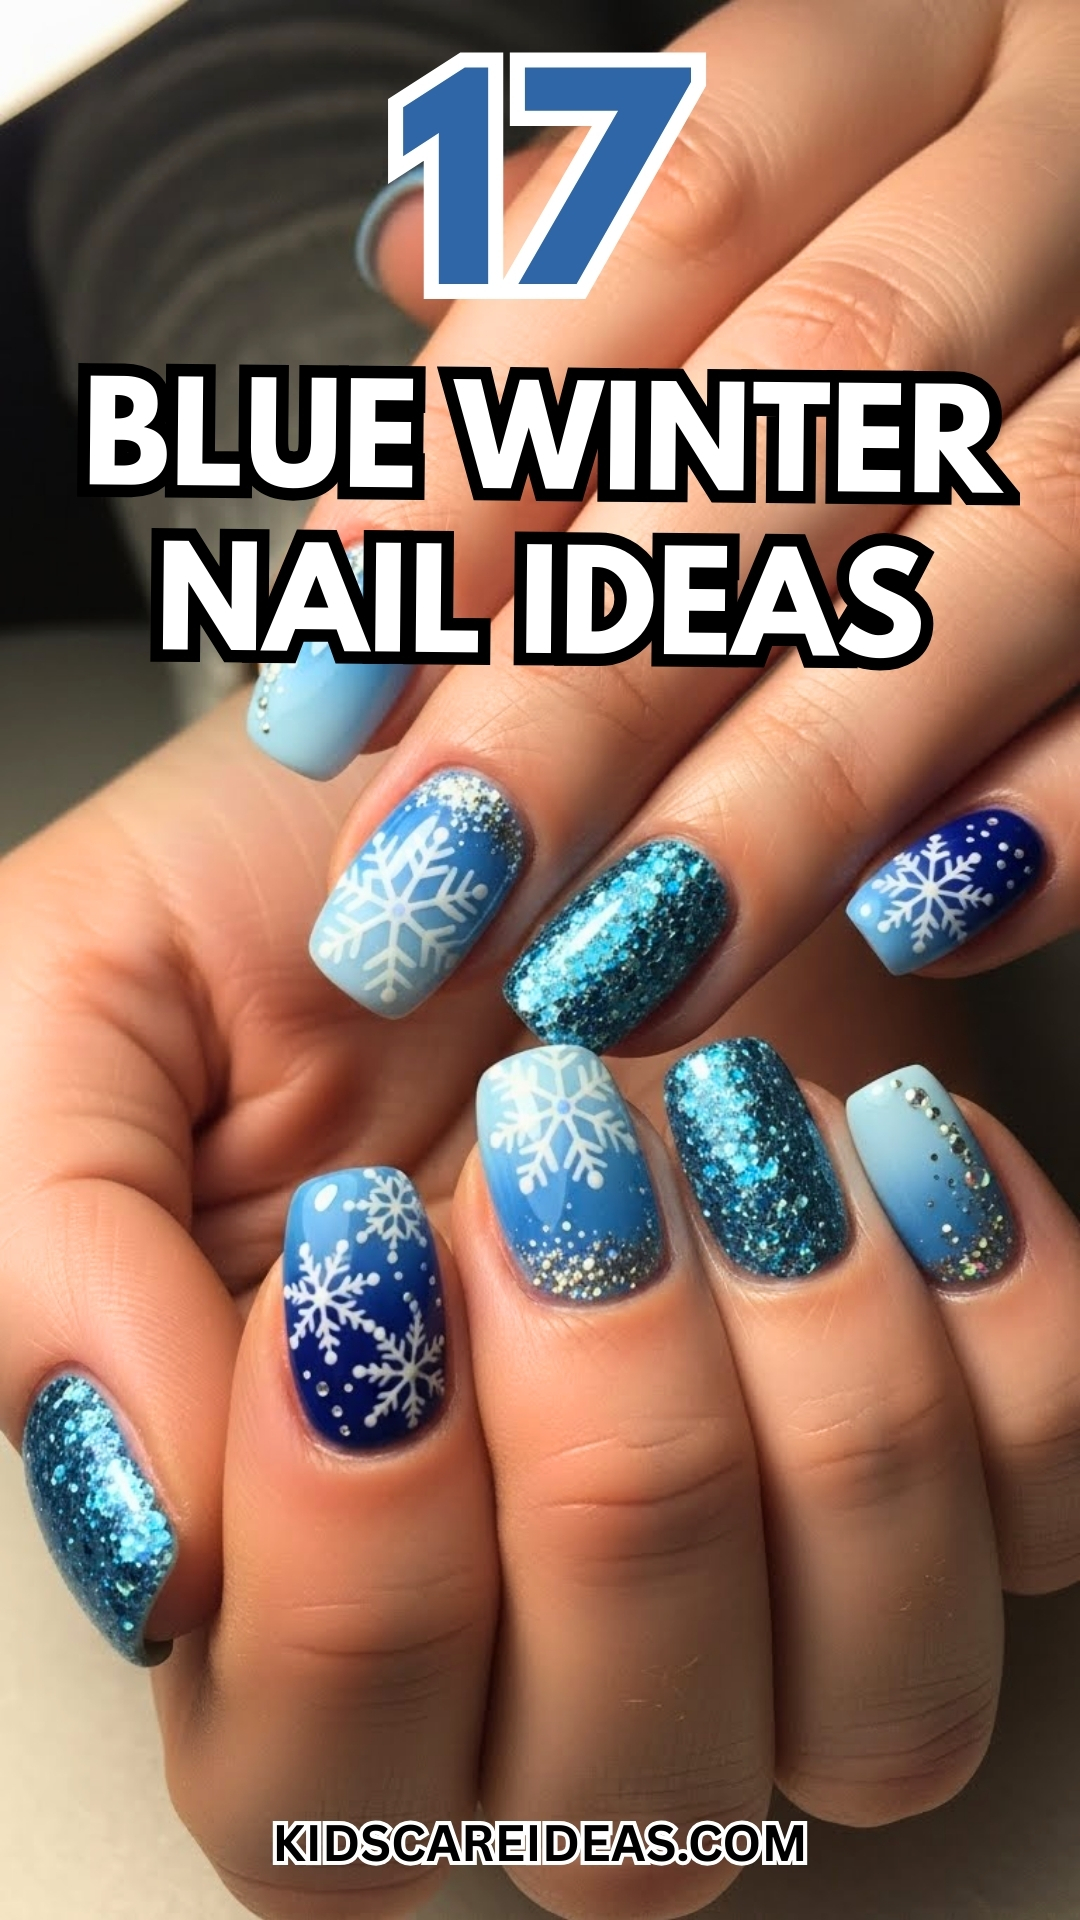
1. Frosted Indigo Tips with Silver Sparkle
Go for deep indigo tips and finish with a frosted matte topcoat. The dark base lets the frosty finish really stand out, but it’s not too loud.
Brush on thin silver glitter right along the smile line. It’ll catch the light every time you move your hands.
Keep the glitter line narrow so things stay chic, not wild. This look works on both short and long nails.
Try a steady hand or grab a striping brush for those crisp edges.
Expert Tip from KidsCareIdeas: “Apply a peel-off base if you want easy removal later.”
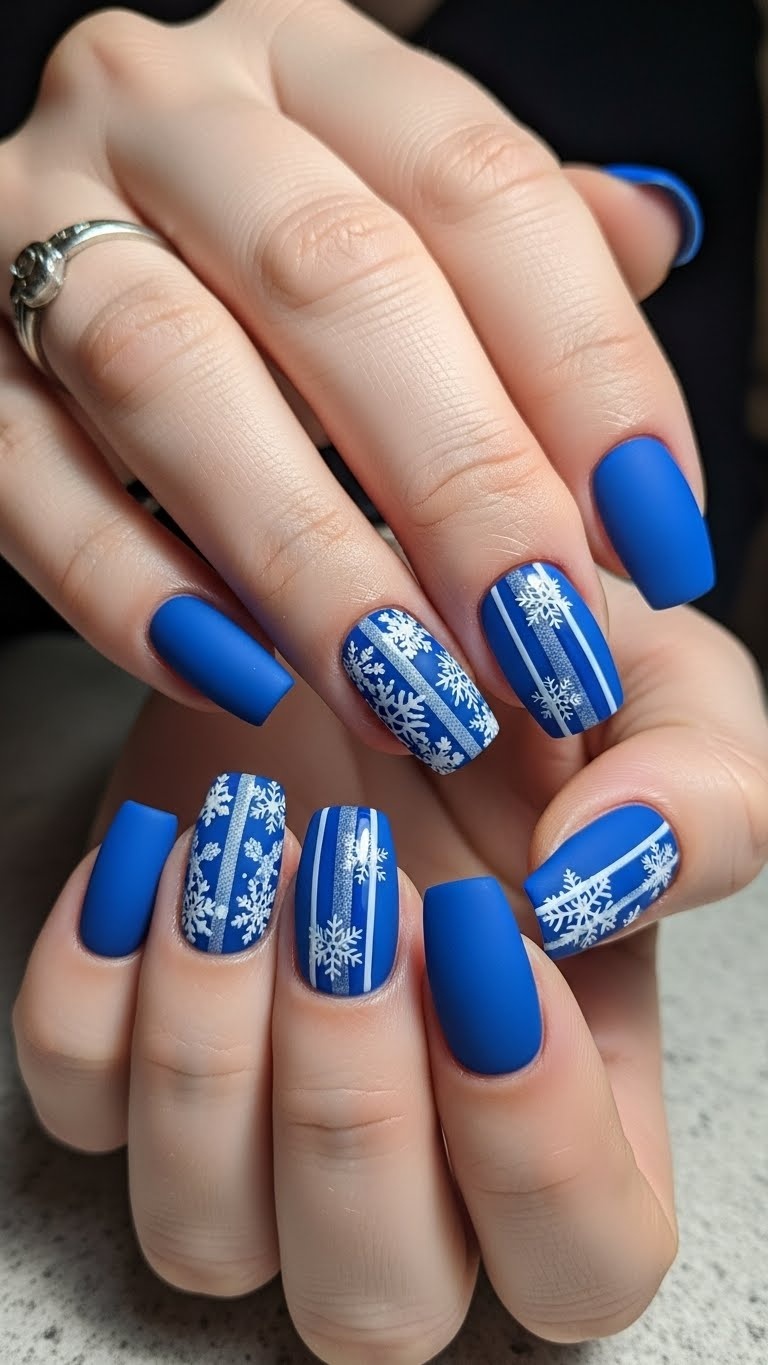
2. Matte Navy Blue with Snowflake Decals

Pick a deep matte navy for your base. It’s simple, modern, and makes white snowflakes stand out like crazy.
Stick on a few snowflake decals—one or two per hand keeps things balanced. Mix in some tiny dots to look like falling snow.
Short to medium nails feel extra cozy with this look. Don’t forget a matte top coat to lock it all in.
Expert Tip from KidsCareIdeas: “Place decals with tweezers for precise placement and press gently to avoid bubbles.”
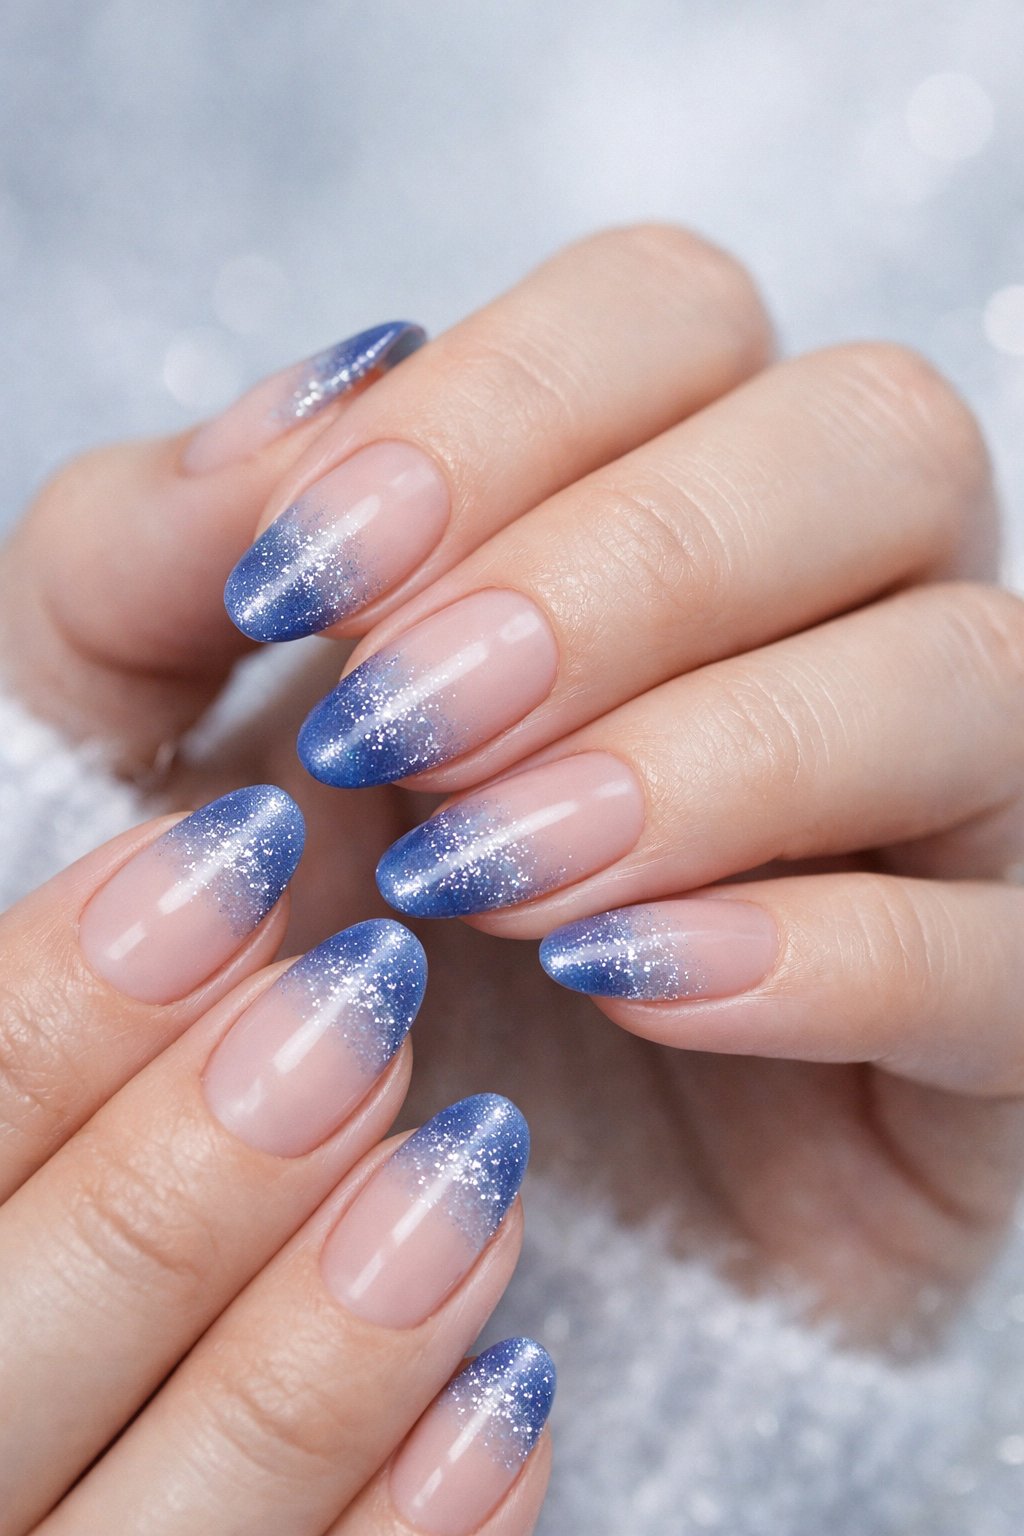
3. Glittery Ice Blue Ombre
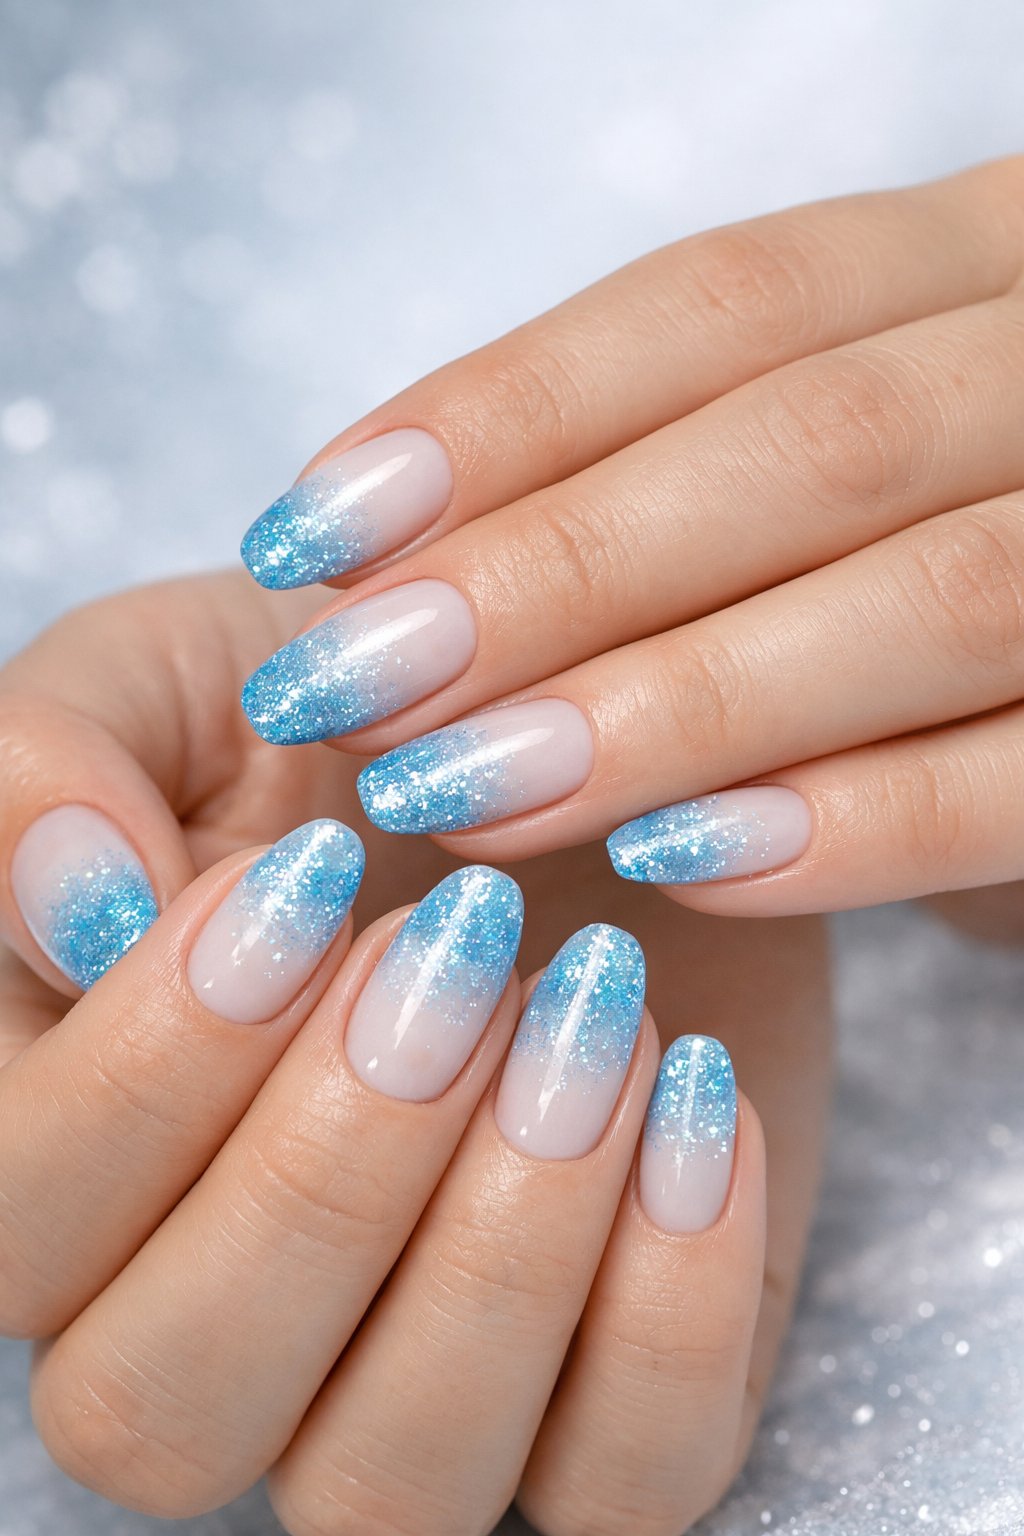
If you want sparkly, icy nails without a ton of effort, this is your jam. Start with pale blue at the cuticle, then blend to frosty white at the tip for a soft ombre.
Dab on some fine silver glitter over the blue. Use a makeup sponge to blend it all out and get that smooth gradient.
Finish with a glossy topcoat so your nails look glassy and the glitter stays put. Short to medium nails work best for this wintry vibe.
Expert Tip from KidsCareIdeas: “Use a clear polish as a base to help the sponge blend smoothly and prevent staining. Work in thin layers and cure or dry fully between coats to avoid clumping.”
4. Electric Blue Accents on White
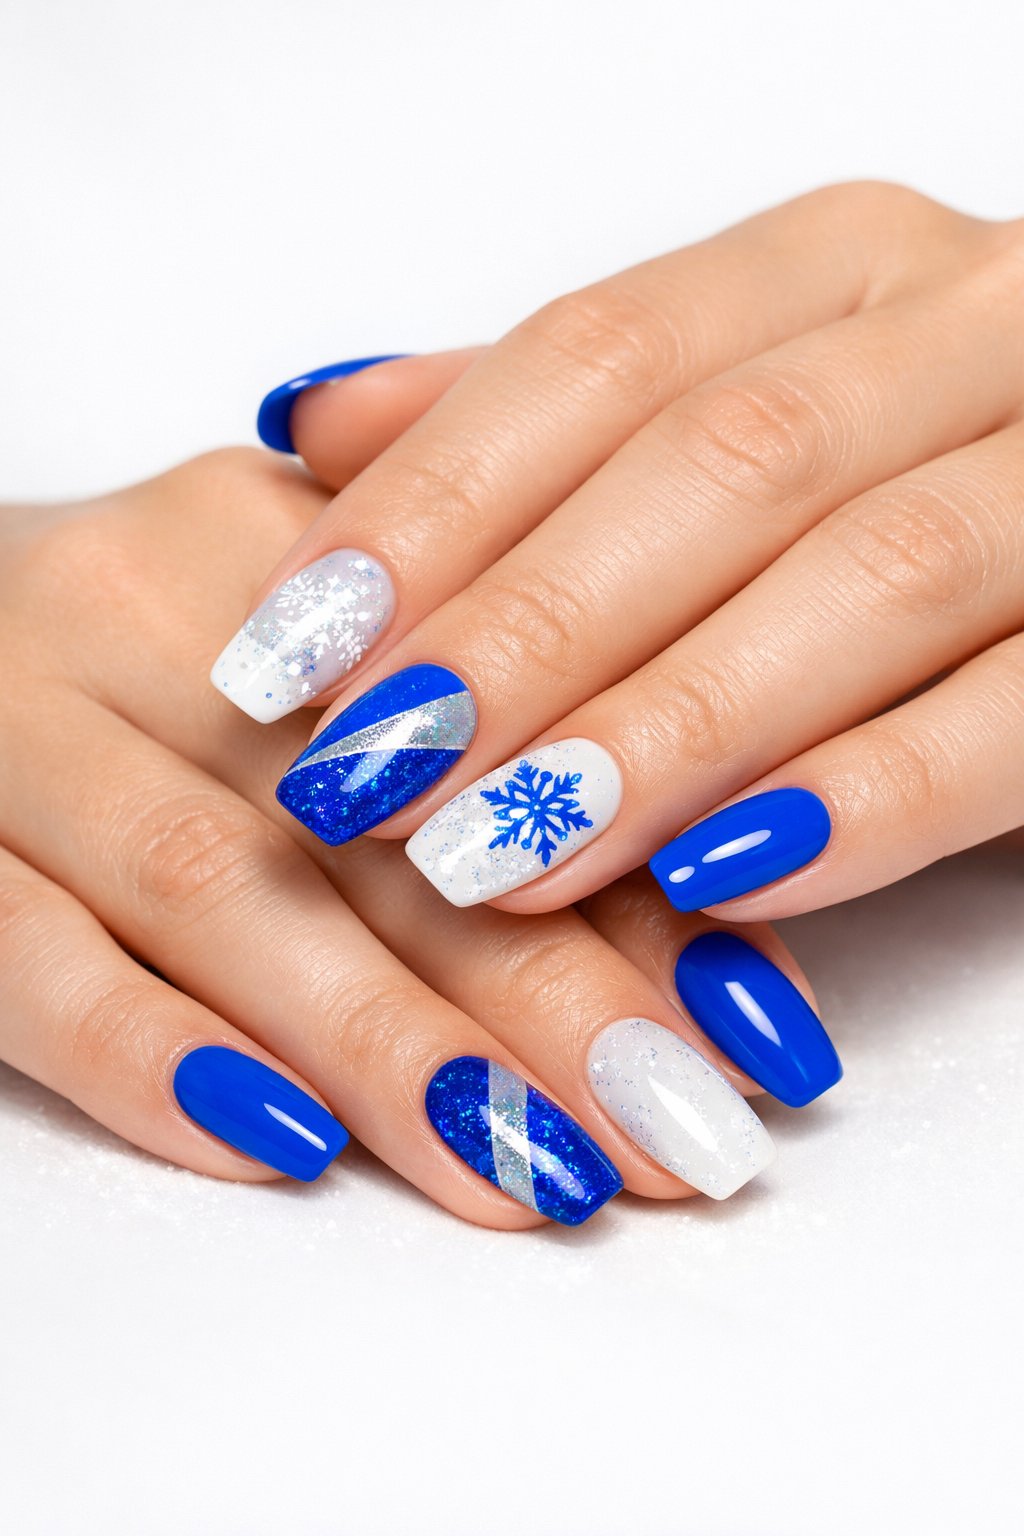
Paint your nails crisp white, then add thin electric blue stripes or tiny dots for a modern look. Throw in a solid electric blue accent nail if you’re feeling bold.
Try a white base with a blue French tip for a fresh twist. Want to go wild? Add stars or lightning bolts with a dotting tool.
Use striping tape or a fine brush for sharp lines. Glossy topcoat keeps everything shiny and chip-free.
Expert Tip from KidsCareIdeas: “Use fast-dry topcoat and wait 30 seconds between layers to avoid smudges.” Expert Tip from KidsCareIdeas: “Practice stripes on a plastic card before painting your nails for steadier lines.”
5. Deep Sapphire with Rhinestone Accent
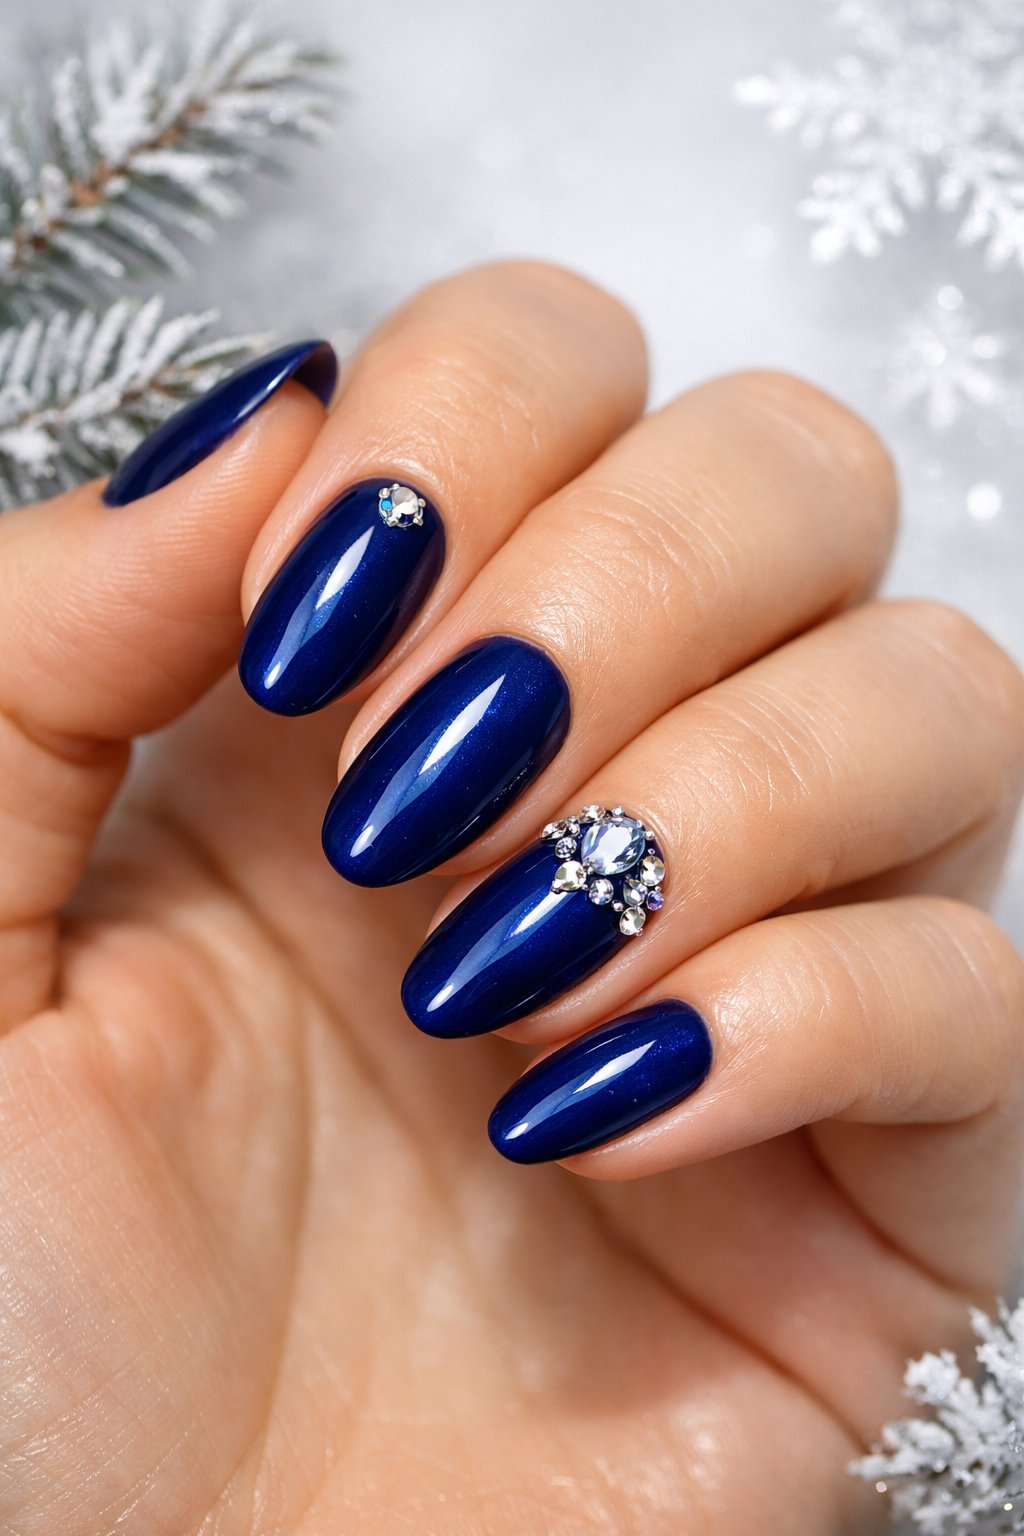
Grab a rich sapphire shade for a wintery, elegant look. This color looks great on any nail length.
Stick a rhinestone near the cuticle or at the tip for instant glam. Use clear nail glue so your gem doesn’t go flying during hand washes.
Let the rest of your nails stay plain so the sparkle stands out. Pair this look with silver rings or a chunky sweater.
Expert Tip from KidsCareIdeas: “Place rhinestones with a toothpick dipped in glue for precise placement.”
6. Metallic Blue Chrome Finish
Metallic blue chrome polish gives you a shiny, mirror-like finish. Start with a dark base to make the chrome pop.
Rub chrome powder onto the tacky layer for that smooth, reflective look. Always seal with a tough top coat so the shine sticks around.
Try a matte accent nail for contrast. Keep your brush strokes light to avoid streaks.
Expert Tip from KidsCareIdeas: “Use a small sponge applicator for chrome powder to avoid streaks.”
Expert Tip from KidsCareIdeas: “Always finish with two thin top coats for longer wear.”
7. Bright Cobalt with Snowman Art
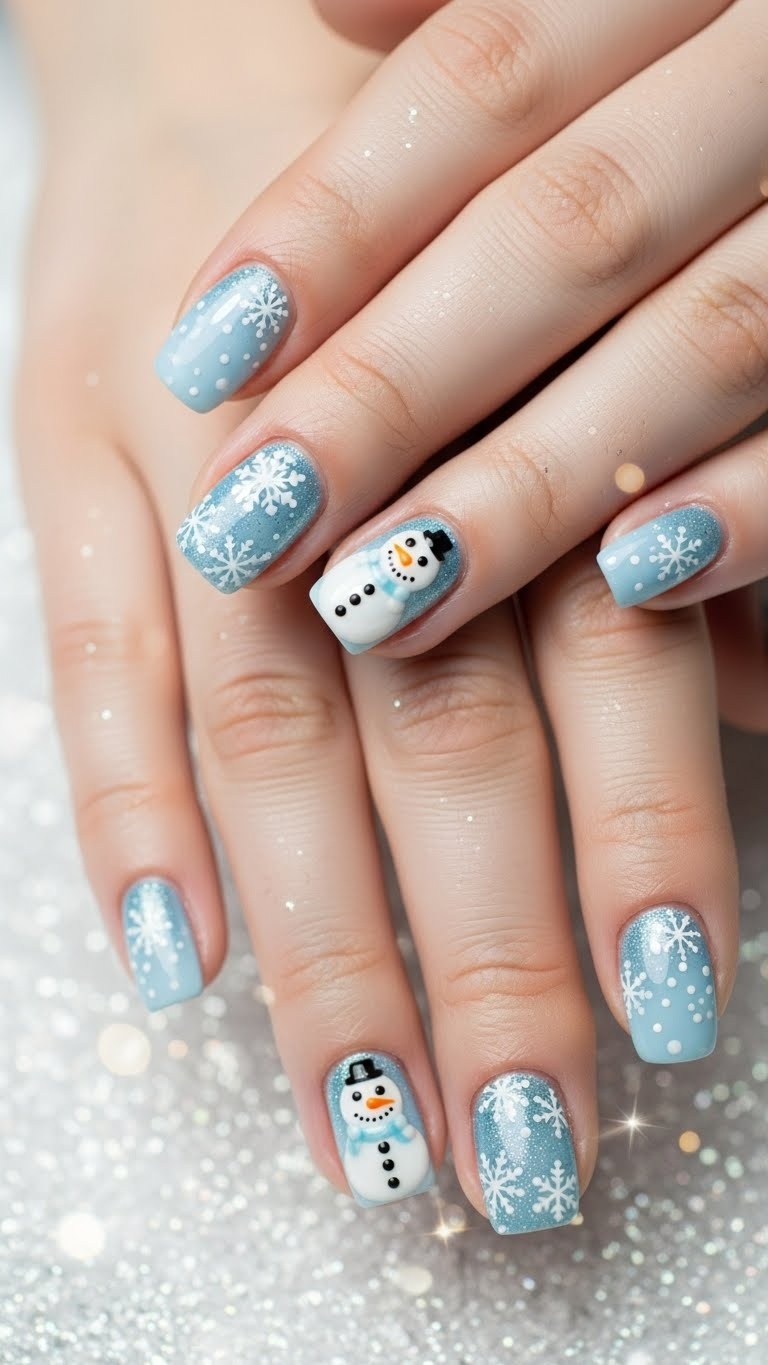
Paint your nails bright cobalt for a bold winter base. This shade really stands out, especially with a little snowman art.
Draw tiny snowmen on one or two accent nails using white dots. Add black for eyes, orange for noses, and a scarf if you’re feeling artsy.
Seal with glossy topcoat to protect your masterpiece. You can do this at home with a toothpick if you don’t have a dotting tool.
Expert Tip from KidsCareIdeas: “Use a toothpick for tiny snowman details if you don’t have a dotting tool.”
8. Sheer Blue Base with White Stripes

Start with a sheer blue polish for that icy, fresh look. The see-through base keeps things light and perfect for winter.
Paint on crisp white stripes across one or two nails. Thin, spaced lines look best and keep things from getting messy.
Try horizontal or diagonal stripes, whatever suits your mood. Top it off with a glossy coat for shine and longer wear.
Expert Tip from KidsCareIdeas: “Use striping tape for straight lines and peel it off while the polish is tacky, not fully dry.”
9. Midnight Blue French Tips
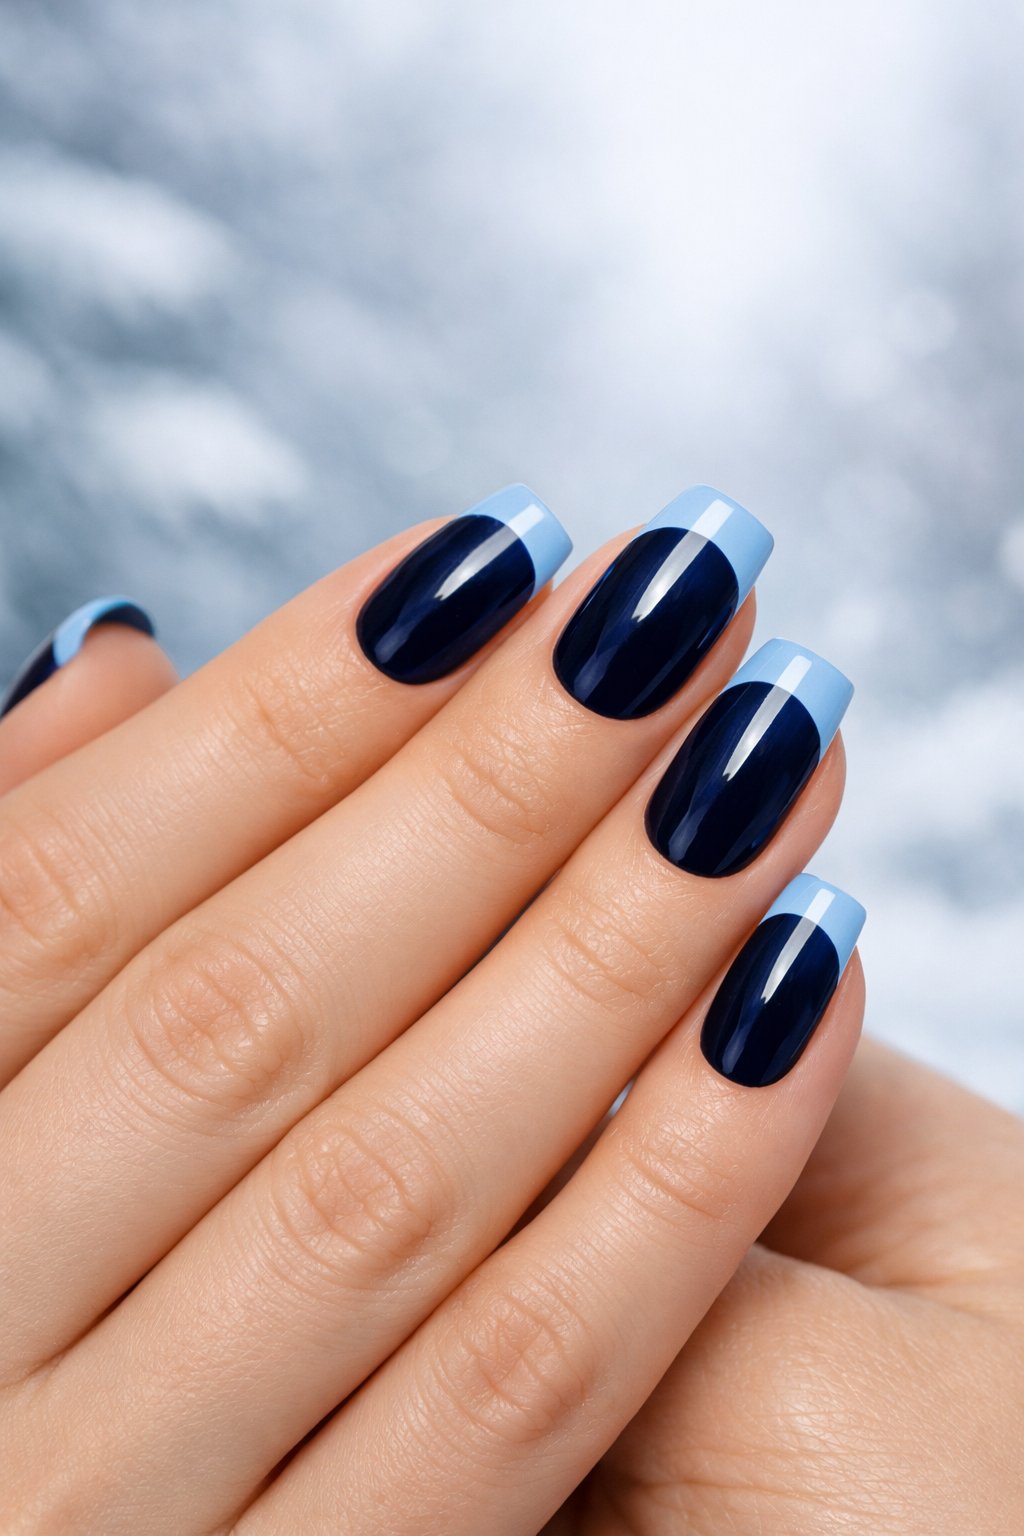
Switch up your French tips by using deep midnight blue instead of white. The dark blue looks dramatic but still neat for winter.
Glossy top coat makes the color stand out and last. Add a skinny silver line under the blue if you want a little sparkle.
You can use this look on natural nails or over a sheer nude base. It works for all nail lengths and pairs well with cozy clothes.
Expert Tip from KidsCareIdeas: “Use a thin brush for crisp lines and wipe it on a paper towel between strokes to avoid clumps. Seal with two thin top coats for longer wear.”
10. Powder Blue with Glitter Gradient

Go for a soft powder blue base for a calm, wintery vibe. Two thin coats give you smooth, even color.
Start the glitter at the tips and fade it toward the middle. It’s shiny, but not over the top.
Use a small sponge to blend the glitter for a nice fade. Finish with a glossy topcoat to keep everything sparkly and chip-free.
Expert Tip from KidsCareIdeas: “Apply glitter in layers, tapping gently for control. Seal with two thin topcoats to keep the gradient smooth and chip-free.”
11. Dark Teal with Tiny Silver Stars

Pick dark teal for a rich, wintery look that still feels fresh. This shade hides chips pretty well, which is always a win.
Add tiny silver star decals or paint a few stars with a thin brush. Keep most nails plain and let the stars shine on accent nails.
Glossy topcoat makes the stars pop and keeps your design safe. This look pairs nicely with silver jewelry or a cool scarf.
Expert Tip from KidsCareIdeas: “Use a toothpick dipped in polish to make small stars if you don’t have decals.”
12. Sky Blue Base with Frosty Dots
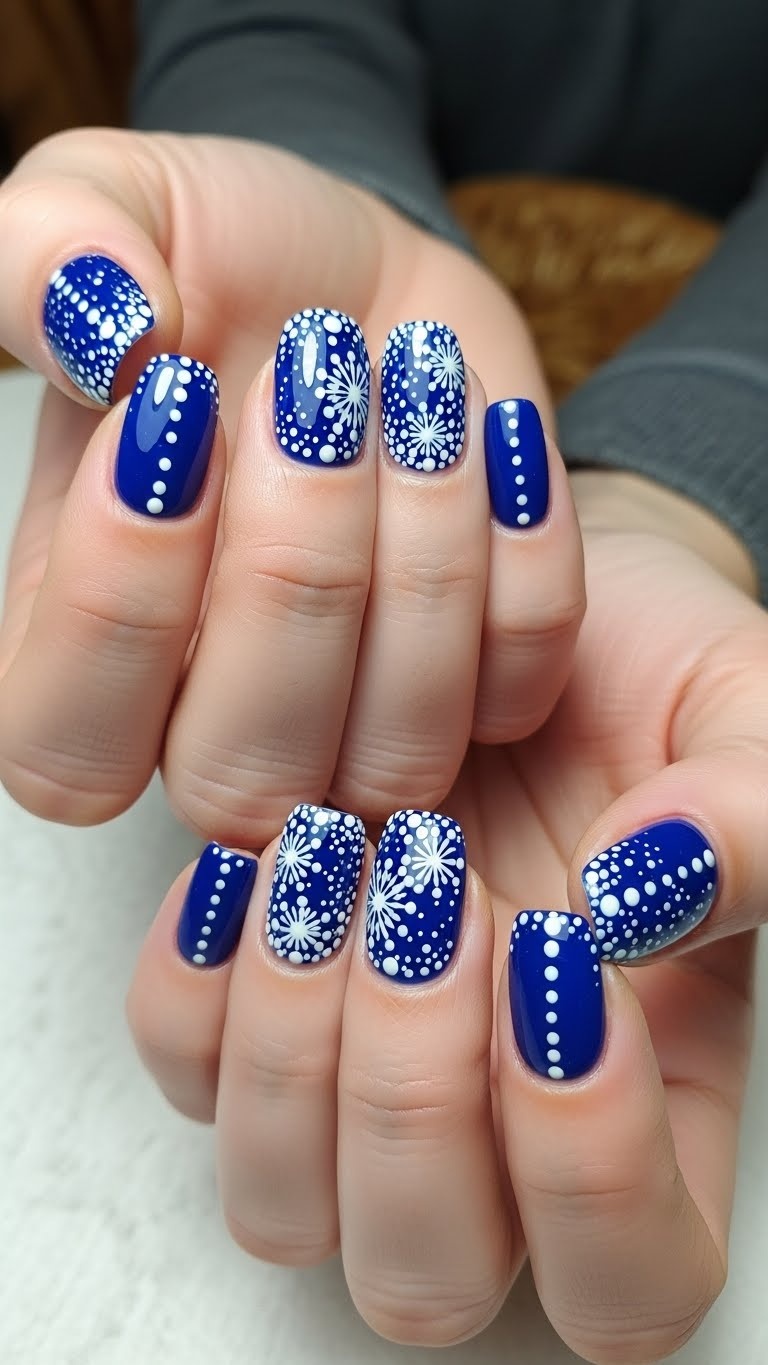
Paint your nails a soft sky blue for a chill winter look. Make sure the base is smooth for the best effect.
Dot on small white or silver spots using a dotting tool or toothpick. Cluster them near the tips and space them out near the cuticles.
Glossy top coat makes the dots stand out and last. This style works on any nail length and suits all skin tones.
Expert Tip from KidsCareIdeas: “Apply a quick-dry top coat after the dots to avoid smudging. Start with a light hand on the dots and build up if needed.”
13. Royal Blue Matte with Glossy Stripes
Go for deep royal blue matte as your base. It’s rich, cozy, and feels just right for winter.
Add one or two thin glossy stripes on each nail. The shine pops against the matte, but it’s not too flashy.
Use striping tape or a thin brush for clean lines. Only topcoat the glossy stripes so the rest stays matte.
Expert Tip from KidsCareIdeas: “Work on one nail at a time when adding glossy stripes to avoid smudges.”
Expert Tip from KidsCareIdeas: “If you mess up, wipe the stripe with remover and redo it—fixes are quick.”
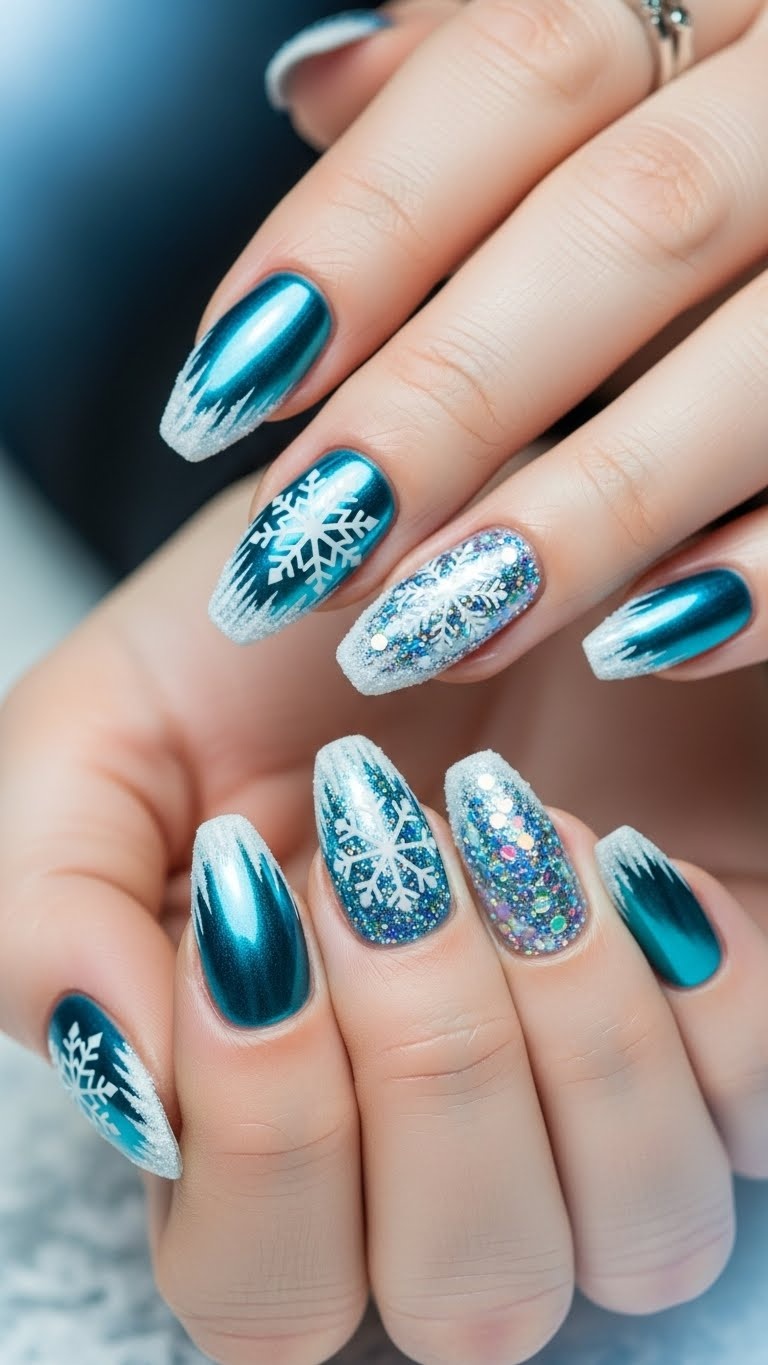
14. Shimmering Turquoise with Snowflakes
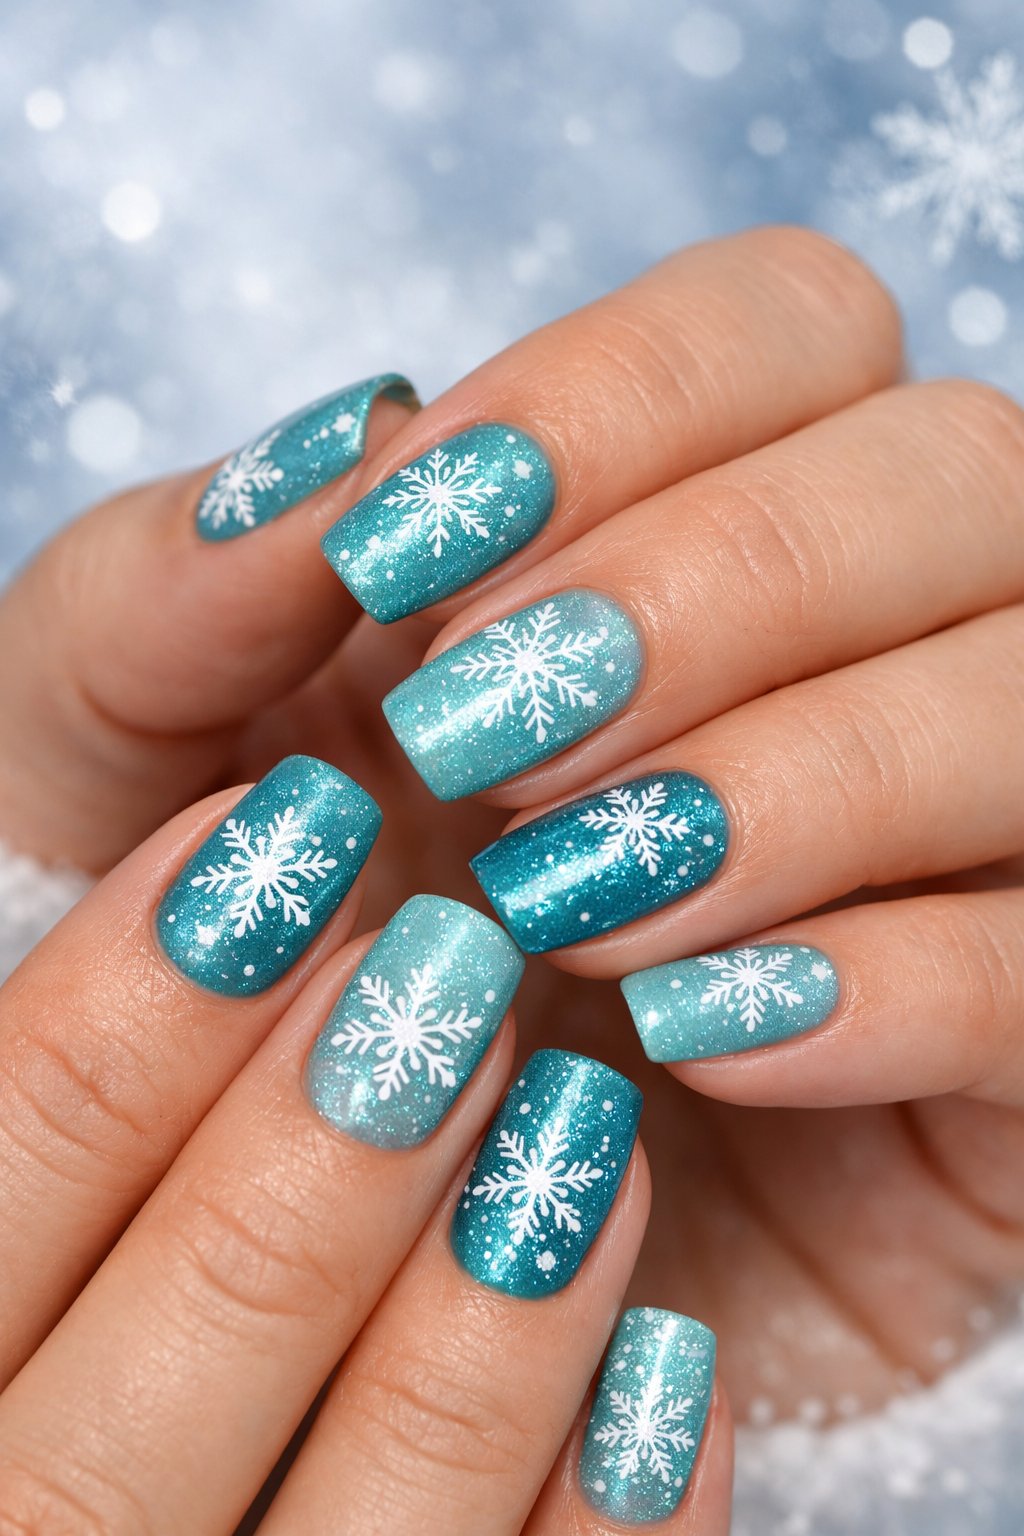
Choose a bright turquoise base with a hint of shimmer. It catches the light just like fresh ice.
Paint tiny white snowflakes on one or two nails. Use a thin brush or dotting tool for crisp details.
Finish with a glossy topcoat to protect the shimmer and add depth. The look feels festive but not over the top.
Expert Tip from KidsCareIdeas: “Apply thin layers of polish and let each dry fully to avoid smudges.”
Expert Tip from KidsCareIdeas: “Stamp or use stickers for perfect snowflakes if freehand feels tricky.”
15. Blueberry Swirl Marble Design

This one totally reminds me of blueberry jam swirled on toast—soft, dreamy, and kind of delicious.
Start with a pale blue base and dab on little spots of navy and white while the polish is still wet.
Grab a thin brush or even a toothpick and swirl the colors together on each nail. You want to work fast, one nail at a time, so everything blends before it dries.
Finish it up with a glossy topcoat to lock in that marble look. This style pops on both short and almond shapes.
Expert Tip from KidsCareIdeas: “Use a small dotting tool for more control when swirling colors.”
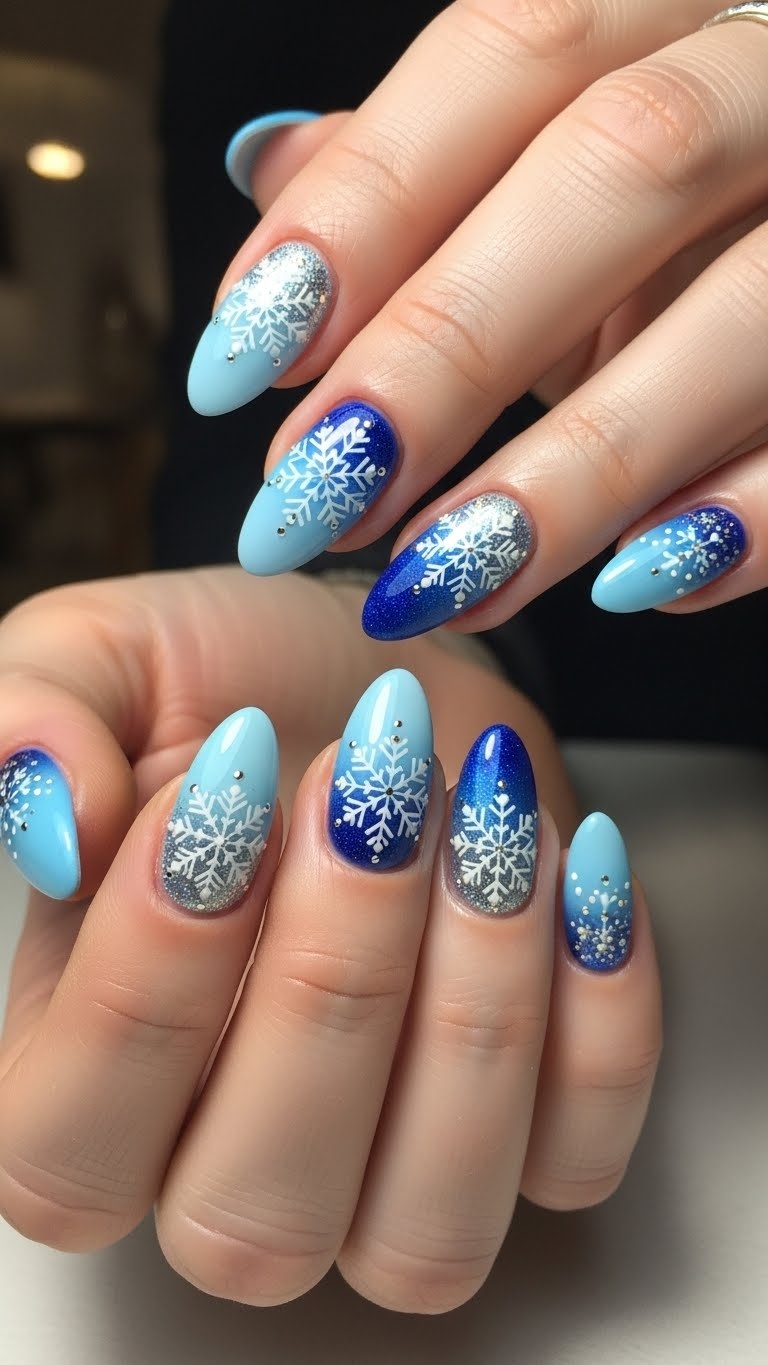
16. Navy Gradient with Holographic Flakes
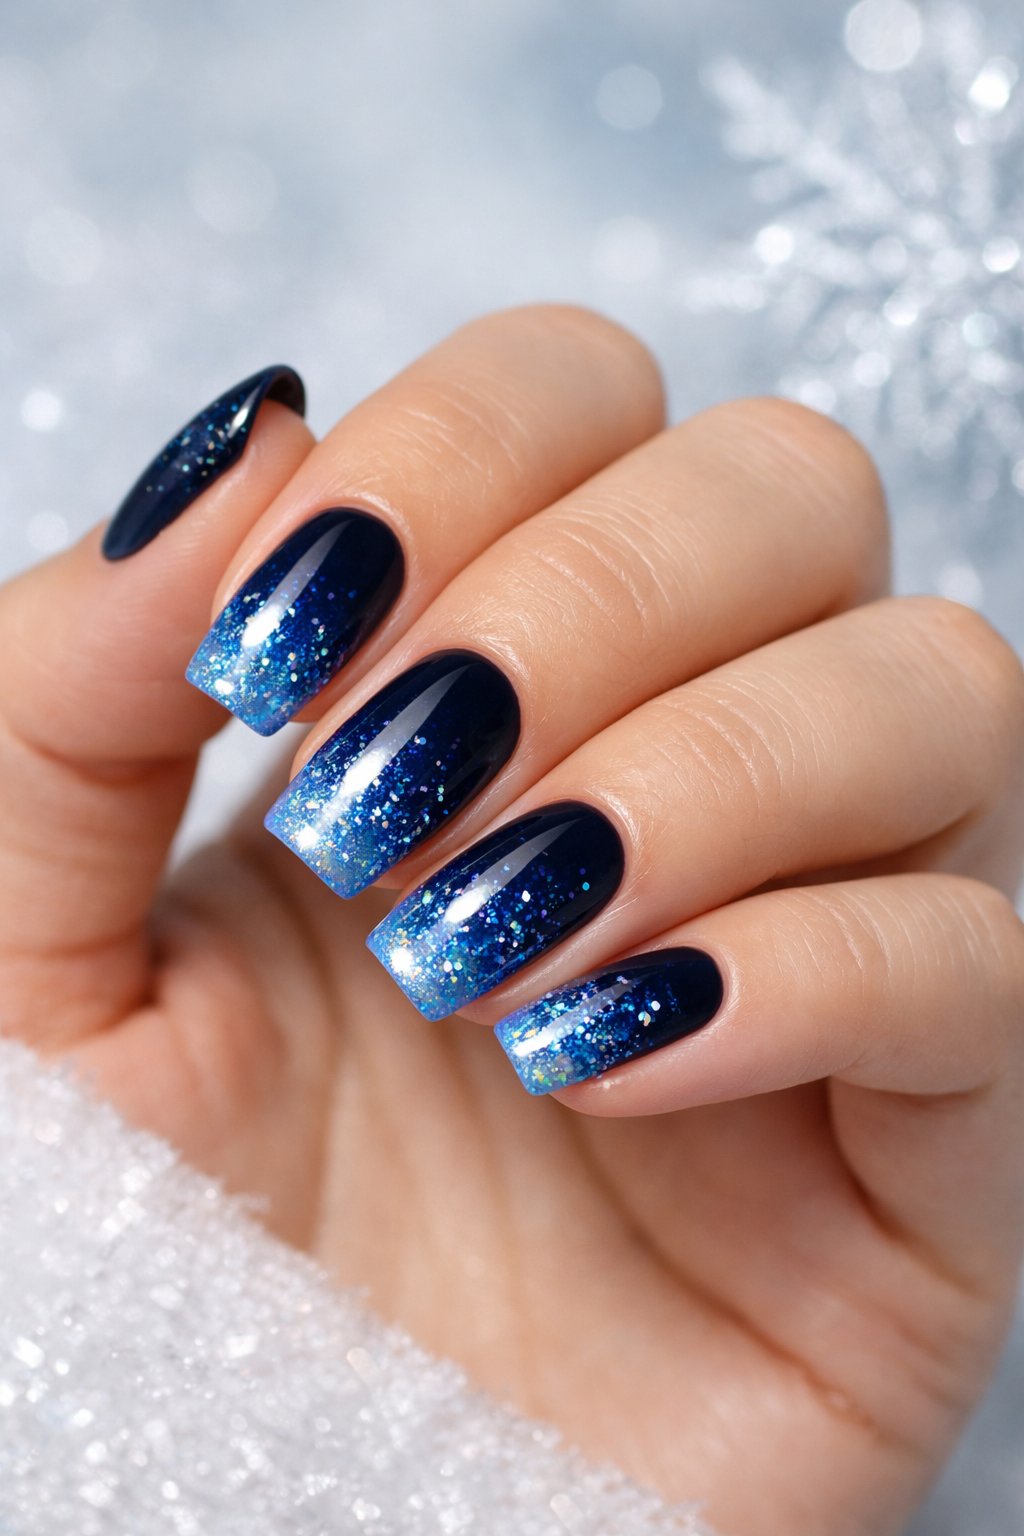
Go bold with a deep navy at the tips and fade it out to a lighter blue near your cuticle.
A sponge or brush makes blending way easier—just tap until you get that smooth ombré effect.
While the polish still feels a bit tacky, gently press on some tiny holographic flakes right in the middle. These little guys catch the light and give you that icy, sparkly vibe without going full disco ball.
Top it off with a glossy coat to smooth things out and boost the shine. This look is super flexible, working on both short and long nails, and honestly, it looks awesome with silver rings.
Expert Tip From KidsCareIdeas: “Use a peel-off base for easy removal if you try lots of flakes. Work in thin layers to avoid clumping.”
17. Baby Blue with Tiny Mittens
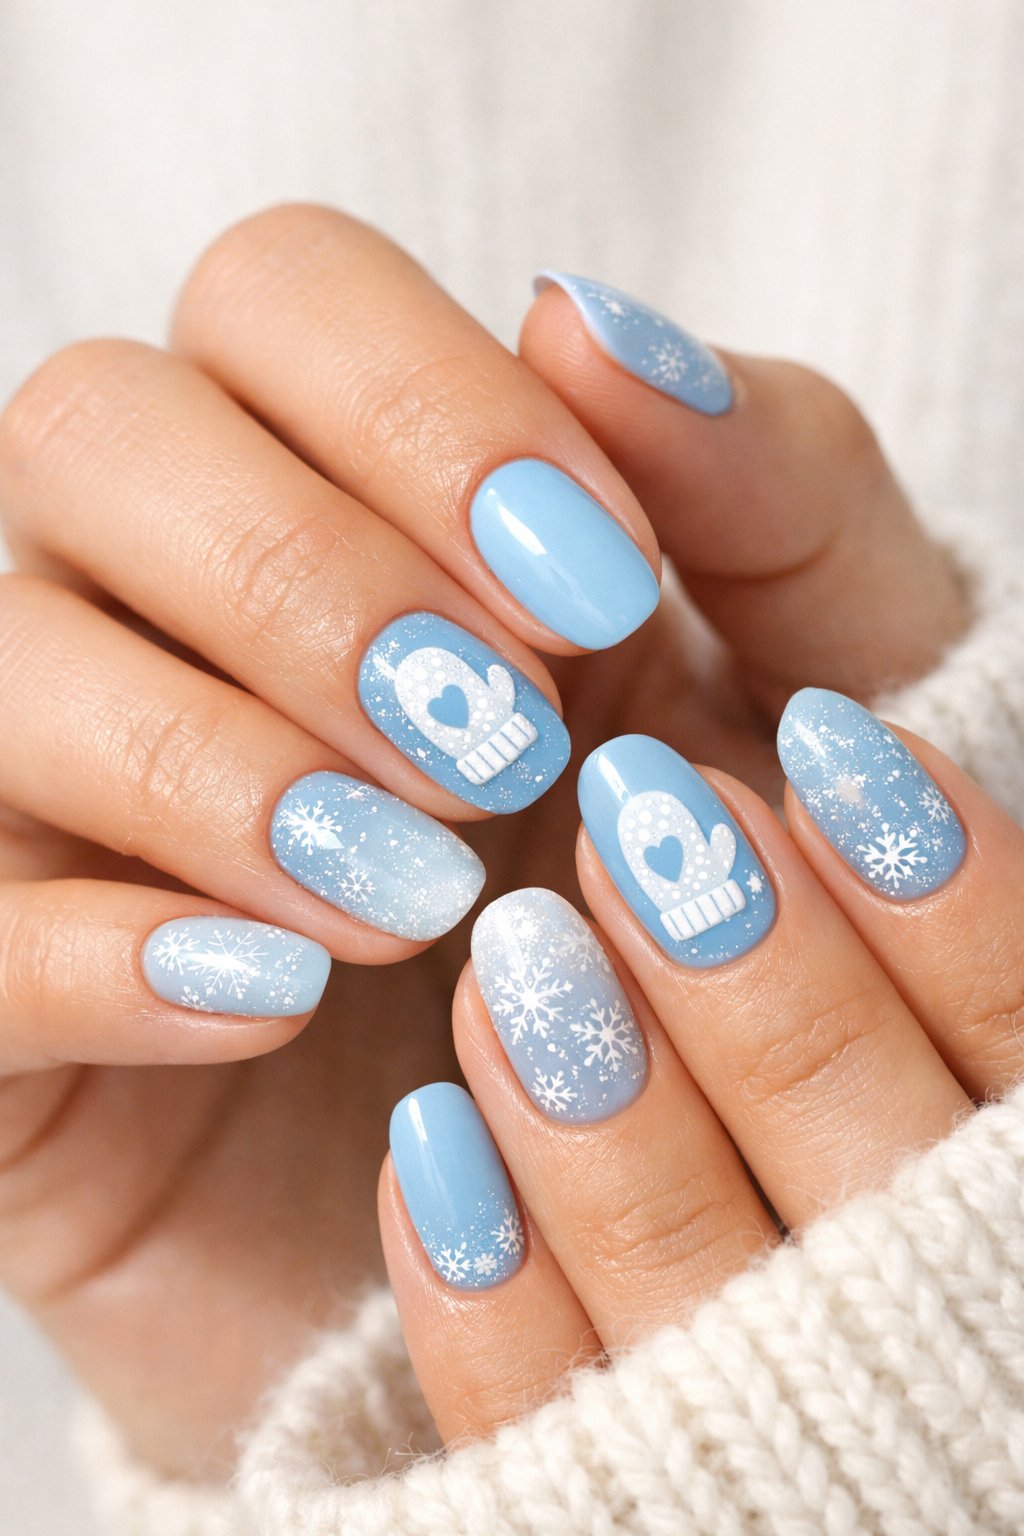
Nothing says cozy like a soft baby blue base in winter. It’s fresh, simple, and just feels right.
Add little white mittens to a couple of accent nails. Keep the mittens basic—just an oval with a cuff—so they stay cute and don’t get messy.
A thin brush or dotting tool helps keep your lines neat. Seal it all with a glossy topcoat for extra shine and to protect your mini mittens.
Expert Tip from KidsCareIdeas: “Practice mitten shapes on paper first, then transfer them to your nail for steadier lines.”
How to Choose the Perfect Shade of Blue
Picking a blue polish isn’t just about grabbing the first bottle you see. Think about your skin tone and the clothes you love to wear.
Hue, brightness, and finish all matter if you want your nails to look like you meant to pick that shade—not like you just rolled with whatever was on sale.
Understanding Skin Tones
Check your wrist veins in natural light. Green veins mean you’re probably warm-toned. Blue or purple veins? You’re cool-toned. If you can’t really tell, you might be neutral.
Warm skin tones look amazing with teal, turquoise, or navy with a bit of gold shimmer. These colors bring out your warmth without clashing.
Cool tones? Go for ice blue, cobalt, or indigo with silver or pearly finishes. These shades brighten your skin and just look extra crisp.
If your skin is neutral, try true blue or denim shades. Both matte and glossy finishes work here. Not sure? Paint one nail or use a swatch stick before you commit.
Pairing Blue Nails With Winter Outfits
Look at your coat and accessories before picking your polish. Dark navy or deep teal nails look sharp with black coats and boots.
Lighter blues pair well with gray, cream, or camel wool. It’s all about balance.
For jewelry, silver or white gold pops with icy blues and indigos. Gold and brass shine with teals and turquoise. You don’t have to match exactly—sometimes a little contrast is even better.
Think about textures and patterns too. Chunky sweaters handle bold, matte blues. Glossy or pearly nails look great with sequins or wool. If you want a little variety, keep one or two accent nails in a different color.
Essential Tips for Long-Lasting Winter Nails
Cold air and all those household chores can really mess with your manicure. If you want your blue polish to last, you’ve got to prep well, keep nails hydrated, and use a good top coat.
Prepping Your Nails for the Cold
Wash your hands with warm water and gentle soap before you start painting. Get rid of all old polish—any leftovers mess with how new layers stick.
Push back your cuticles with an orange stick. Trim any hangnails and file your nails in just one direction to keep them from splitting.
Buff your nails lightly to remove shine so the base coat can grab on. Apply a thin, even base coat—this stops deep blue polish from staining your nails.
Let your nails stay dry for at least an hour before painting. Cold temps weaken polish bonds, so warm your hands up or hang out in a cozy room while your nails dry.
Paint on two thin coats of blue polish, letting each coat dry before adding the next. Finish with a quick-dry top coat, and swipe on another thin layer every 3–4 days to keep things looking fresh.
Mistakes That Make Blue Polish Chip Faster
If you skip the base coat or slap on thick, gloopy layers, your polish will start peeling way sooner than you’d like.
Thick coats just don’t dry right, and they trap moisture underneath. That almost guarantees chips.
When you paint over oily or damp nails, the polish basically gives up and slides right off. Wipe your nails with a little alcohol or nail cleanser first—trust me, it helps.
If you cut your cuticles too much, you end up with weak skin that snags at the edges of your polish. I always leave a tiny bit of cuticle to guard the base of my nails.
Dry hands and cracked skin push right up against your polish, making it flake off. I use a fragrance-free hand cream and dab on cuticle oil before bed—my nails thank me for it.
If you forget to seal the edges, the tips are just sitting ducks for chips. I always swipe the brush along the free edge when I paint and after the top coat. It’s a small step but totally worth it.
