Looking for some fresh nail ideas this April? Let’s be honest, you probably want something fun, easy, and not too fussy.
You’ll see everything here—from soft pastels and flowers to playful dots and glossy finishes that scream “spring is finally here!”
I picked out simple, wearable designs that work for all skill levels. There are so many ways to mix colors and tiny details for a look that feels fresh.
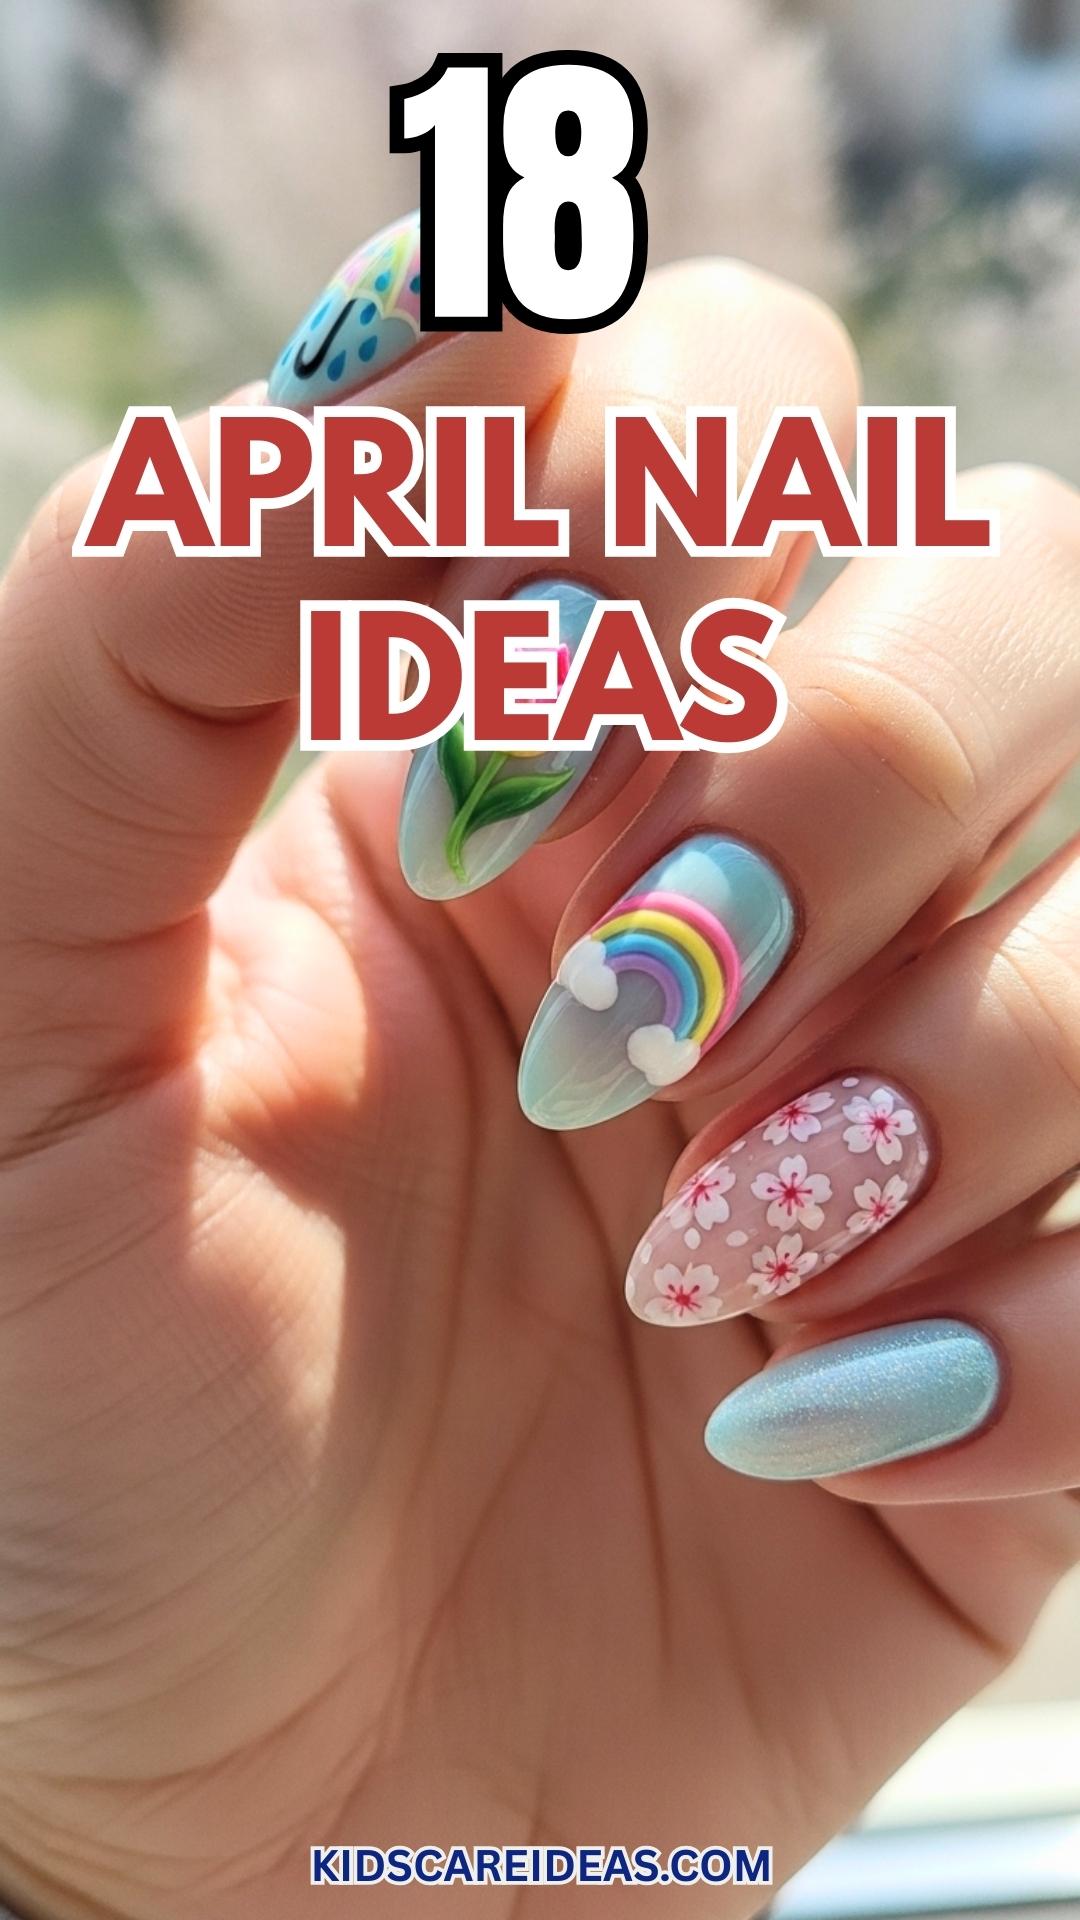
You’ll get styles like blossom art, ombre tips, raindrop dots, and playful decals. Just pick the one that makes you smile for your next mani.
1. Cherry Blossom Nail Art
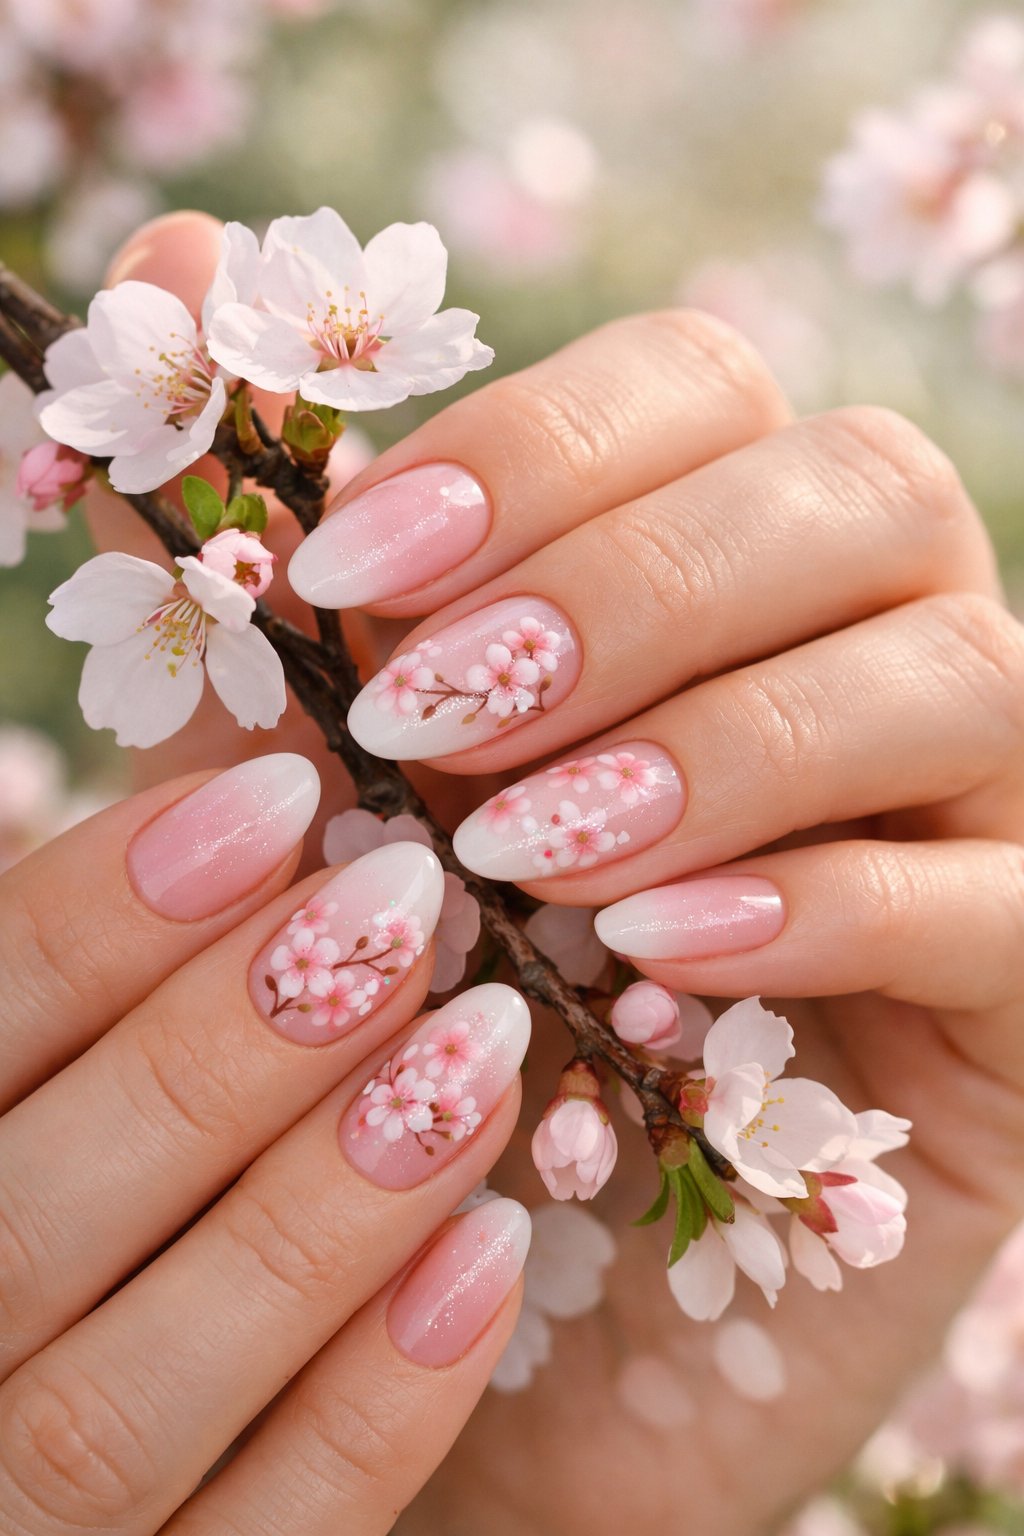
Start with a pale pink or nude base for a soft spring vibe. Dot on tiny white or pink petals, then drag them into flower shapes with a thin brush.
Pop a single blossom on each nail for a minimalist look, or cluster a few on one nail if you’re feeling extra. A glossy top coat makes everything shiny and seals in your hard work.
Expert tip: If you don’t have a fine brush, a toothpick totally works for petal details. Let each layer dry before you add more, or you’ll get the dreaded smudge.
2. Pastel Ombre Tips
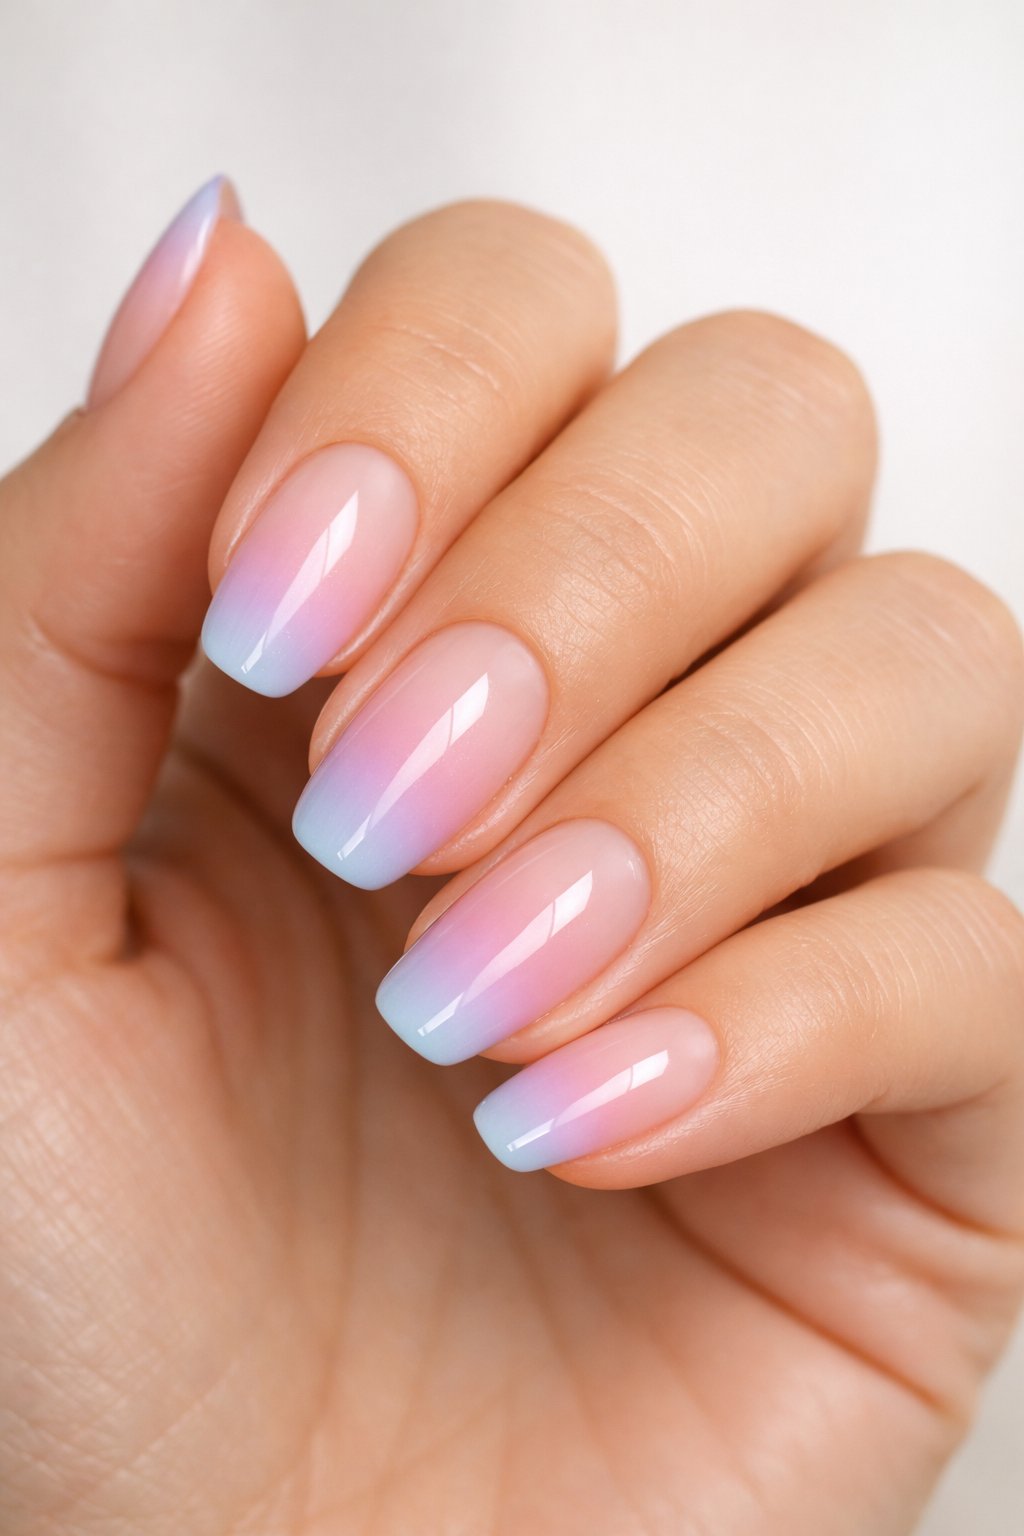
Pick two or three soft colors—think baby pink, mint, or pale lilac. Lay down a base coat, then use a sponge to dab on the colors where you want them to blend.
Work one nail at a time so the polish stays tacky and blends better. Top it off with a glossy coat for shine.
Clean up the edges with a brush and remover for that pro look. If you’re new to sponging, practice on a plastic tip first.
Expert tip: Slap some peel-off base around your nails before sponging for a way easier cleanup.
3. April Showers Blue Accent
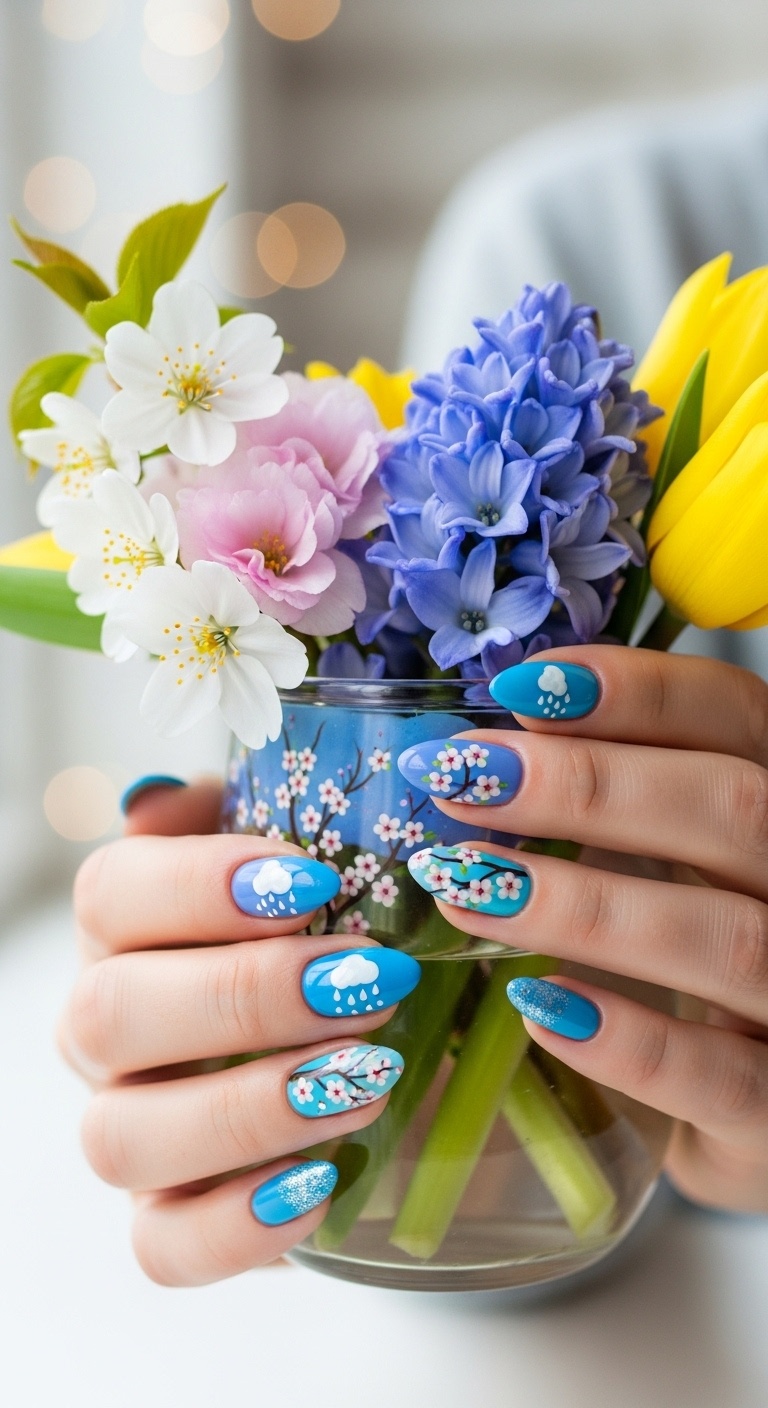
Go for a soft blue base and add tiny raindrop dots on a couple nails. You’ll get a clean look that’s still a little playful.
Use a dotting tool or toothpick for the drops. Mix up the sizes for a more natural rain vibe.
A glossy top coat makes the blue pop. Leave one nail plain if you want a modern twist.
Expert tip: Practice your raindrops on paper first. Two thin top coats help your design last longer.
4. Daffodil Yellow French Tips
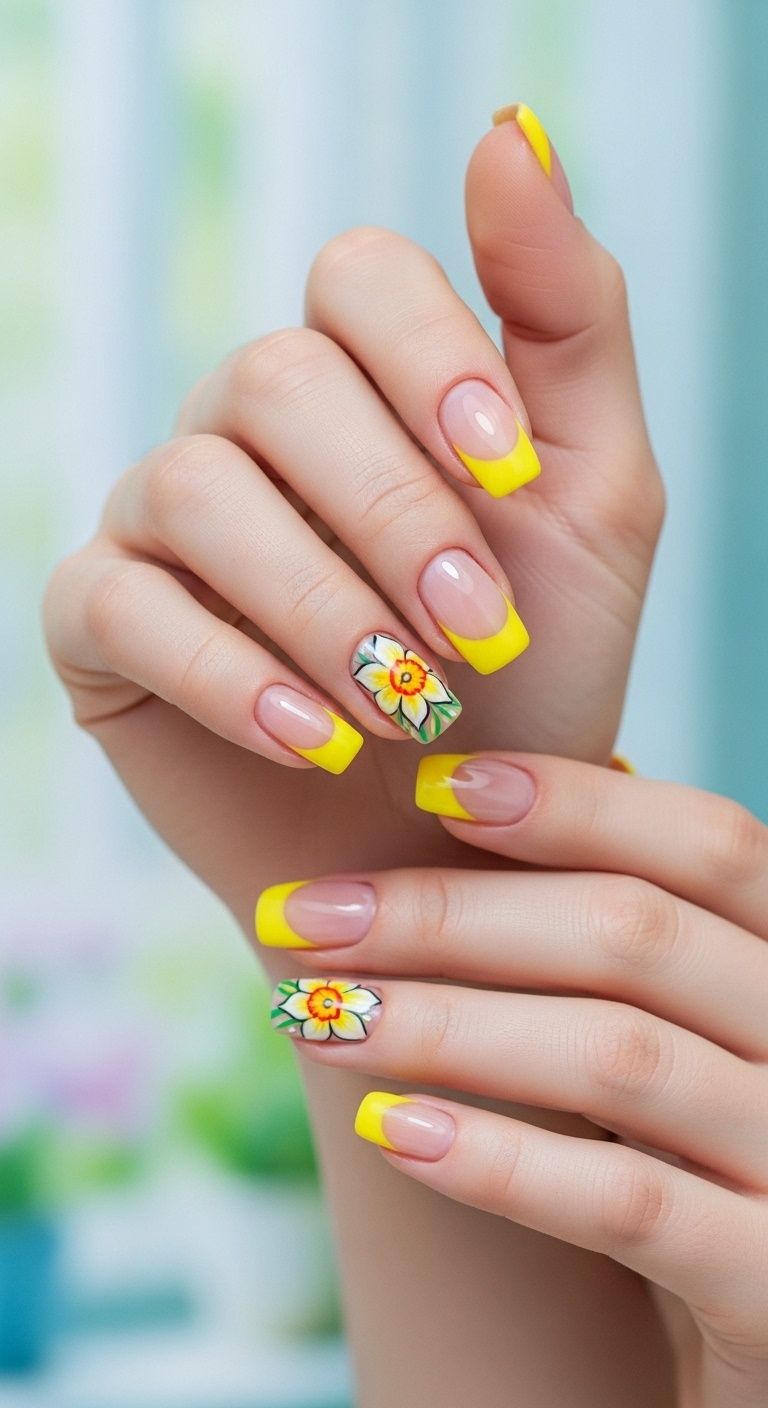
Pick a soft yellow for the tips to keep things bright but not blinding. Pair it with a sheer nude or pale pink base so the yellow stands out.
Thin, curved tips give that classic French look, but you can go wider for more drama. Add a tiny daisy or white dot on an accent nail if you want a little extra.
Use a thin brush or nail guides for smooth lines. Top coat keeps chips away.
Expert tip: Practice the tip shape on a spare nail to find what looks best for you. Gel top coat keeps yellow looking fresh longer.
5. Raindrop Gradient Effect
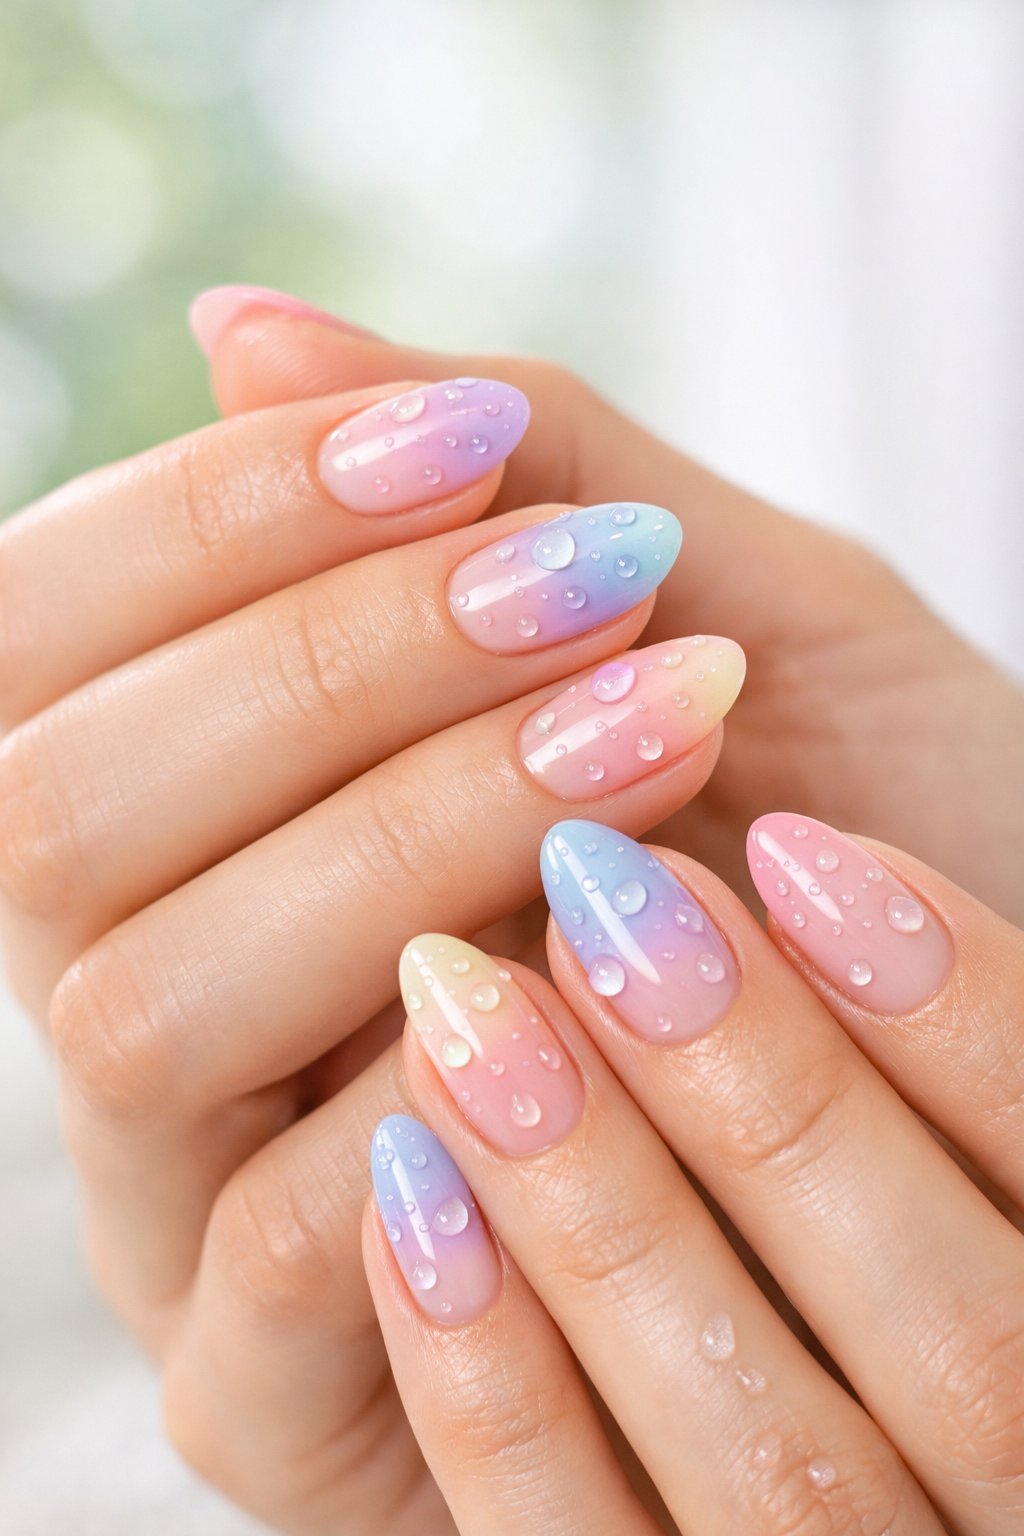
Paint a soft base color, then add tiny teardrop shapes in a darker shade. Place drops near the cuticle and fade them out for a cool gradient.
Use a dotting tool or toothpick for control. Blend each drop quickly with a clean brush or sponge to soften.
Try mixing two shades, like pale blue and navy, for some depth. Glossy top coat makes the drops look extra juicy.
Expert tip: Practice drop size on paper first. Do one nail at a time so the gradient blends nicely.
6. Tulip Inspired Nail Decals
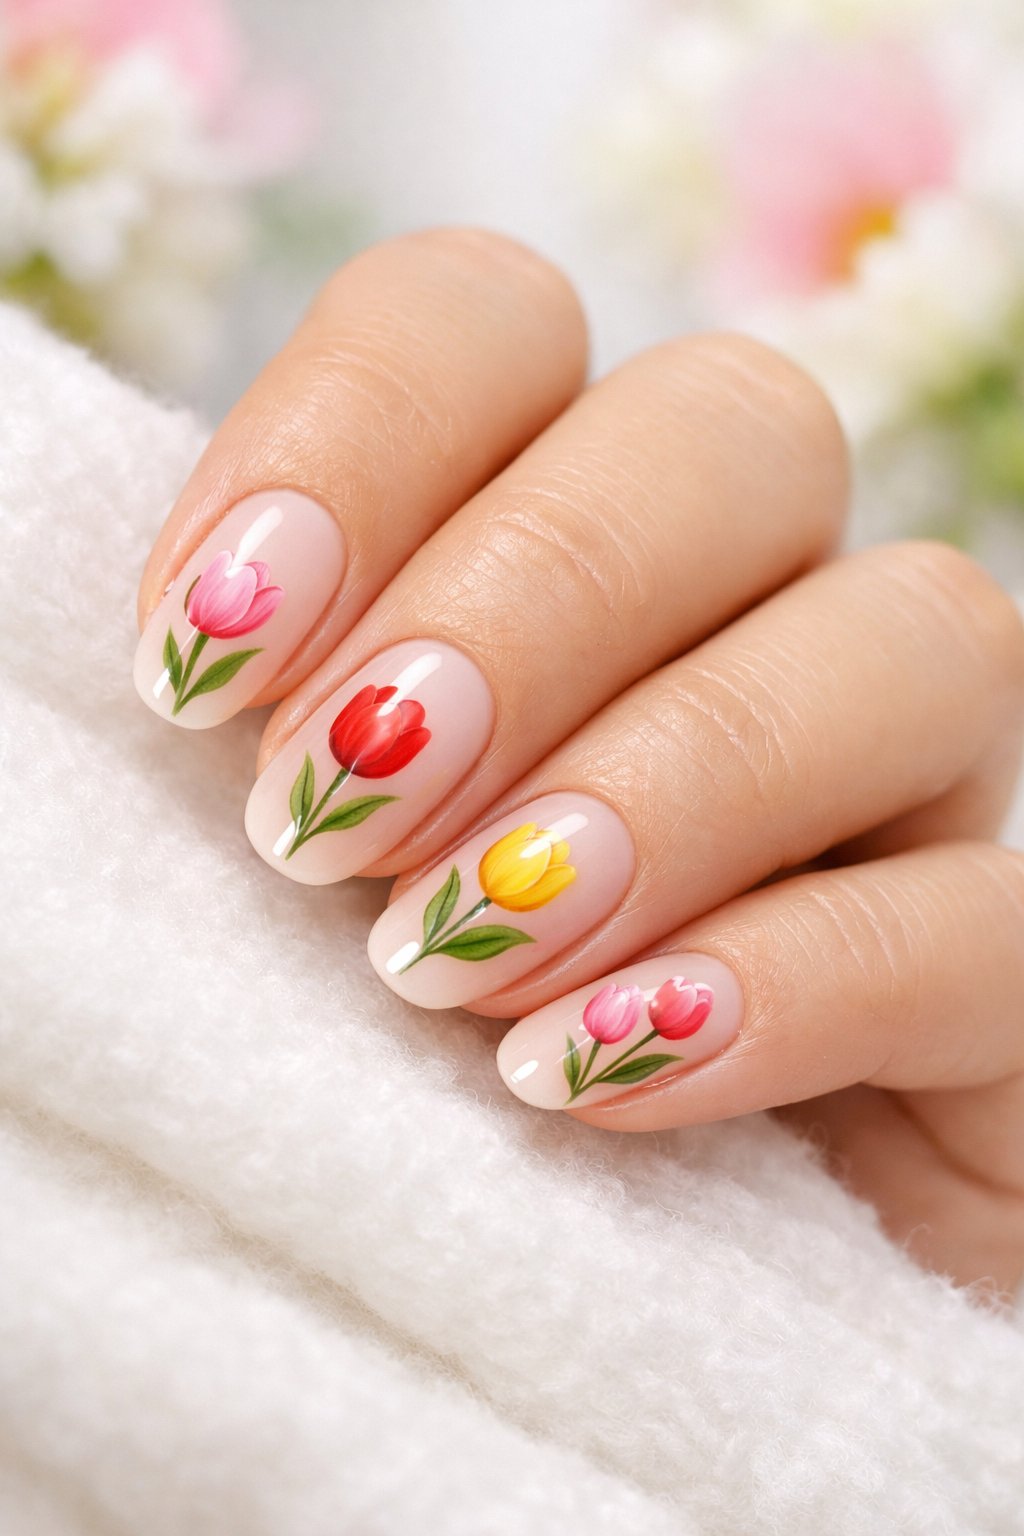
Grab some tulip decals for a quick springy look. They stick right on clean nails and save you from painting tiny flowers by hand.
Pick pastel or bright tulips to match your mood. A clear top coat helps the decal last longer.
Mix full decals with single tulip stickers for balance. Remove gently with oil or foil wrap so your nails stay happy.
Expert tip: Match the decal color to your nail base for a seamless look. Press edges down before top coat to keep them from peeling.
7. Easter Egg Color Splashes
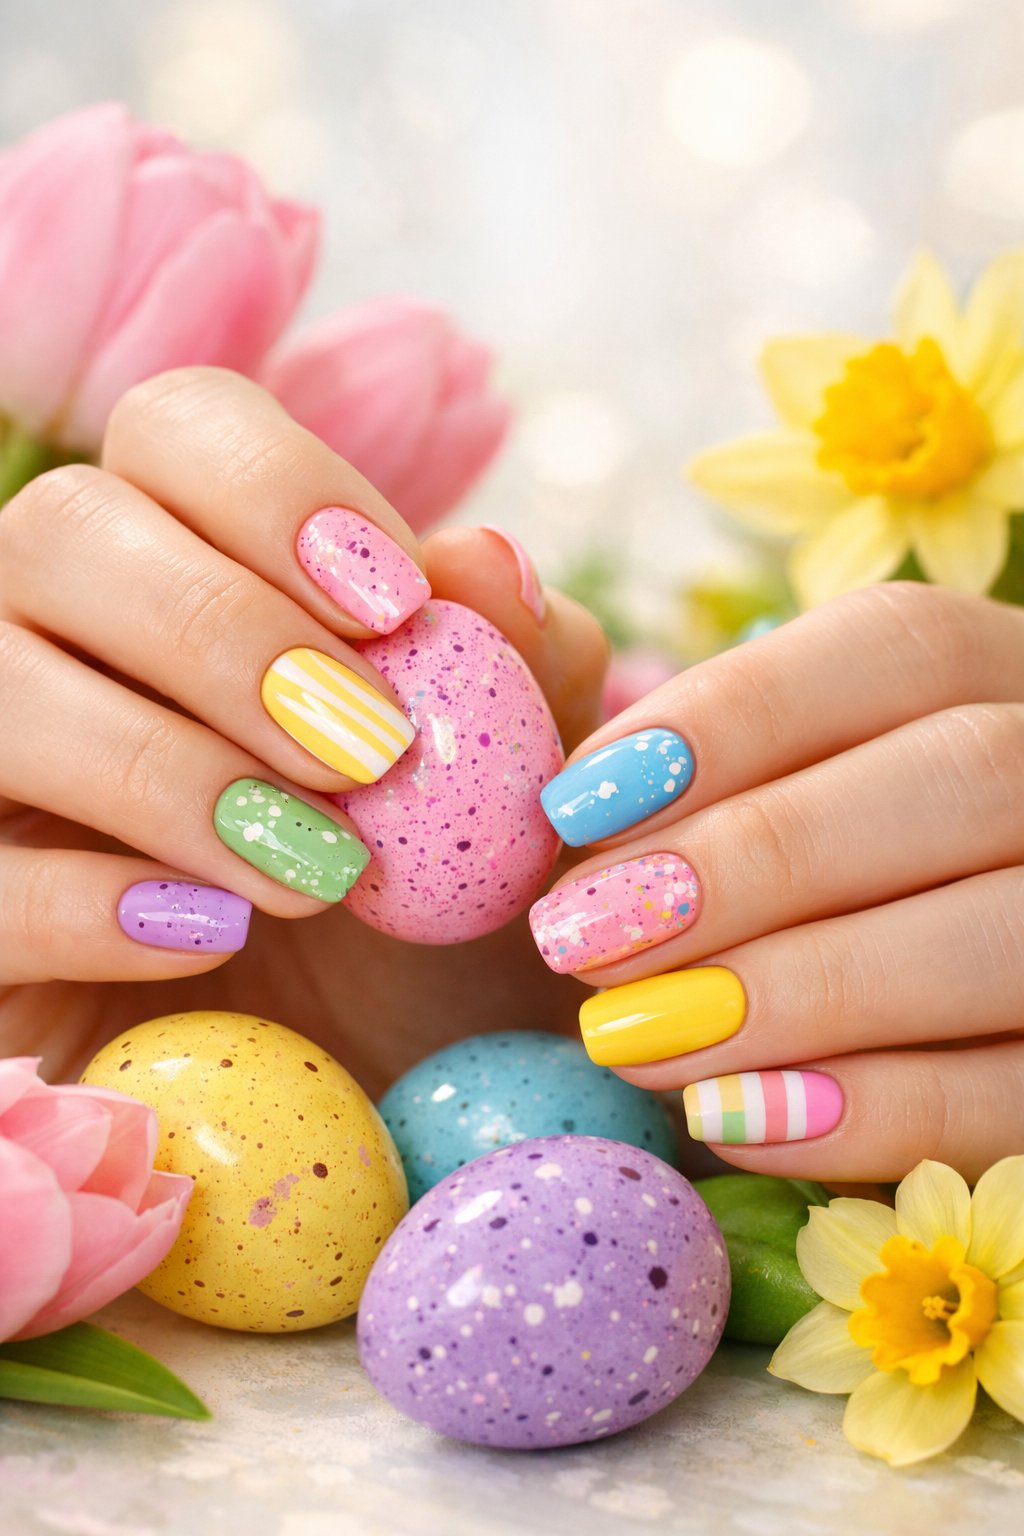
Dab on pastel spots and bright splashes for a fun, egg-inspired look. Use a sponge or tiny brush to dab color on a neutral base for soft, uneven edges.
Try lilac, mint, and butter yellow for a springy combo. Add a tiny metallic dot for a hint of shine.
Switch up splash sizes for a playful finish. Glossy topcoat keeps the texture and color looking fresh.
Expert tip: Practice splattering on paper first. Use a toothpick to drag little paint dots into egg shapes.
8. Mint Green Matte Finish

Pick a soft mint green for a fresh, calm look that works anytime. Matte topcoat turns the color modern and keeps it from looking too shiny.
Paint two thin coats for good coverage and let each dry well. Add tiny white dots or a gold stripe on one nail if you want a little flair.
Expert tip: Use a quick-dry matte topcoat to avoid smudges. If it looks too flat, dab a bit of cuticle oil on the edges for a soft glow.
9. Lavender Field Stamping
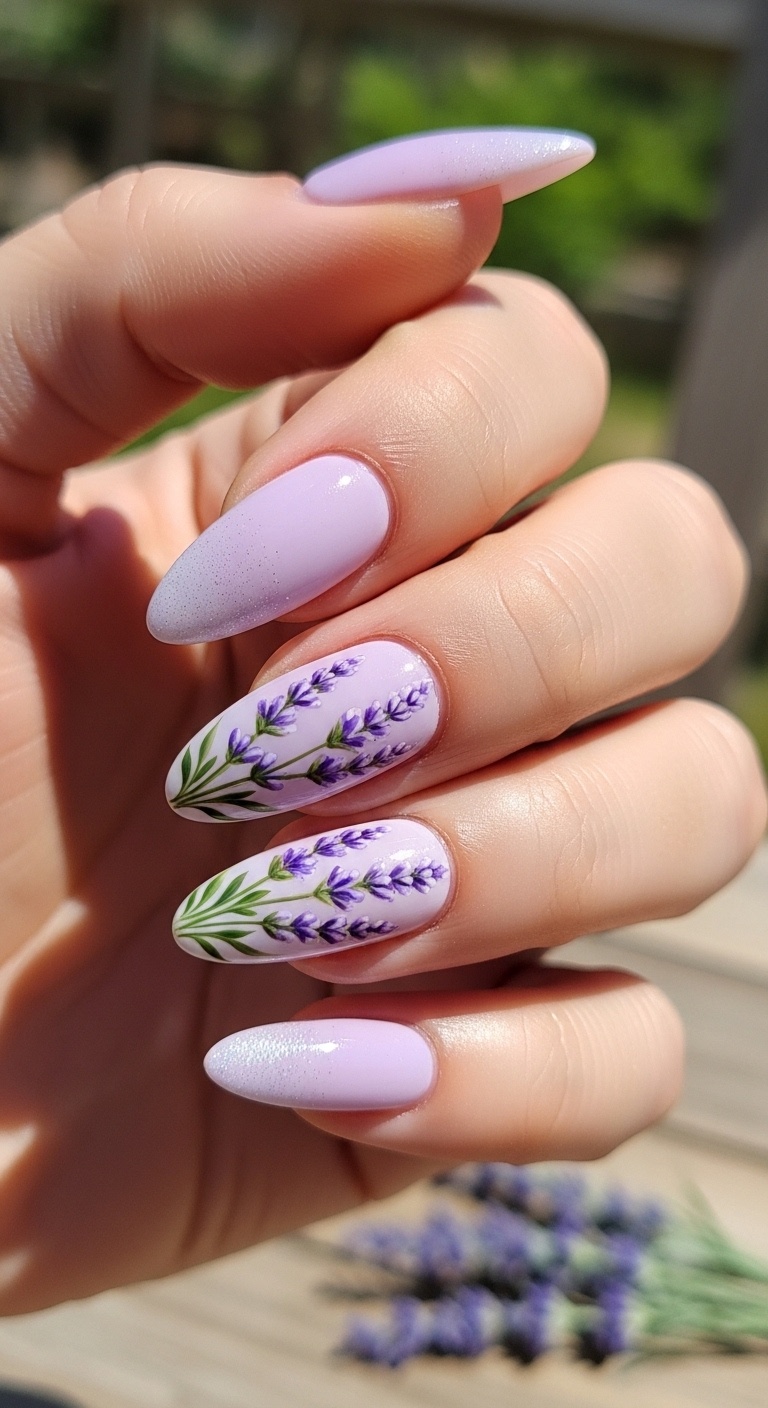
Start with a soft lilac base to give that early morning look. Use a stamping plate with tiny sprigs to make neat rows of lavender.
Stamp with a darker purple for some depth. Add thin green stems with a nail brush to finish the field.
A glossy topcoat keeps everything smooth. This one looks great on short or almond nails.
Expert tip: Blend two purples with a sponge before stamping for a gradient. Clean your stamper between presses to keep prints crisp.
10. Butterfly Wing Patterns
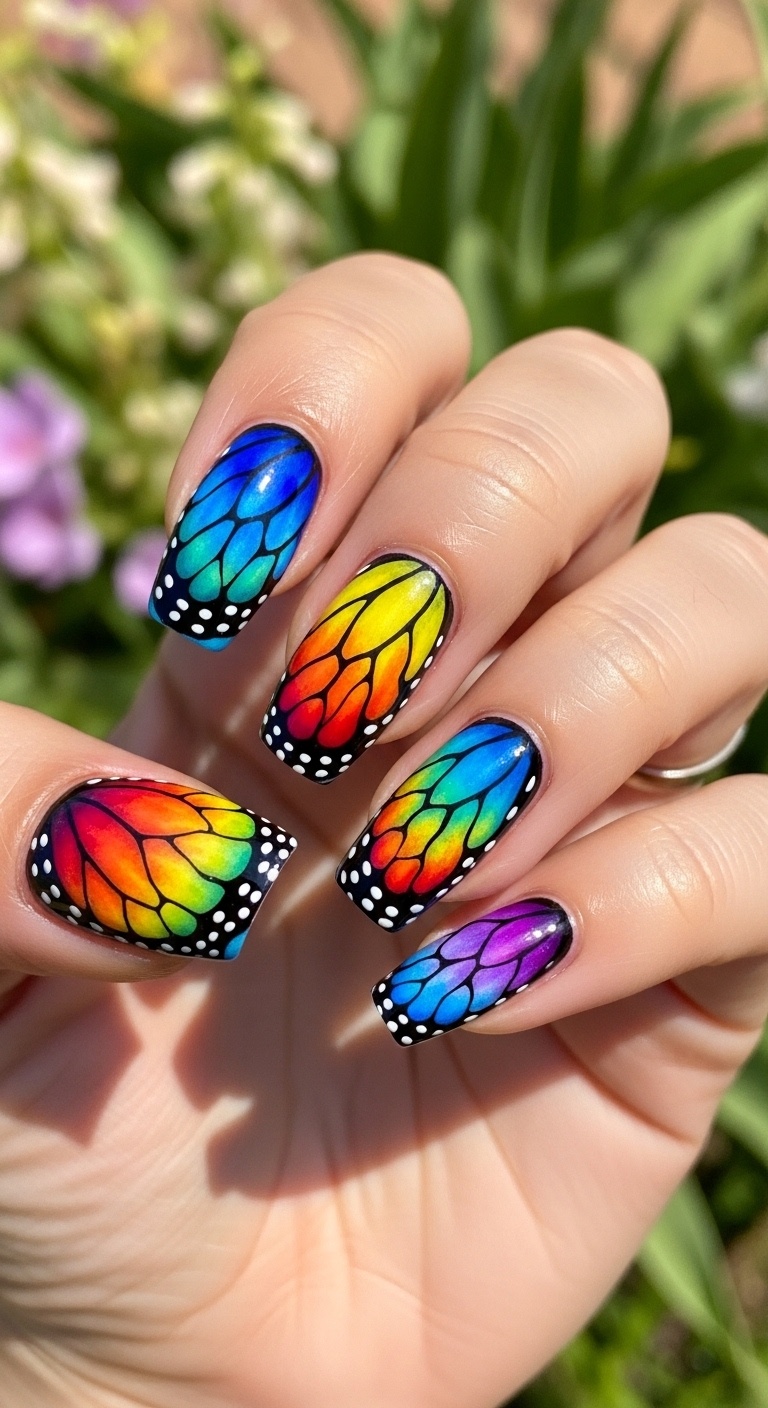
Copy real butterfly wings for a bold, artsy look. Use a thin brush to draw veins and dots on a bright base.
Try a gradient background that shifts color for extra wow. Outline with black or white to make the pattern stand out.
Keep it small on short nails, or do one accent nail with a full wing. Glossy topcoat keeps colors bright and lines sharp.
Expert tip: Paint a full wing on one nail and just the tip on others for balance.
11. Neon Splash with White Polka Dots
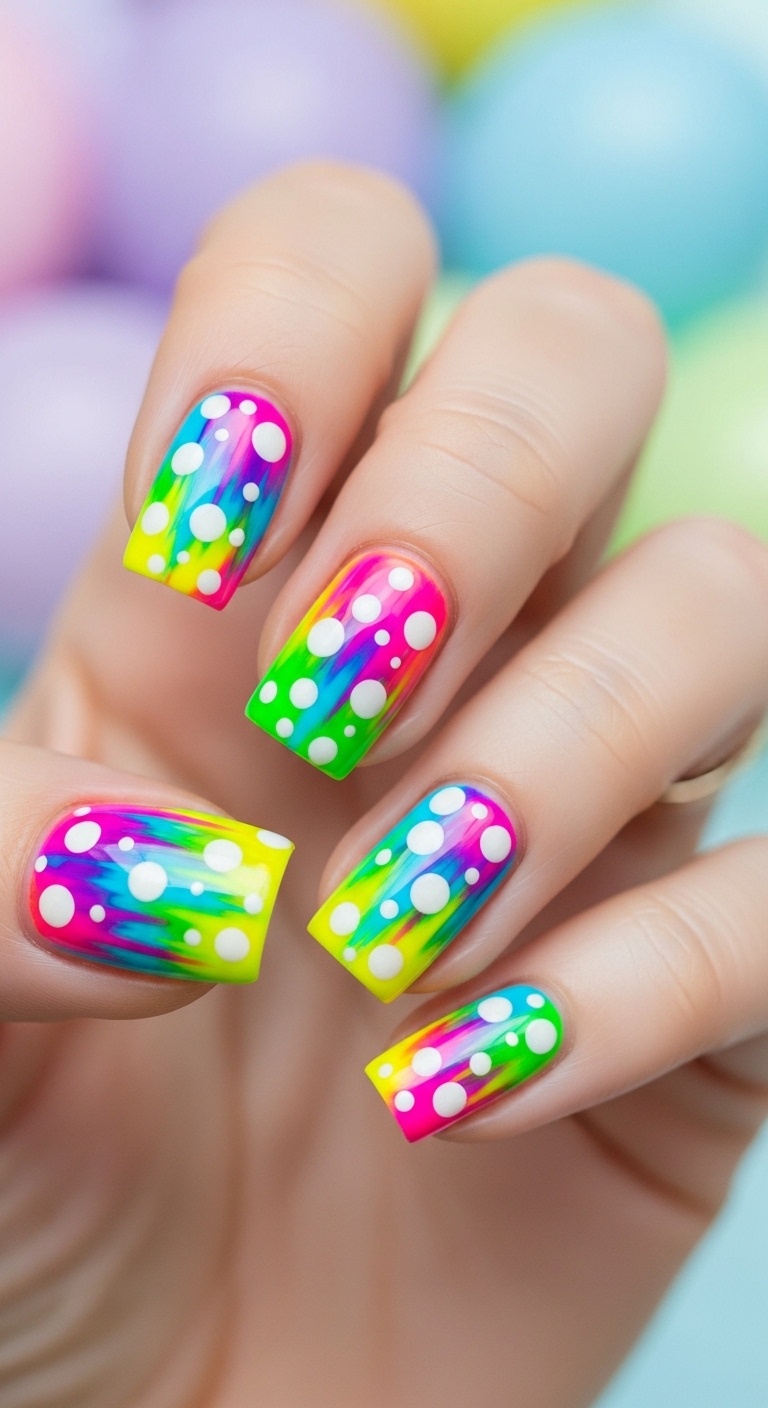
Pick a neon base like hot pink, lime, or electric blue for nails that stand out. Paint two coats and let each dry.
Use a thin brush or dotting tool to add small white dots. You can space them evenly or scatter for a fun twist.
A clear topcoat seals the color and adds shine. Neon shades last longer with a good topcoat.
Expert tip: Use peel-off base on every other nail if you want to change colors fast.
12. Soft Pink and Grey Swirls

Go for a soft pink and grey swirl if you want nails that feel calm but still interesting. Start with a pale pink base, then swirl in thin lines of grey with a fine brush or toothpick.
Keep swirls light and spaced out. Finish with a glossy topcoat to make the colors pop.
Expert tip: Draw swirls with quick, gentle motions for smooth lines. If you mess up, wipe with a brush dipped in remover before it dries.
13. Rainbow Sprinkles Nails
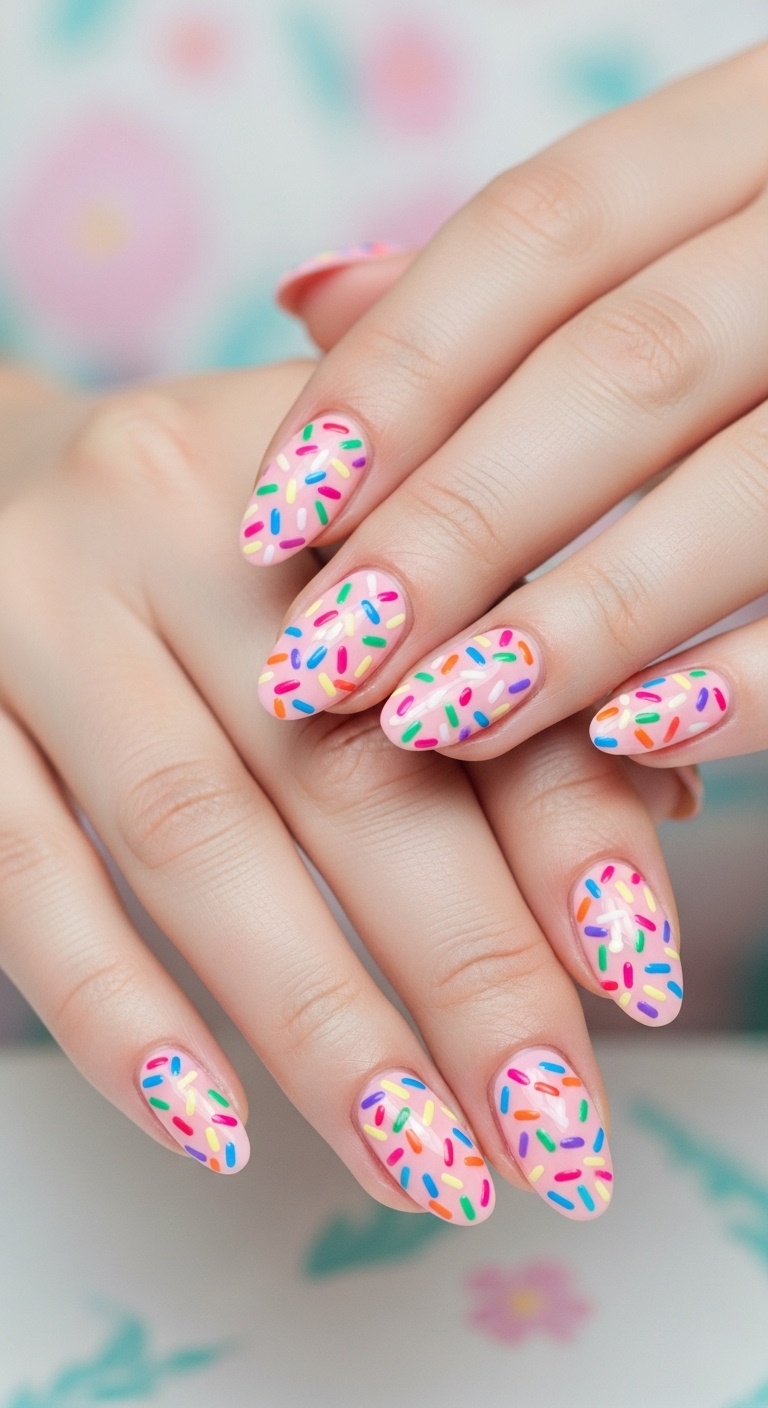
Pick a pale base—white, cream, or soft pink—so the sprinkles shine. Use a thin brush or dotting tool to make tiny colorful dashes all over.
Switch up sprinkle colors and directions for a playful, neat look. Glossy top coat locks in the design and stops chips.
You can make sprinkles with quick strokes from a nail pen or tiny brush. Try it on a plastic sheet first to get the hang of it.
Expert tip: Keep a toothpick and tray of polish nearby to fix mistakes fast.
14. Pearl Embellishment Tips
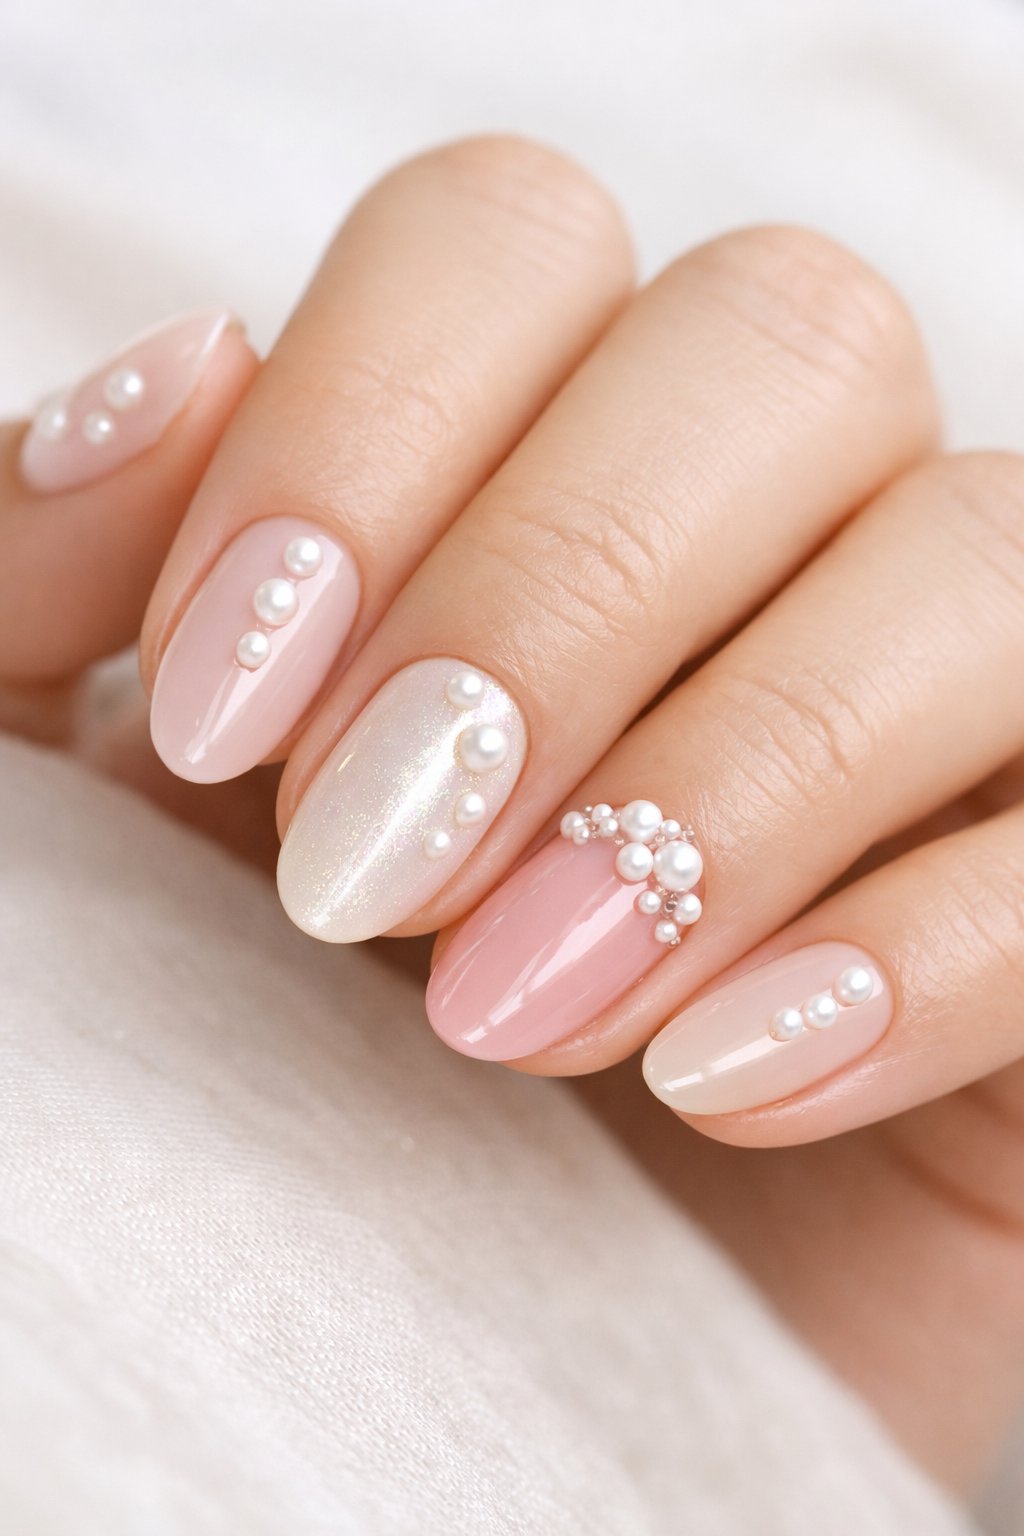
Place pearls near the cuticle for a classy, visible look. Use a dab of nail glue so they stay put.
Mix big and small pearls for depth. One big pearl with tiny ones around it makes a cool focal point.
Seal with two thin topcoats to protect and smooth. Cure each coat if you’re using gel so pearls don’t move.
Expert tip: Press pearls into tacky gel, then cure to lock them in place.
15. Pastel Clouds and Sun Design
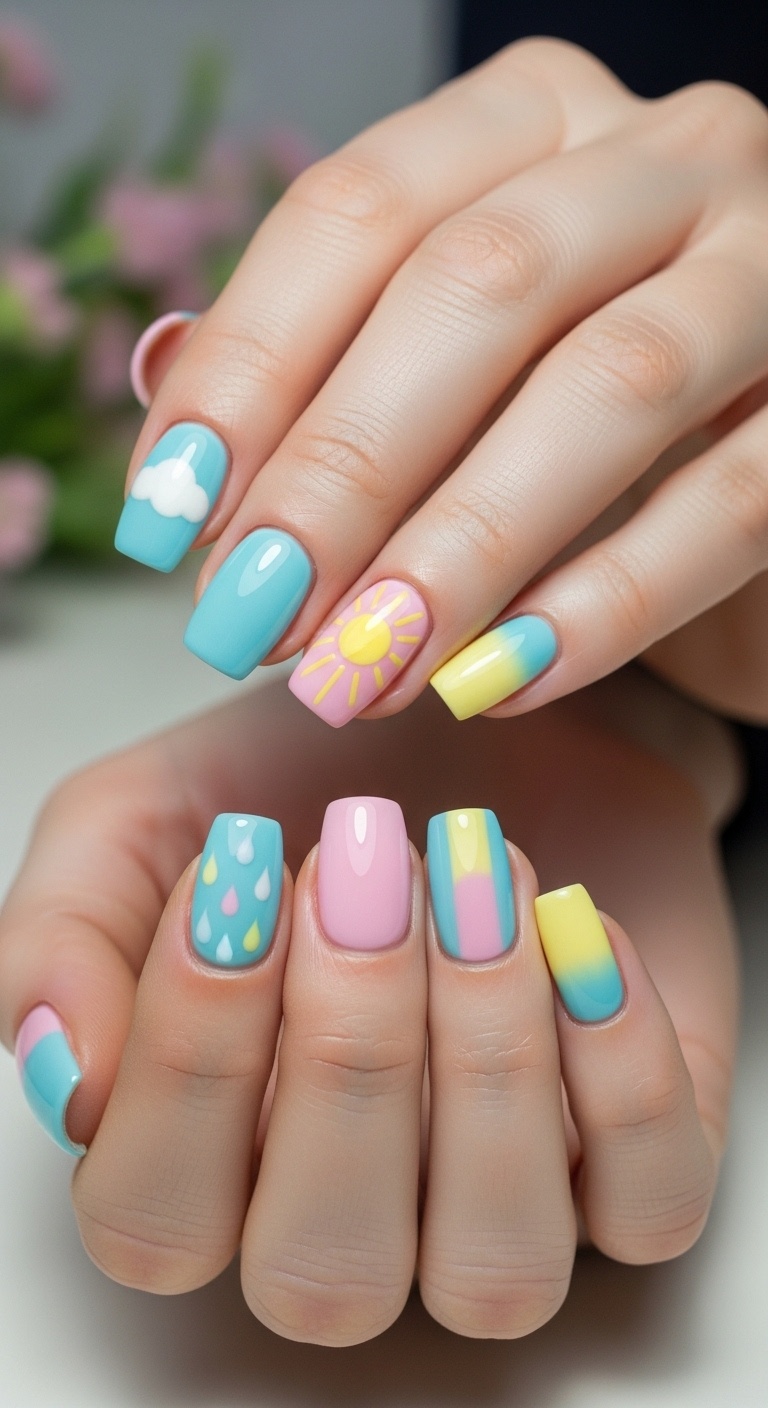
Start with a pale blue polish for a soft sky. Let it dry all the way so layers don’t smudge.
Paint tiny white clouds with a dotting tool or bobby pin. Blend edges with a sponge for a fluffy look.
Add a small yellow sun near the cuticle or tip. Use a thin brush for rays or dots for a cute sun.
Finish with a clear topcoat for shine.
Expert tip: Dab pastel colors with a makeup sponge for a soft, pro-looking gradient.
16. Speckled Eggshell Effect
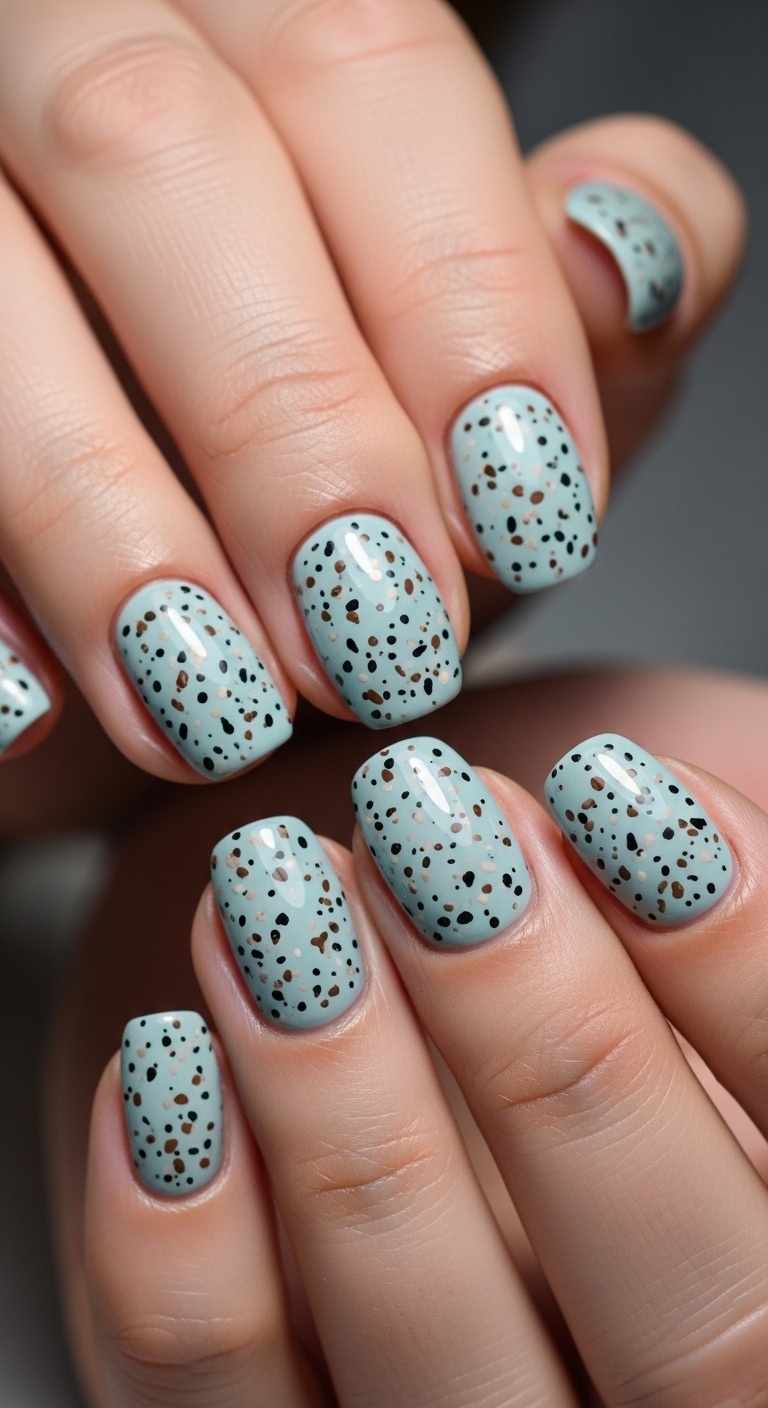
Start with a light pastel base—think robin’s egg blue or soft pink. Then grab a stiff brush or even a toothpick and flick on some tiny speckles with a shade that stands out.
I like to keep the speckles a little sparse near the cuticle, then pile them up more toward the tip. It just looks cooler that way, like an actual egg.
Don’t forget to seal everything with a glossy topcoat. That keeps the colors bright and the texture safe from chips.
If you want things to look even more natural, mix up the speckle sizes a bit. Oh, and it’s smart to practice your flicking skills on a nail wheel first—trust me, it saves a lot of mess.
Expert Tip from KidsCareIdeas: “Dilute polish slightly with nail polish thinner to make speckles easier to flick.”
17. Green Leaf Silhouettes

Go for a pale base, then paint on small leaf shapes using different shades of green. You can tuck them at the tip or along the side if you’re feeling a little artsy.
A thin brush or a dotting tool works wonders for keeping those lines sharp. If you mix up the leaf sizes, the whole thing looks a lot more natural and less crowded.
Swipe on a glossy top coat to make the greens really pop. If you want a little something extra, throw in one metallic accent nail—just enough to catch the light.
Expert Tip from KidsCareIdeas: “Practice leaf shapes on a nail wheel first to find the size that fits your nail. Use a small angled brush for sharper silhouettes and quicker cleanup.”
18. Holographic Raindrops
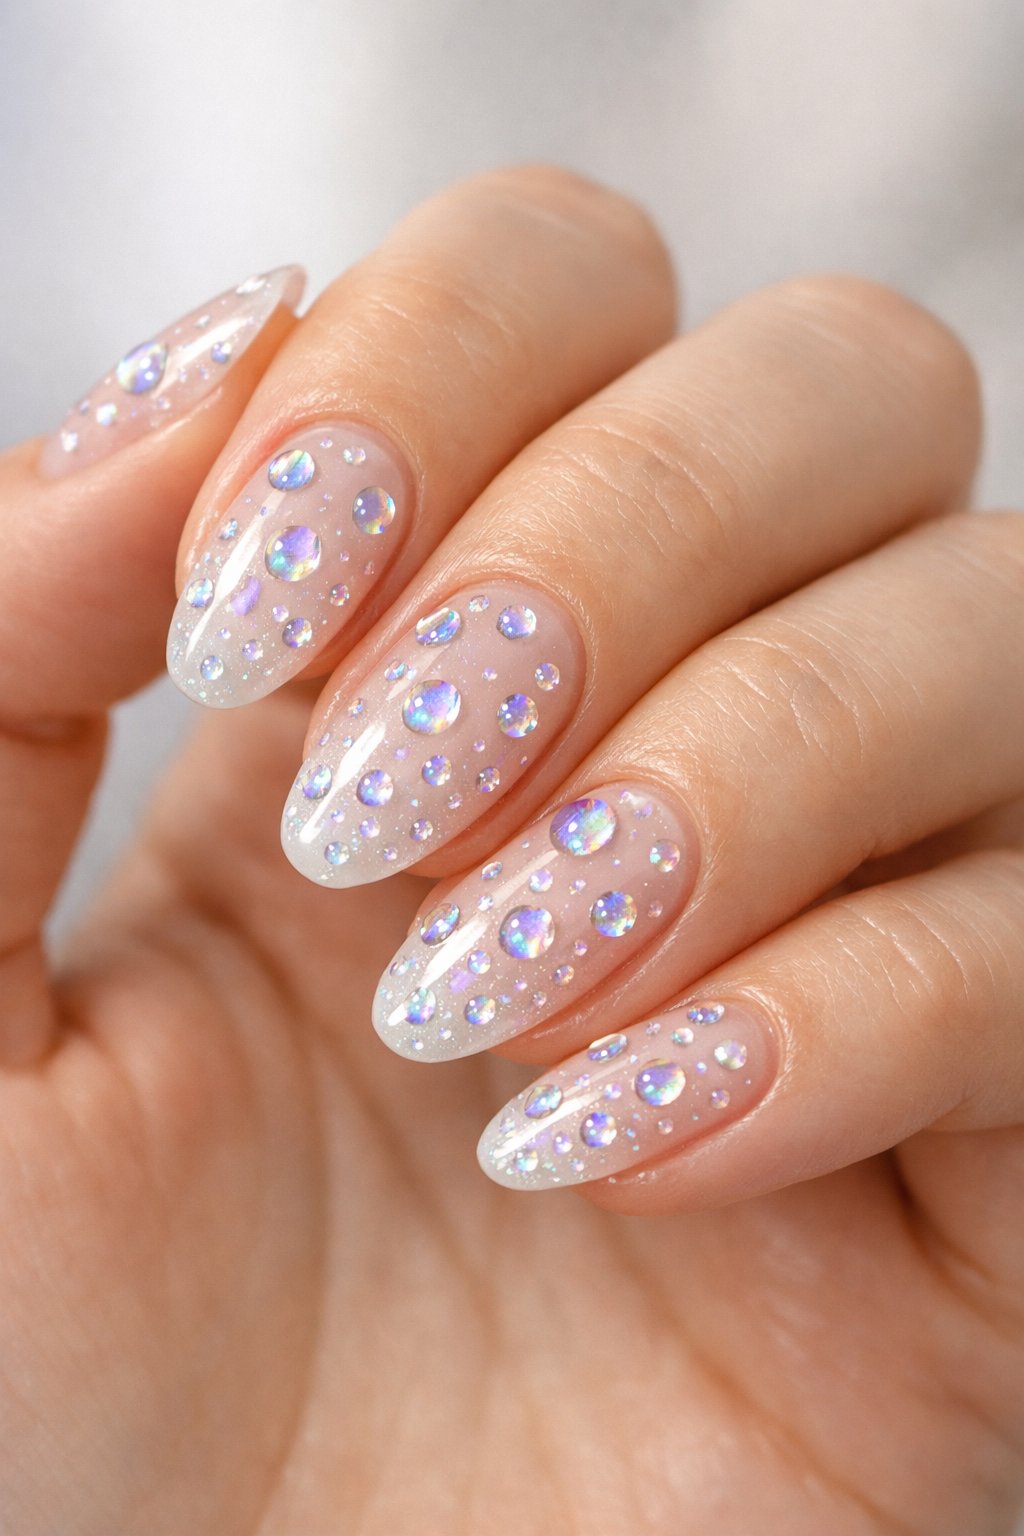
Start off by painting a sheer base color, like a soft blue or a simple nude.
After that, grab a holographic polish and dab on some tiny teardrop shapes.
Try to keep the drops small and scattered so they look more like real raindrops.
I usually use a dotting tool or, honestly, just a toothpick if that’s what I have on hand.
Don’t forget the topcoat!
It locks everything in and helps stop chipping before it starts.
The best part?
That holographic shimmer bounces light everywhere and even hides little chips you might get.
It’s such a playful look—perfect for spring or just whenever you want your nails to feel a bit more fun.
Expert Tip from KidsCareIdeas: “Apply thin layers of holographic polish to avoid bubbling. Finish with a glossy topcoat for longer wear.”
